Data loss is a very serious problem for individuals as well as businesses of all sizes. Losing your important files means having to halt operations to recover the information needed. So, it’s always important to keep a backup of your all-important data. You can set up your own backup tools, such as a Synology NAS or an external hard drive, to take care of your backup needs, but it requires more investment and maintenance.

Synology has recently announced a new backup service called C2 Backup that allows you to backup your entire computer to the C2 cloud. You can easily back up your Windows computer or a Windows laptop through a simple configuration process at a very competitive price. Let’s check out how to backup your Windows PC using Synology C2 Backup.
Note: C2 Backup is a cloud-based service and it doesn’t need Synology NAS. The service can be used by anyone. This means you can use the C2 Backup service even if you don’t have a Synology NAS. The tutorial is based on the C2 Backup Personal Plan, and tests were conducted on a Lenovo laptop with Windows 11 OS.
C2 Backup Highlights
- Windows/Microsoft 365 support
- A dedicated backup tool on the computer to manage backups.
- Backup external devices.
- Centralized data protection – Securely and efficiently backup Windows devices and Microsoft 365 data from a single console.
- Flexible backup settings – Configure backup schedules and retention policies based on individual or company-wide protection requirements.
- Multiple recovery methods – Restore the entire device with bare-metal recovery or single files and folders with file-level recovery.
- Quick and hassle-free – consumes less system resources and reduces configuration time.
- Reducing network bandwidth and storage usage with incremental backup.
- Backup schedule & retention policy – Backup tasks can be initiated manually, scheduled, or configured to be triggered automatically when predefined events occur.
- Time-based scheduling – Backups tasks are configured to run once every hour, day, or week at a specified time.
- Event-based triggering – Events can be set as triggers for the backup process, such as Screen lock, User logout etc.
- Data security – Data encryption with AES 256-bit encryption
- End-to-end encryption for Windows devices backup
- server-side encryption is used for Microsoft 365 backups.
- Active monitoring – Receive email alerts in case of abnormal events (coming soon).
C2 Backup Supported Operating Systems/Services
- Operating systems
- Windows 7 SP1, Windows 10, Windows 11
- Windows Server 2008 R2, 2012, 2012 R2, 2016/2019
- Microsoft 365 services
- Exchange Online: personal, shared, and archive mailboxes, contacts, and calendars
- OneDrive for Business
- Files and metadata, including file sharing permissions and last modified time
Note: Synology C2 Backup is a Paid service with no lifetime free plan available. Also, Synology C2 Backup is not compatible with Windows x86 devices. This means if your PC has a 32-bit Windows operating system, you’ll be unable to use the C2 Backup service.
How to Backup Windows PC to Synology C2 Backup
To get started, you need a Synology account. If you already have a Synology account, you can use the existing account for C2 Backup or create a new Synology account by visiting this link. Once the account is created, go to this link and log in to the C2 Backup control panel.
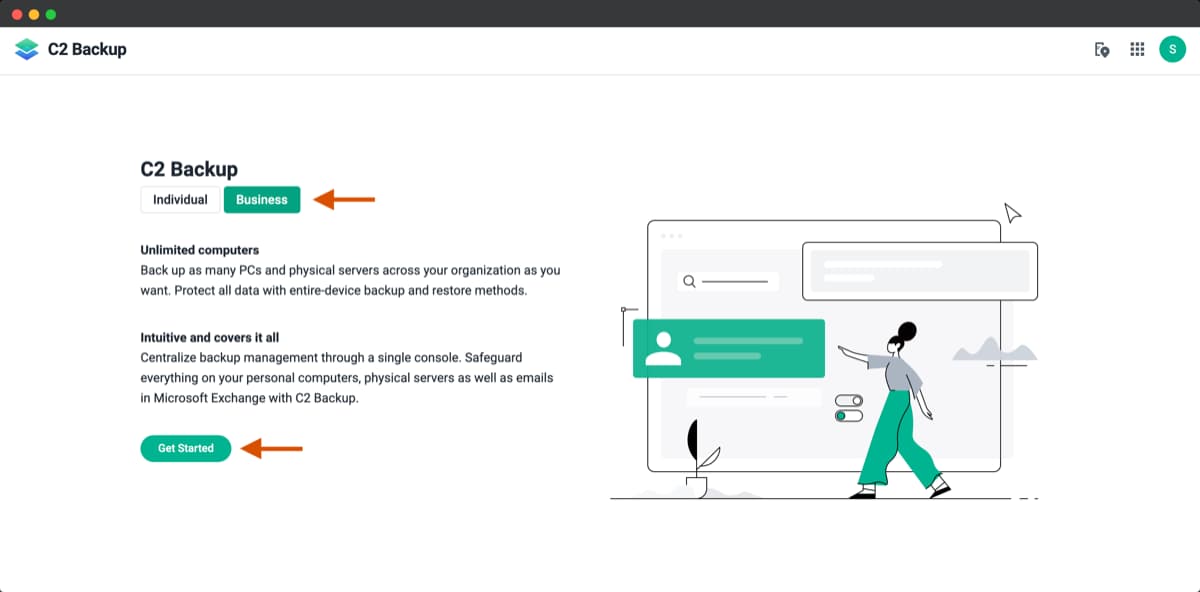
After the sign-in, you’ll be asked to select the plan – Individual or Business. Select the plan as per your needs. Click on Get Started to continue with the process.

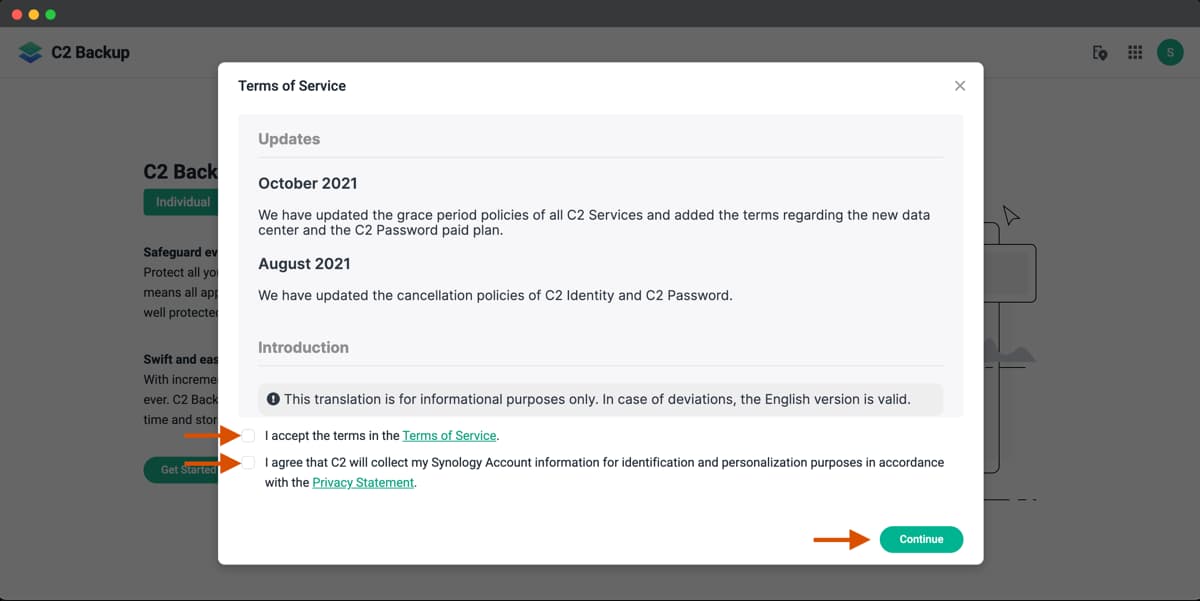
In the next step, you need to accept the privacy policy and terms. Tick mark both the checkboxes and click on the Continue button at the bottom.
Select Subscription
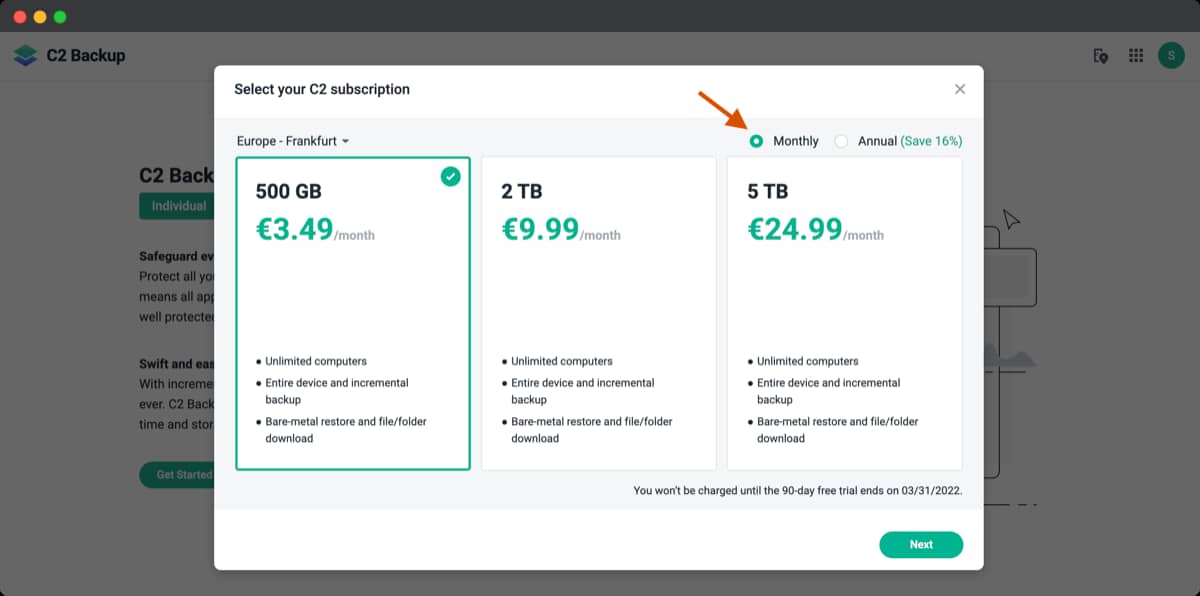
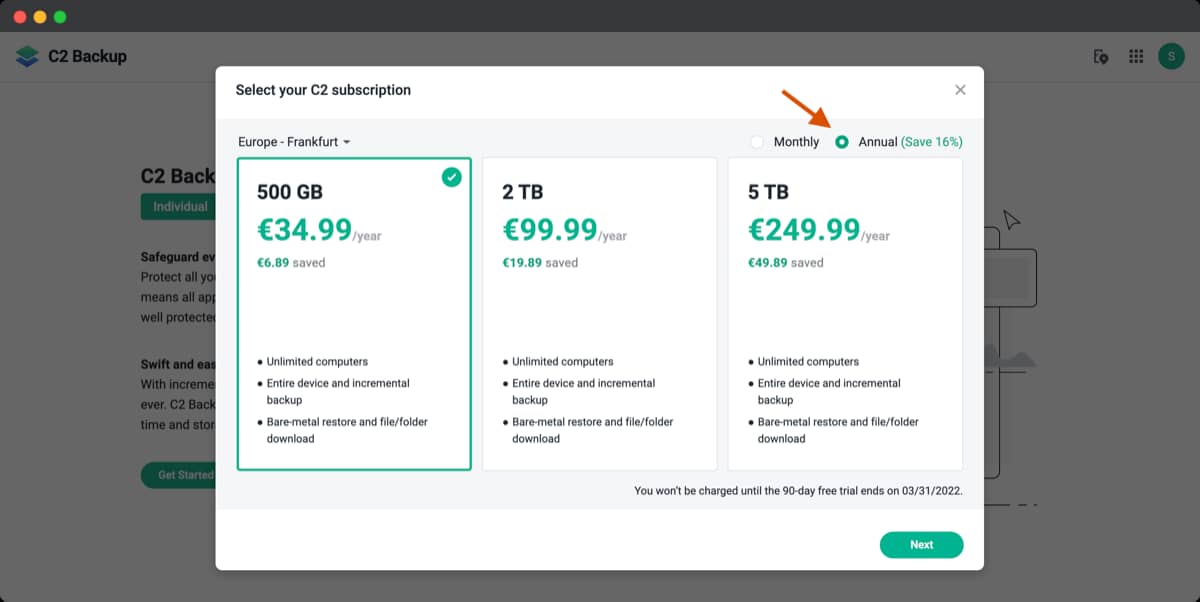
In the next step, you need to choose the subscription. There are two subscriptions and three storage capacities to choose from. Based on your requirements, select the storage capacity needed – 500GB, 2TB, or 5TB. You’ll also get an option to select Monthly or Yearly payments. If you opt for the yearly plan, then, you’ll get around a 16% discount. You can upgrade your plan anytime you want. Check out C2 Individual plans below. Prices as of 9th January 2022.
| 500GB | 2TB | 5TB | |
| Monthly (EUR) | €3.49 | €9.99 | €24.99 |
| Monthly (INR) | ≈ ₹295 | ≈ ₹345 | ≈ ₹2,112 |
| Yearly (EUR) | €34.99 | €99.99 | €249.99 |
| Yearly (INR) | ≈ ₹2,957 | ≈ ₹8,449 | ≈ ₹21,123 |
Select Data Center
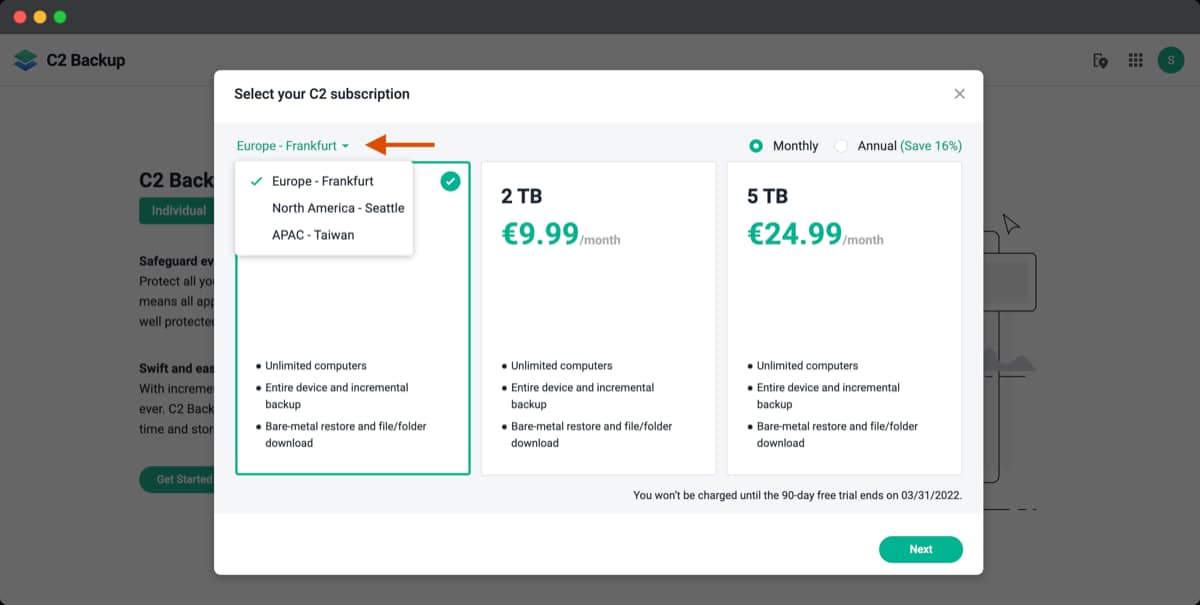
Once you select the appropriate plan, you need to select the Datacenter. There are three options to choose from – Europe (Frankfurt), North America (Seattle), and APAC (Taiwan). Select the data center and click on the Next button.
Select the Payment Method
Synology is offering a 90-day free trial, and there is no need to provide your credit card details at this stage. If you want to try out the C2 Backup service before making the final decision, select the Setup later option in the Payment Method dropdown and select OK. Even if you provide your credit card details at this stage, you’ll not be charged till the 90-day free trial ends.
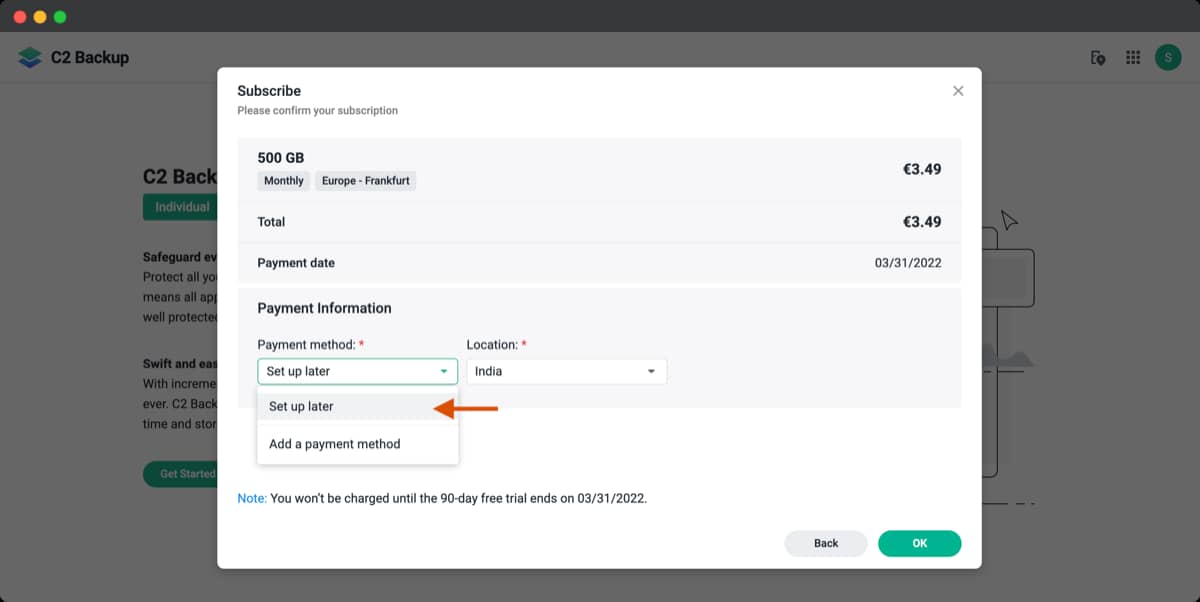
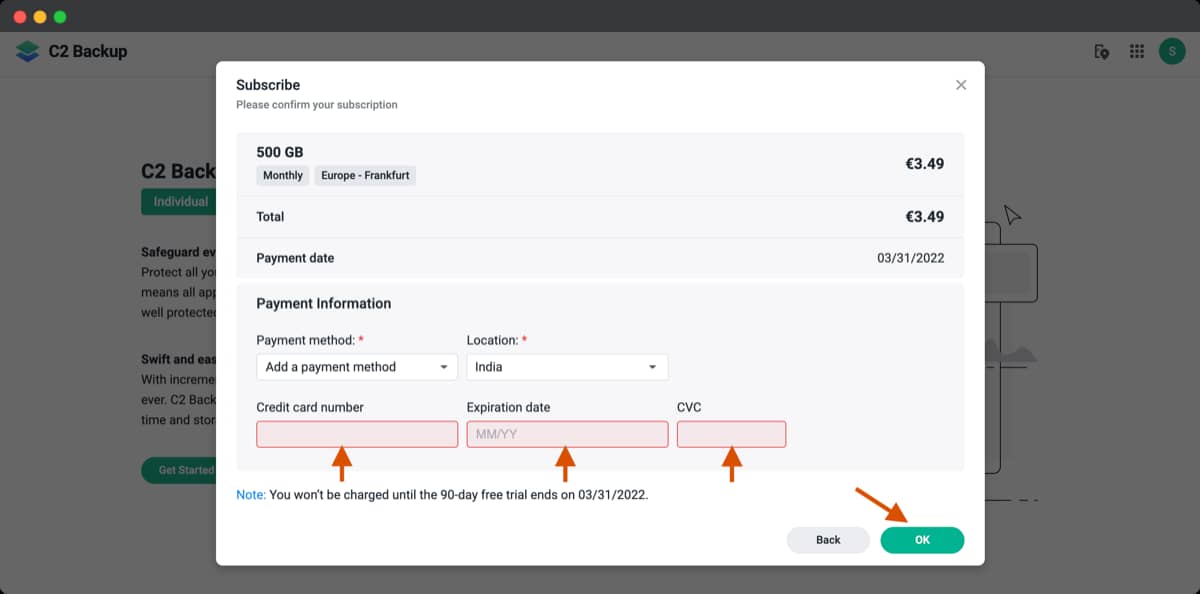
You can set up the payment even after the setup or during your 90-day trial period. If you do not set up a payment method, you may experience a service interruption once your trial period ends. Ensure you add your card details before the end of the trial period or provide them during the signup. You can check the trial end date at the bottom of the screen. Select OK from the pop-up to continue.

Set C2 Encryption Key
This completes the Synology C2 account creation. Now, you need to set a C2 Encryption Key. It’s just like a password used to encrypt all the data in the C2 services. The Password must include 8 characters, at least one uppercase letter, one lowercase letter, and one number. This key will be used across all C2 services such as C2 Transfer, C2, etc.
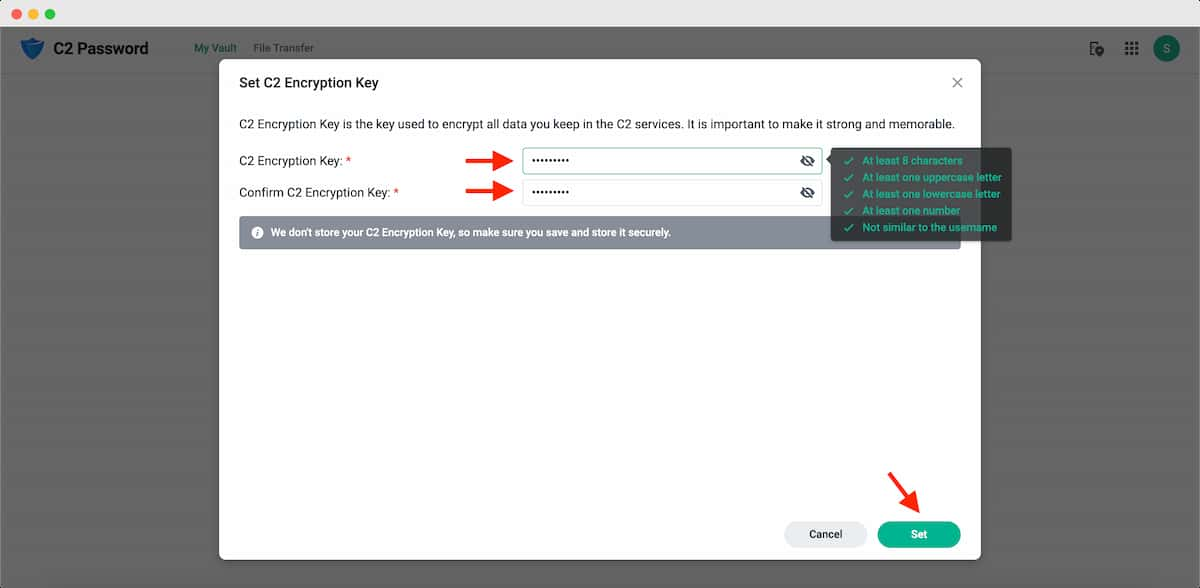
Make a note that Synology doesn’t store or remember the password you created in this step. Make sure you remember the password or make a note of it. Once you type the password, click on the Set button.
Copy or Download the Recovery Code
In the next step, you need to download a Recovery code. It’s like an additional layer of security that helps you access the C2 Backup if you forgot the C2 encryption key that you had created in the previous step. You can either press the copy button or paste the code into a text editor. Or, click the Download button to download a text file containing the key.
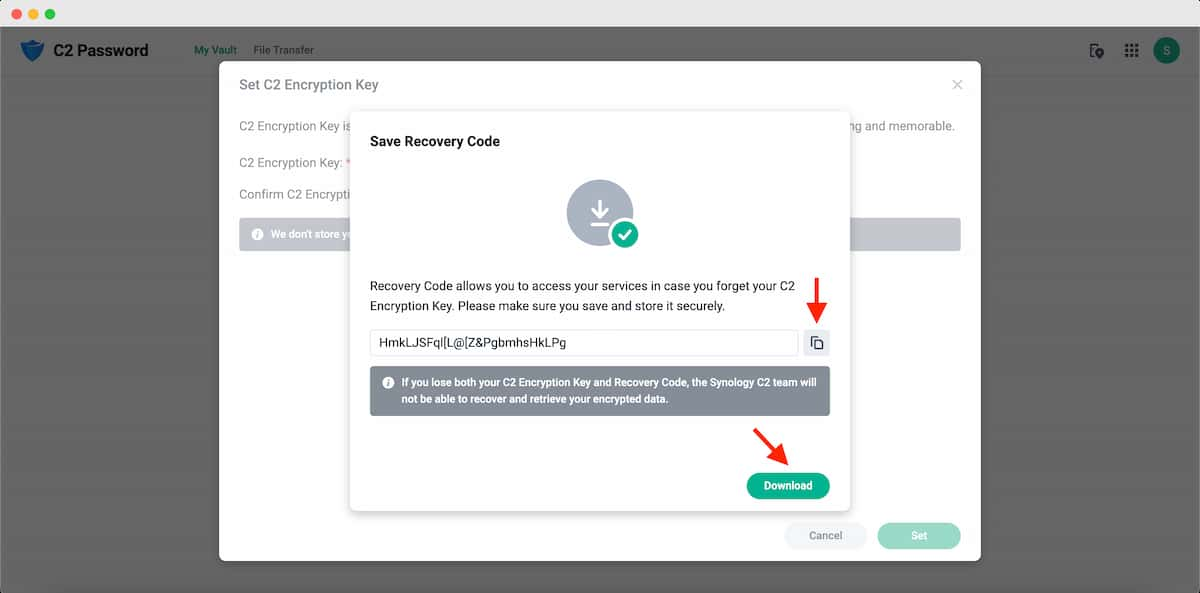
Note: Do not lose your C2 Encryption. Keep it in a very safe location on your PC or Cloud. Without this key, you’ll not be able to access the C2 Backup. Also, the Synology team will not be able to recover and retrieve your encrypted data.
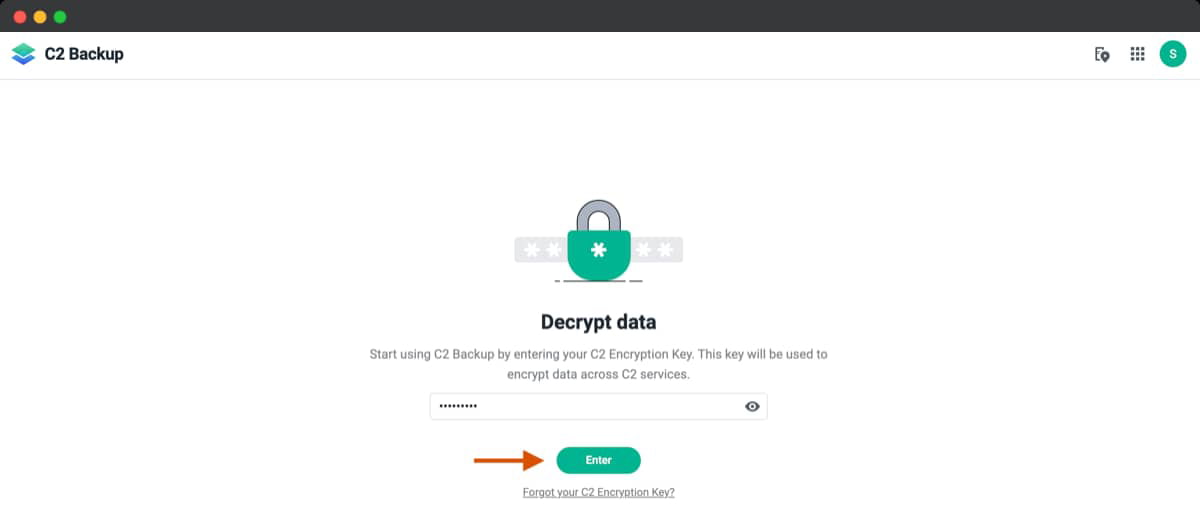
If you have already used any other C2 services like C2 Password, C2 Transfer, etc., you’ll be asked to enter the C2 Encryption Key directly. The C2 Encryption Key is the same for all C2 services. This means if you have created a C2 Encryption Key while signing up for a C2 Password service, you need to use the same C2 Encryption Key for C2 Backup which you had created during the C2 Password sign-up. Enter the key and click on the Enter button.
Adding a Device to C2 Backup
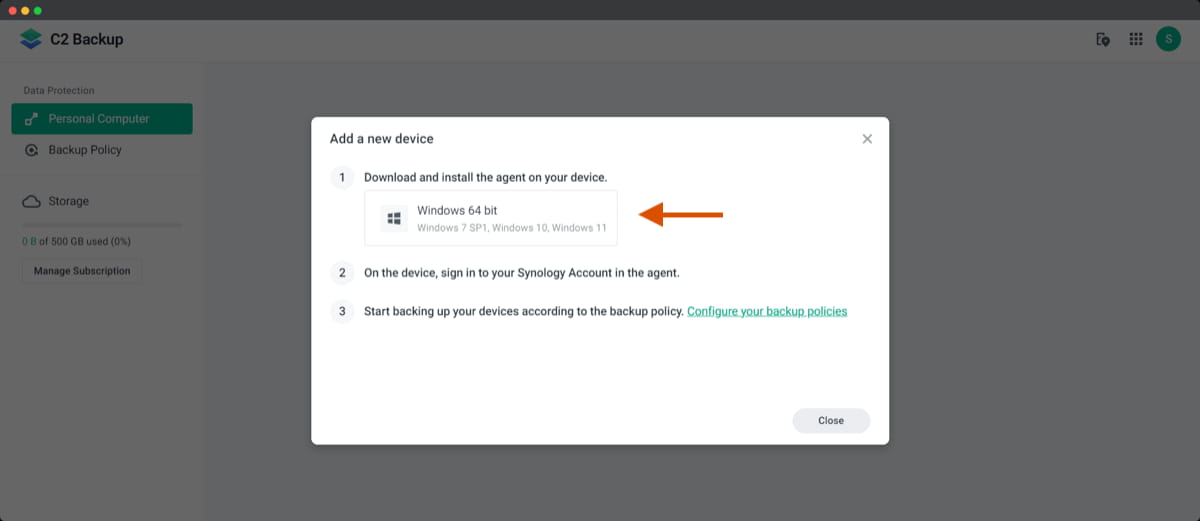
Once you successfully create the C2 encryption key and decrypt the data, it’s time to add your device to initiate the backup process. Click on Add Device.

From the pop-up, click on Windows 64-bit to download the Synology C2 Backup Agent on your computer. It’s a small software application that hardly takes a minute to download.
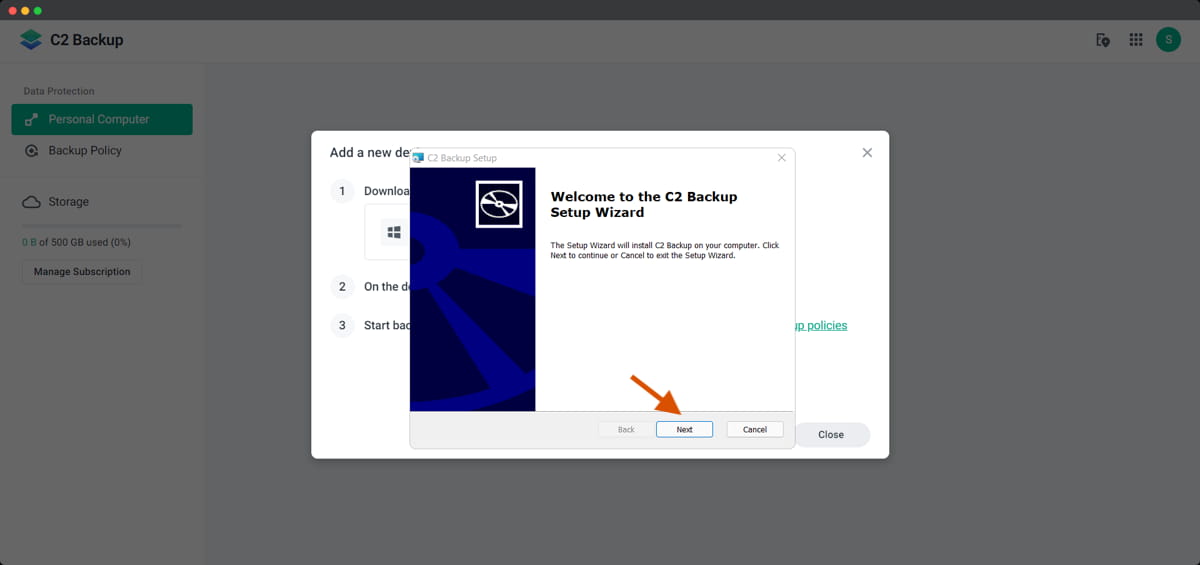
Once the download completes, open the downloaded application to install it on your computer
- Click on Next.
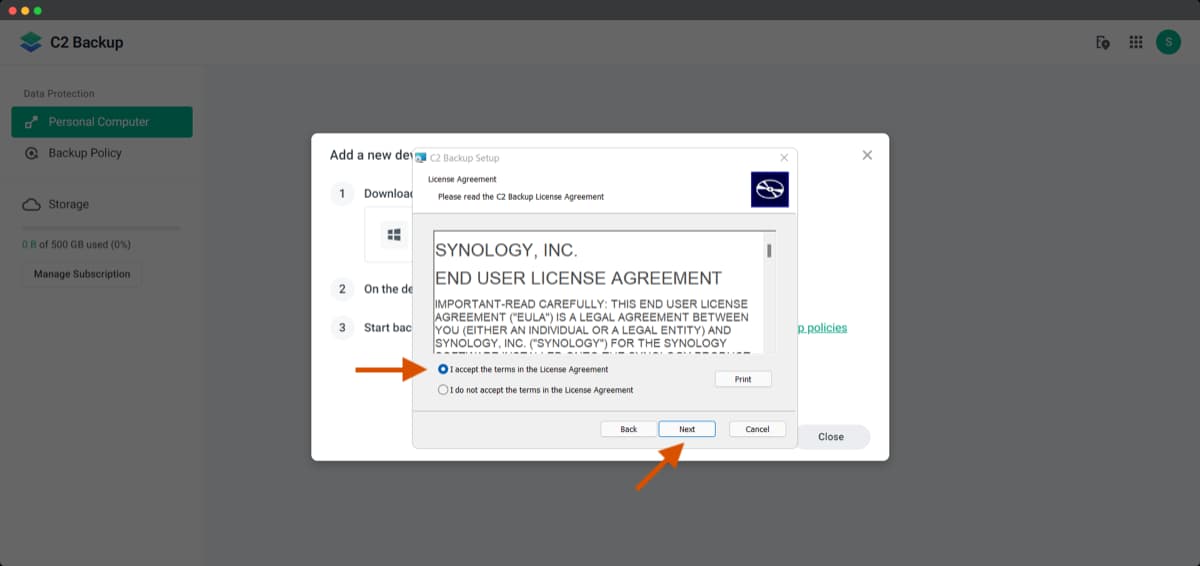
- Accept the Terms and Conditions and click on Next.
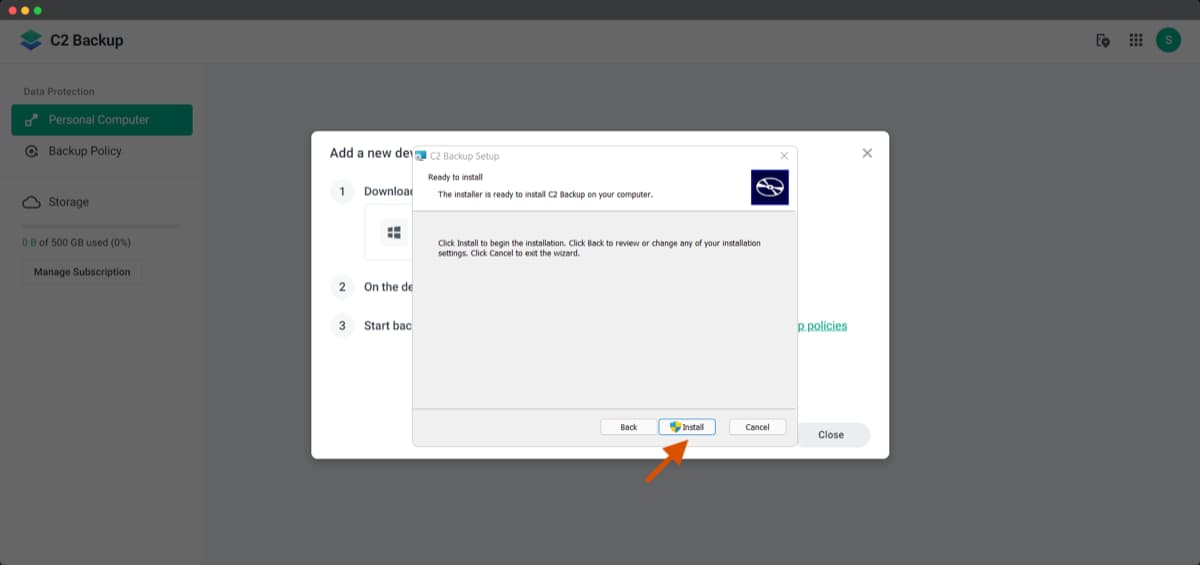
- Click on Install.
- You may receive a User Account Control Warning. Select Yes.
- Tick mark ‘Launch application when finished’.
- Select Finish.
The application will be installed in around 5 minutes. The app opens automatically once the installation completes.

Starting a Backup
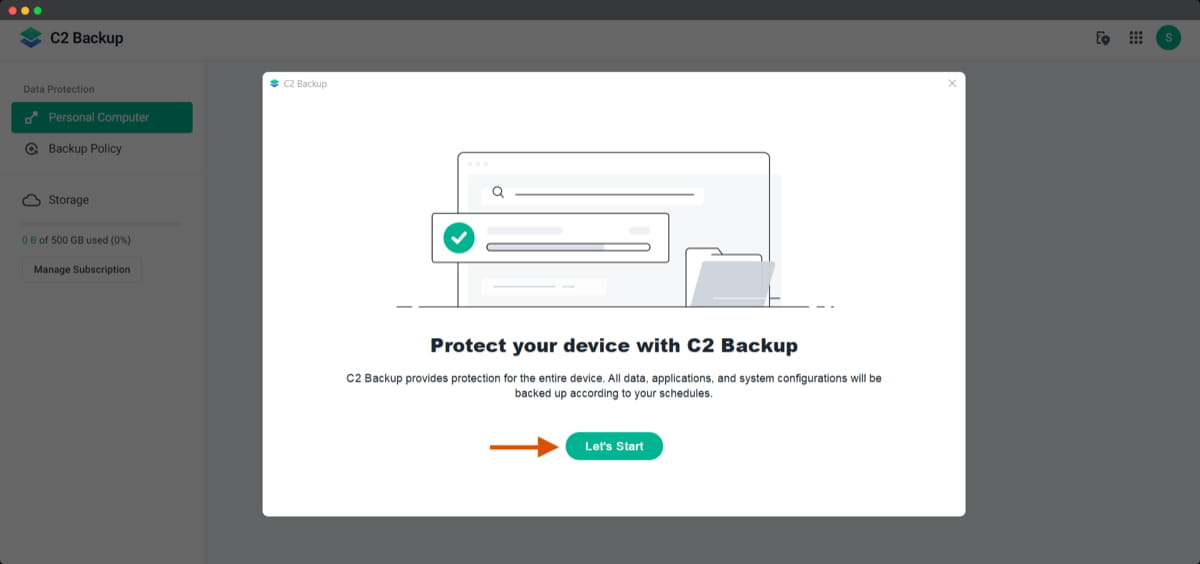
Once the Application opens, Click on Let’s Start to initiate the backup process.
- Enter the Synology username / Email id
- Enter the password
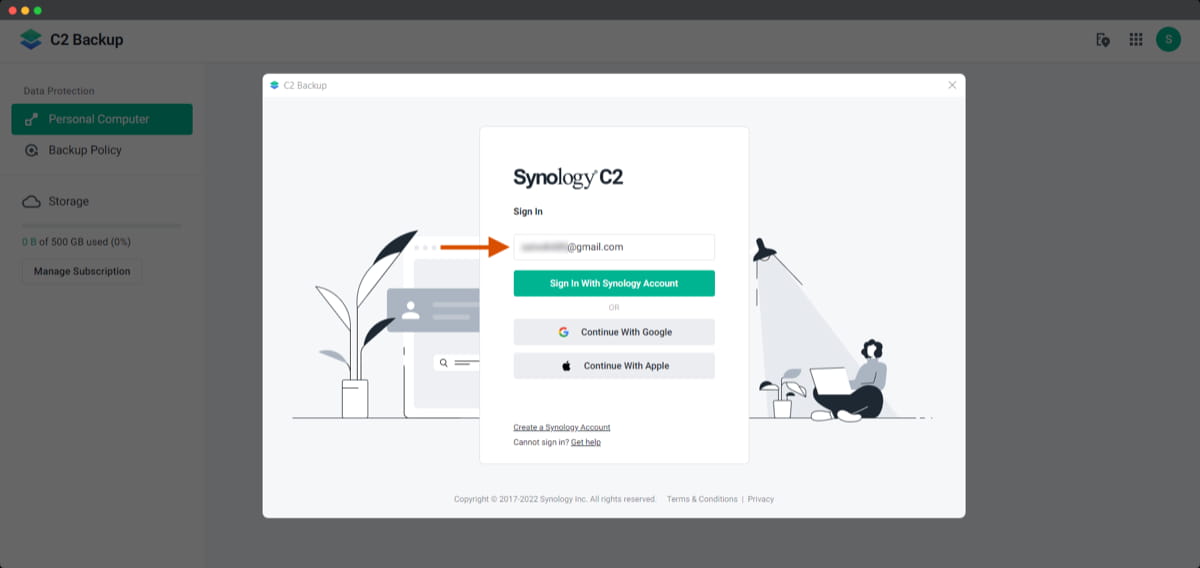
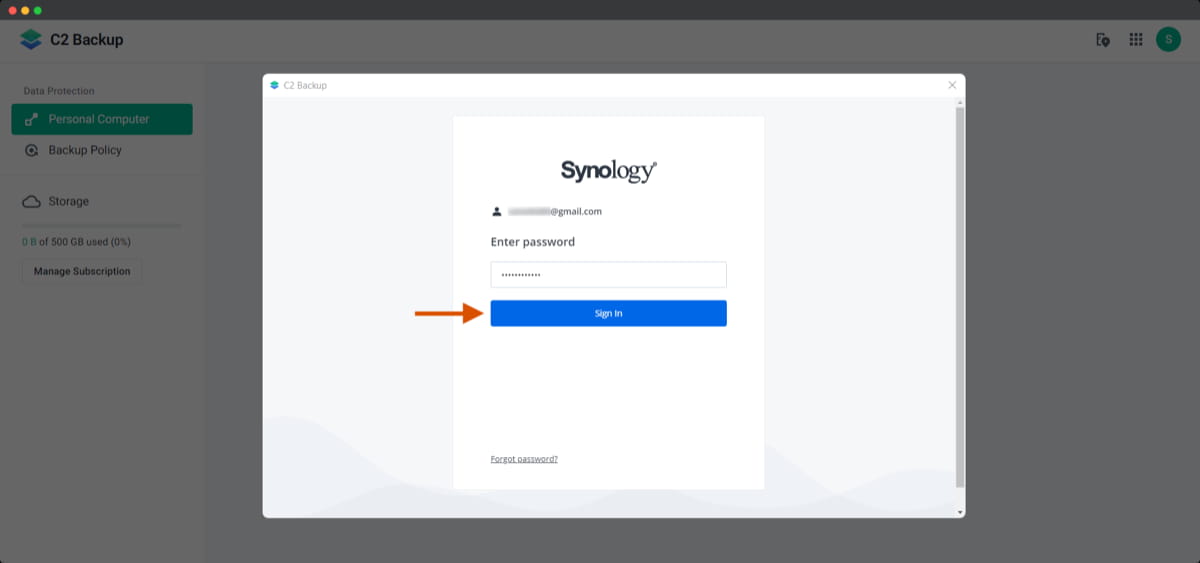
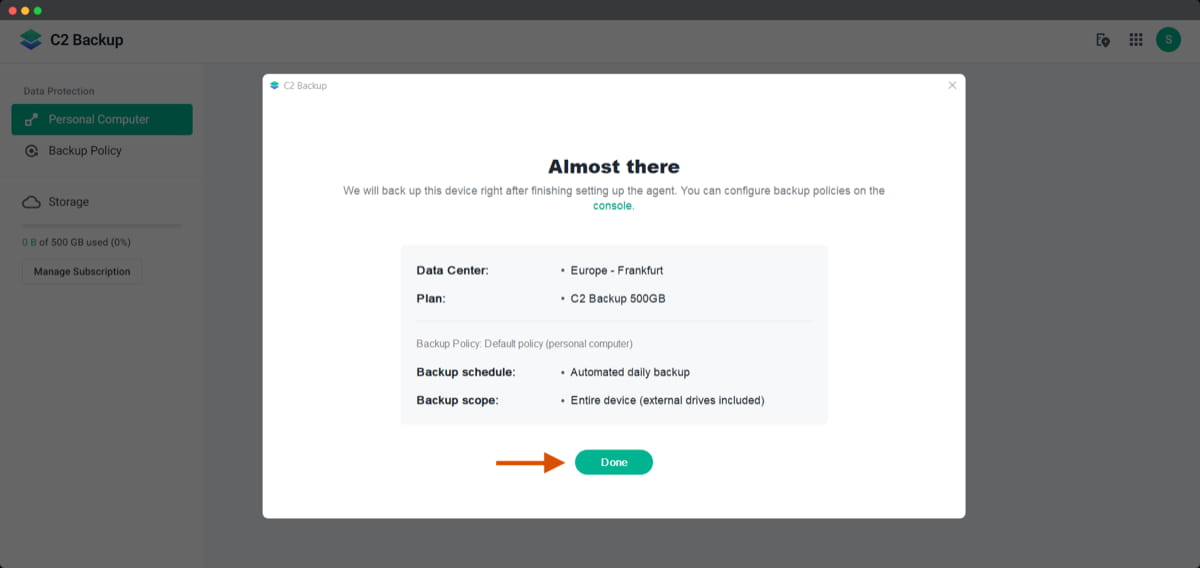
Once you have successfully signed in, the app will show you the summary of the service you have opted for. This includes the Data Center, Plan, Backup schedule, Backup scope. Click on Done.
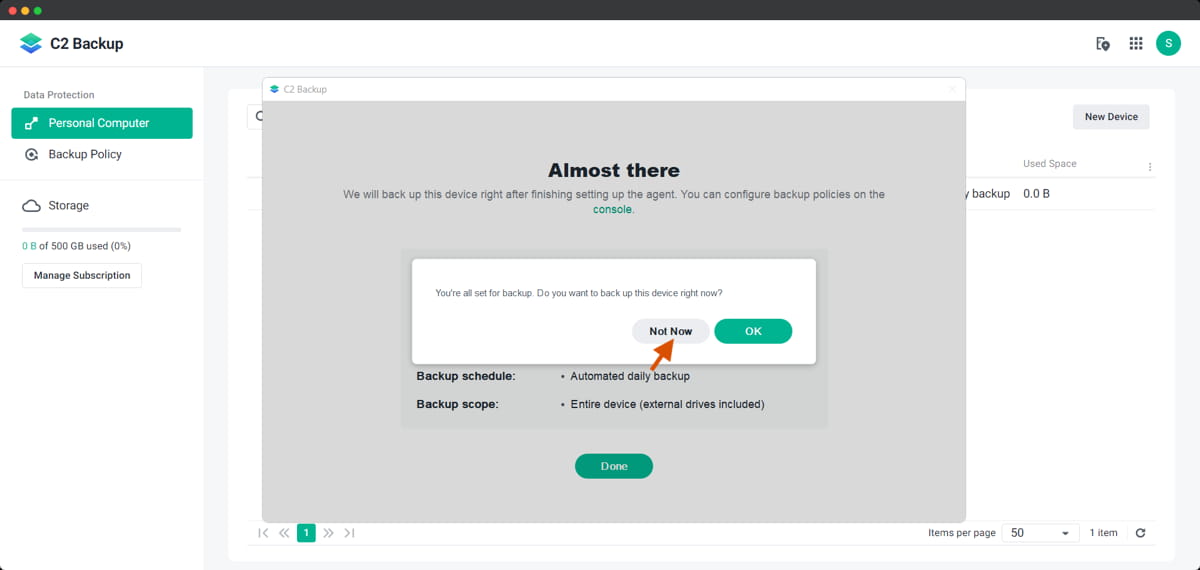
In the next step, you’ll get an option to start the backup immediately. If you click on Yes, the backup starts immediately with default settings. I would recommend you to Click on Not Now so that you can configure the backup settings the way you want before starting the Backup. Click on Now Now.
- Go back to your browser (Synology Backup account)
- Click on the Backup Policy
- and then, Click on Default Policy
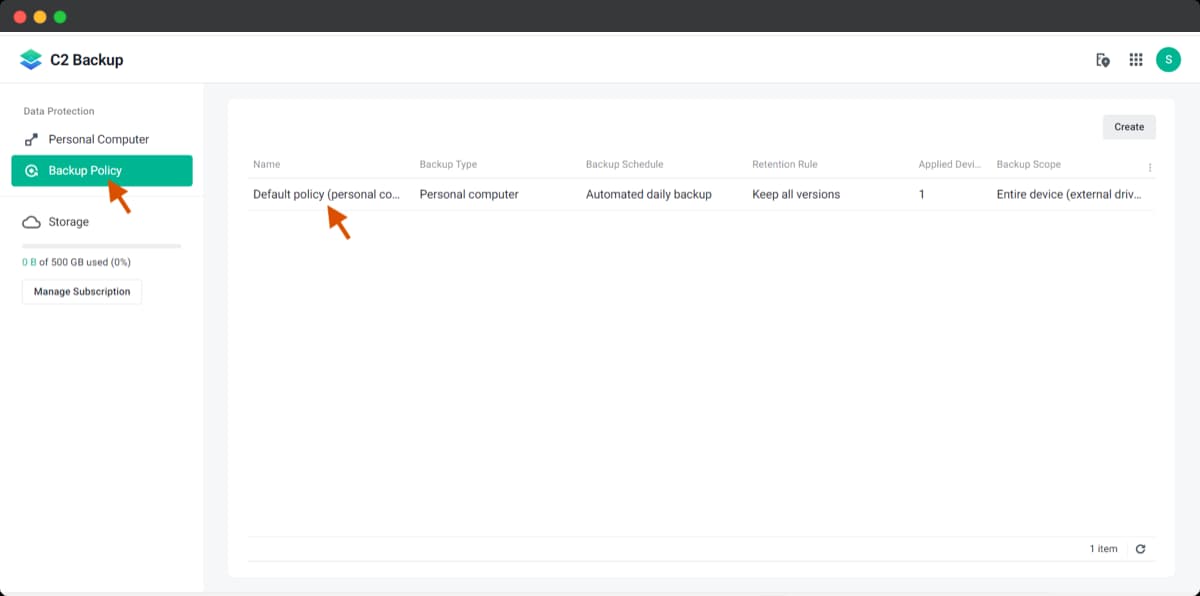
Backup Policy
- Name: The name of the policy.
- Device type: A policy can be applied to one type of device at a time.
- Backup scope: You can choose if you want to back up entire devices, including external drives, system volumes, or specific volumes.
- Backup schedule
- None: There will be no scheduled backups. Your devices will only start to back up when you click Back Up Now under the Device tab.
- Automated daily backup: Your devices will back up once a day at a time chosen by C2 Backup.
- Custom: Options for Daily or weekly backup as well as the time that you want to run the backup.
- Event trigger: C2 Backup will perform a backup of the device When the screen is locked when you sign out and when the device powers on. You can also set a minimum backup interval to make sure that backups aren’t performed too frequently to save bandwidth and space.
- Retention rules
- Keep all versions – Keep all versions permanently.
- Keep all version for _ months – Automatically erase earlier versions to free up storage by setting the retention period (in months)
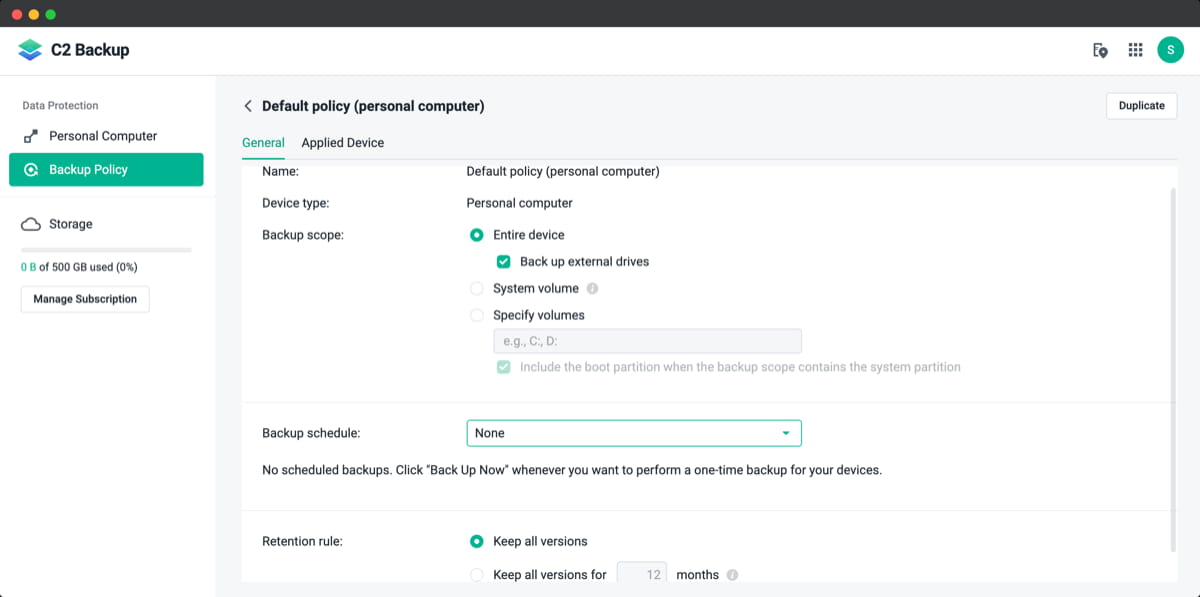
You cannot specify files and folders for backup in C2 Backup. The C2 Backup supports entire device and volume backups only and there is no way to select the files & folders while initiating the backup. This means all your data on the devices and volumes (drives) are backed up to the C2 Backup server. If you want to access specific files, you can download them from C2 Backup Recovery Portal to your local computer once the backup is complete.
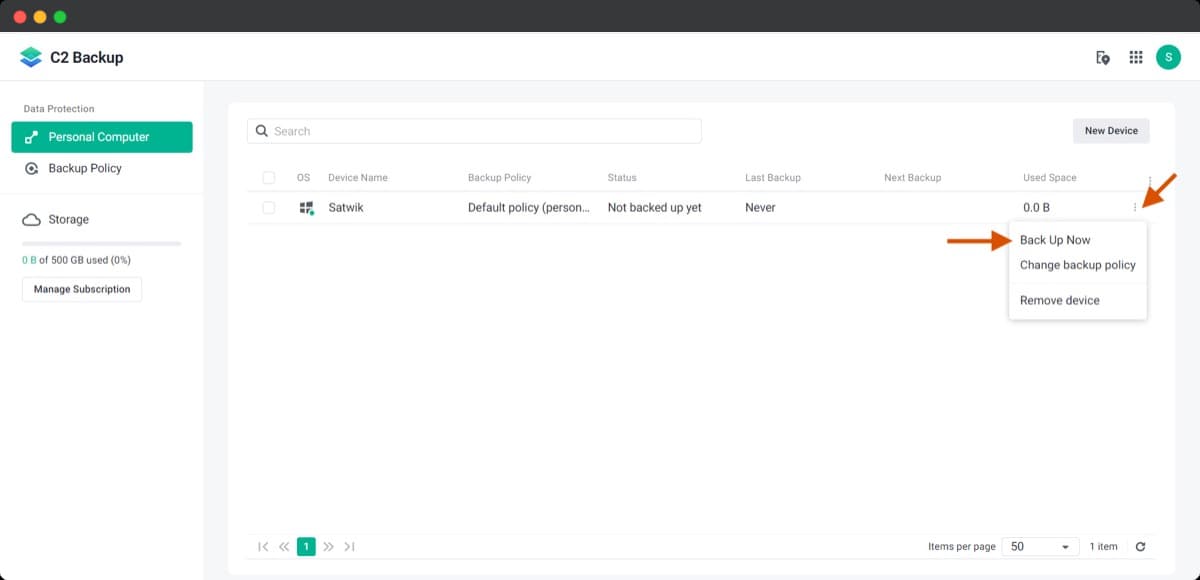
Once you hit Back Up Now, the app starts backing up your PC to the cloud, and the Status changes to Backing Up (__%). The backup time depends upon your PC’s hard drive size, your internet upload speed, and also the Data center. Once the backup completes, the Status changes to Successful.
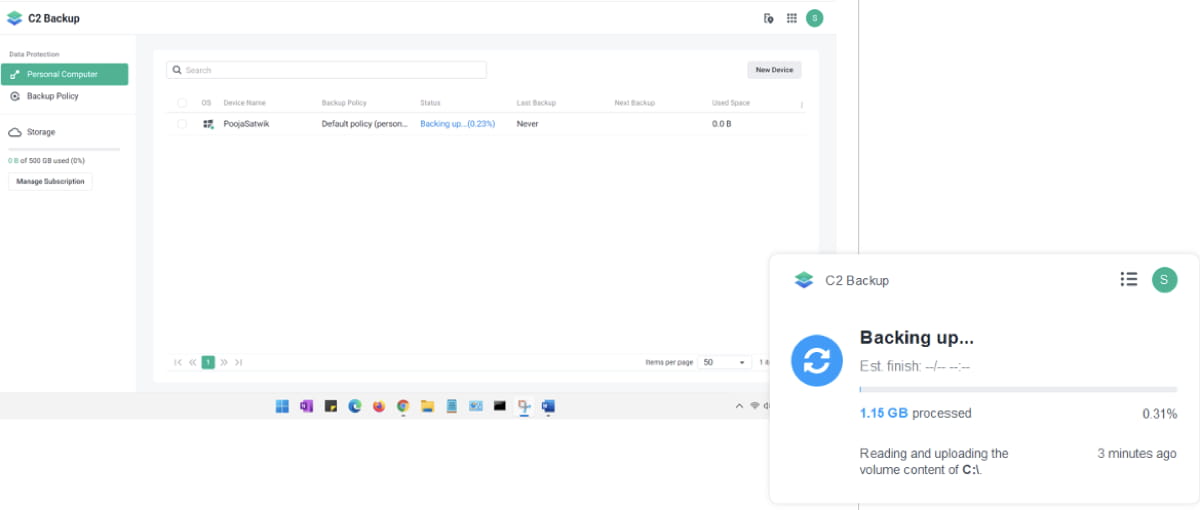
On the first run, the C2 Backup agent will push all your PC’s data to the cloud. This means, your entire PC (or as per settings you made) will be backed up to C2 Cloud. If you run the backup for the second time, the Backup agent only sends the data to the C2 Cloud that has changed since the last time. This results in a drastic reduction in the backup time.
Download Files from the Backup
In case you need any files from the backup, you can use C2 Backup’s Recovery Portal to easily download individual files and folders from your backup to your computer or laptop. To download files:
- Go to C2 Backup control panel – https://backup.eu.c2.synology.com/
- Enter your username and password.
- Enter your C2 Encryption Key to decrypt the data.
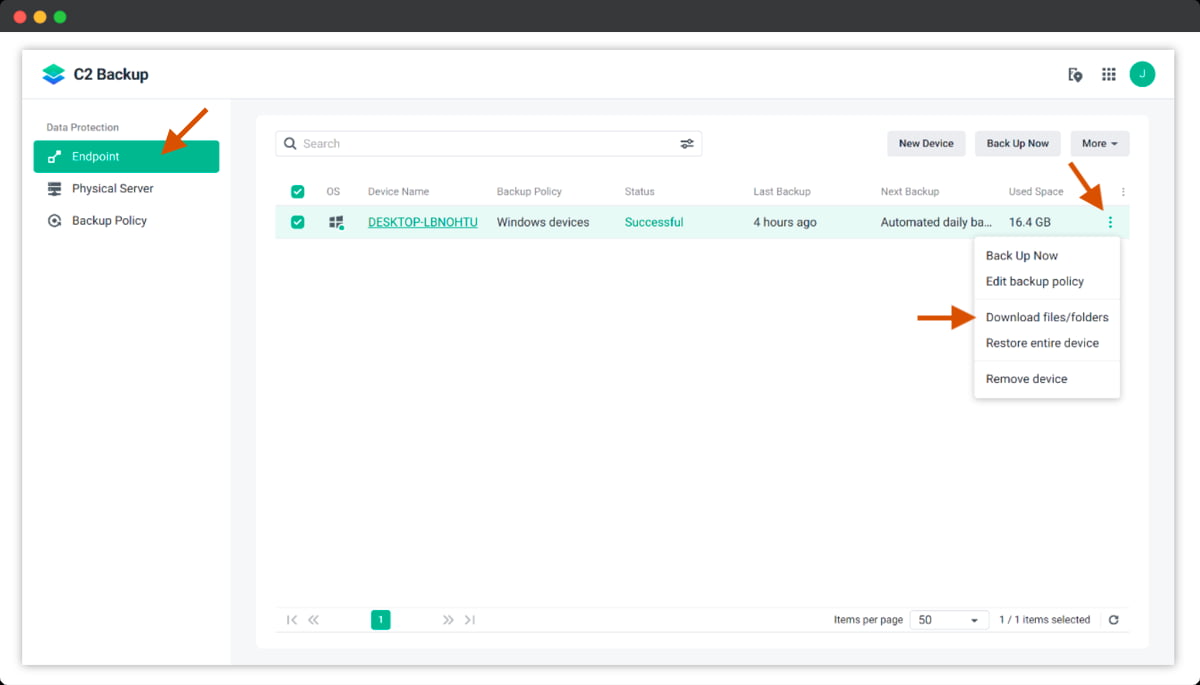
- Click on Personal Computer or Endpoint on the sidebar.
- Click on the three-dot menu icon and select Download files/folders.
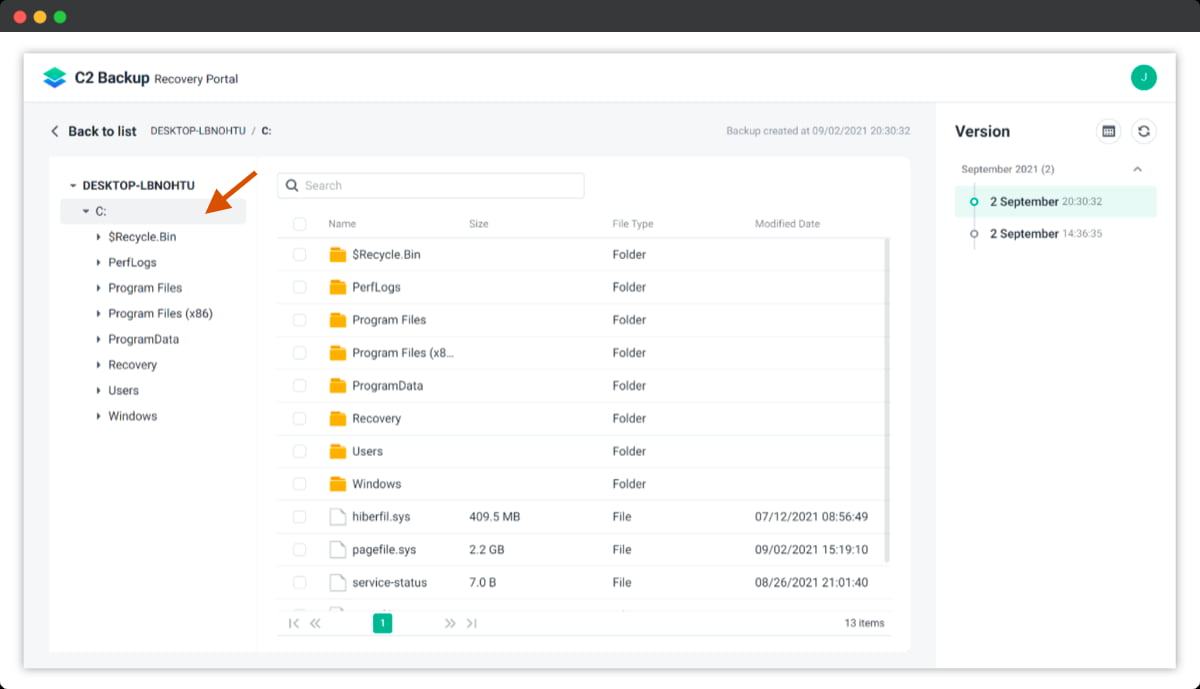
- Find the version that you want in the panel on the right sidebar or panel.
- Jump to your desired date on the timeline or by using the calendar. A green dot next to a date means that a backup was created on that day.
- In the left panel or sidebar, navigate to the file or folder that you want to download.
- Select one or more files/folders and click the download icon to download the selected files to your device.
Note: If you want to restore your entire PC using the backup, then, you’ll have to use the Bare-metal recovery to restore the backup. Check out this link for more information on the C2 Backup Recovery Media Creator and check this link to find more information on restoring an entire device.
Things to Remember
- C2 Backup supports only NTFS file system.
- Windows x86 is not supported.
- Network port support – TCP port 7222 and HTTPS 443.
- C2 Backup only supports simple volumes on dynamic disks.
- C2 Backup can only backup external hard drives. Floppy drives, thumb drives, card readers etc. cannot be backed up.
- Personal computers with 4Kn disks are not supported.
- Virtual hard disks (VHD) on Windows are not supported. To back up VHDs, back up the entire device or volume where the VHD files are located.
- Cloud service backups are only supported on the C2 Backup business plan.
- You can upgrade or downgrade a plan if you want anytime from the C2 Backup -> Manage Account > Subscription.
Synology C2 Backup License Terms
As stated above, the C2 Backup offers several different plans and you need to subscribe to a C2 Backup plan via the official website or by purchasing a license from a reseller before your free trial period ends.
- Free trial will end once you activate a license.
- License key can only be used by one Synology Account.
- License key should be kept in a safe place. If the license key is lost, Synology cannot issue a replacement or help you find it.
- Each license corresponds to a respective region and can only be activated for the data center shown on the package.
This completes the tutorial. I have been using the C2 Backup for a couple of months and it does its job very well. I have not experienced any issues and everything is working fine. If you have any questions do let me know in the comments. Follow GizArena on Facebook and Twitter for the latest tech updates.
You May Be Interested In:
- Synology C2 Password: Features, Installation, Easy Setup Guide with Step by Step Instructions
- Import Passwords to Synology C2 Password Account: Step by Step Guide
- How to Copy Photos from Google Photos to Synology NAS
- How to Copy Photos from Your Phone or PC to Synology NAS
- Connect Synology NAS Directly to PC or Mac Over Ethernet: Step by Step Guide
- Synology DS220+ Review – Powerful Yet Affordable
Super useful. Thanks a lot for the helpful guide.