A Network switch or a Router is required to set up and configure your Synology NAS. As stated in the Synology DS220+ review, the data transfer rate over WiFi is always less compared to the data transfer over Ethernet. It might not make much difference if the file size is in MB, but takes a significant amount of time if the file size is in GB. Let’s see how to connect Synology NAS directly to Mac or PC via Ethernet.
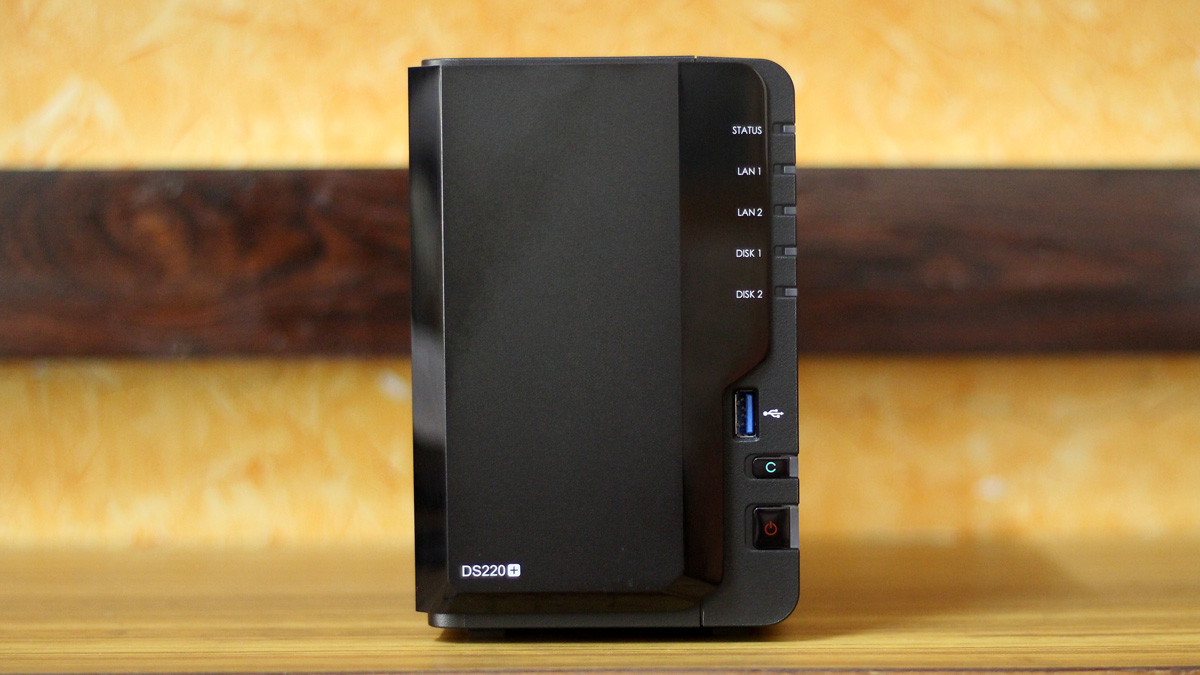
Note: This tutorial is made on MacBook Pro using Synology DS220+. But, the process remains almost the same for Windows Computer. As the MacBook Pro does not include a built-in Ethernet port, I have used a TP-Link UE300 Gigabit USB Ethernet adapter.
What all do you need?
- Synology NAS
- Ethernet Cable
- PC or Mac with Ethernet Port
- USB Ethernet Adapter (Optional)
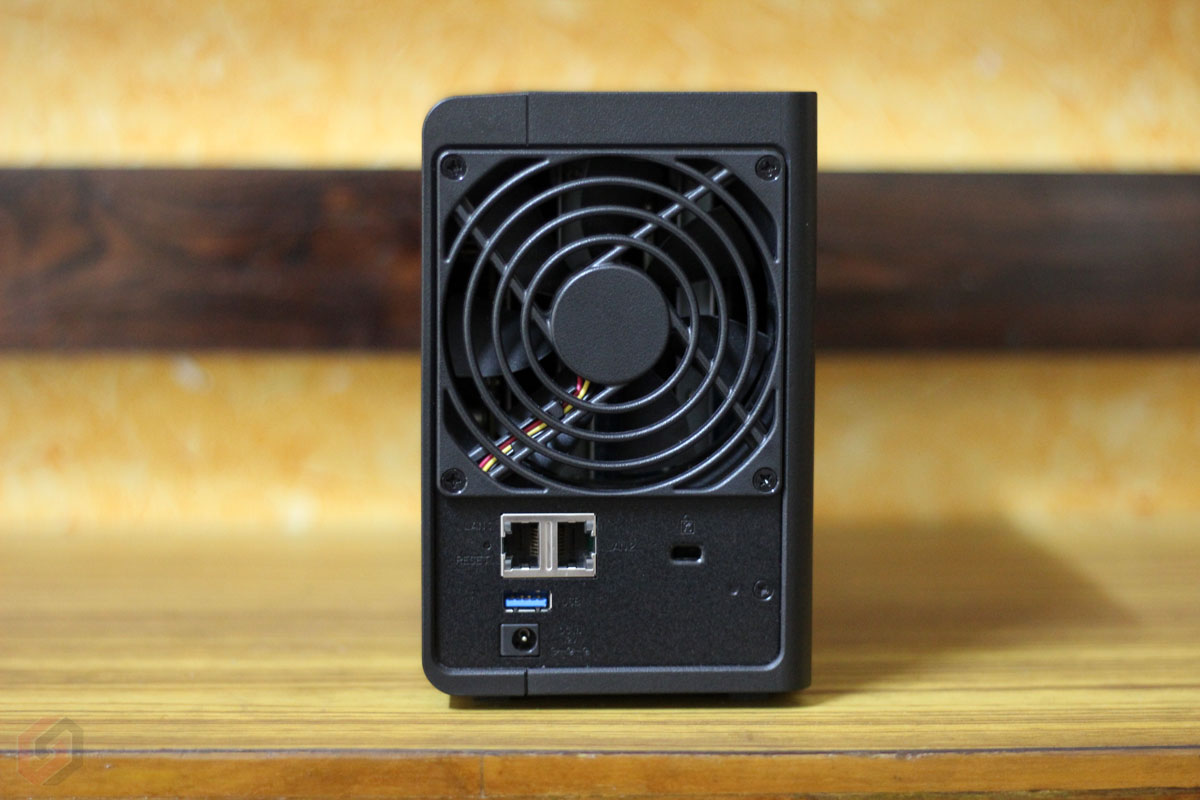
When you connect Synology NAS directly to Mac or Windows computer over ethernet, both NAS and the PC have to be on the same IP address to communicate with each other. Else, you’ll not be able to access the NAS. You can change the IP address of your PC but not the IP address of NAS unless you have access to NAS. Check out this tutorial to set up your newly bought Synology DS220+ or any other Synology NAS.
1. Assign a static IP address to NAS
2. Assign a static IP address to Mac or Windows PC
3. Access NAS over Ethernet using Synology Assistant
Assign a Static IP Address to NAS
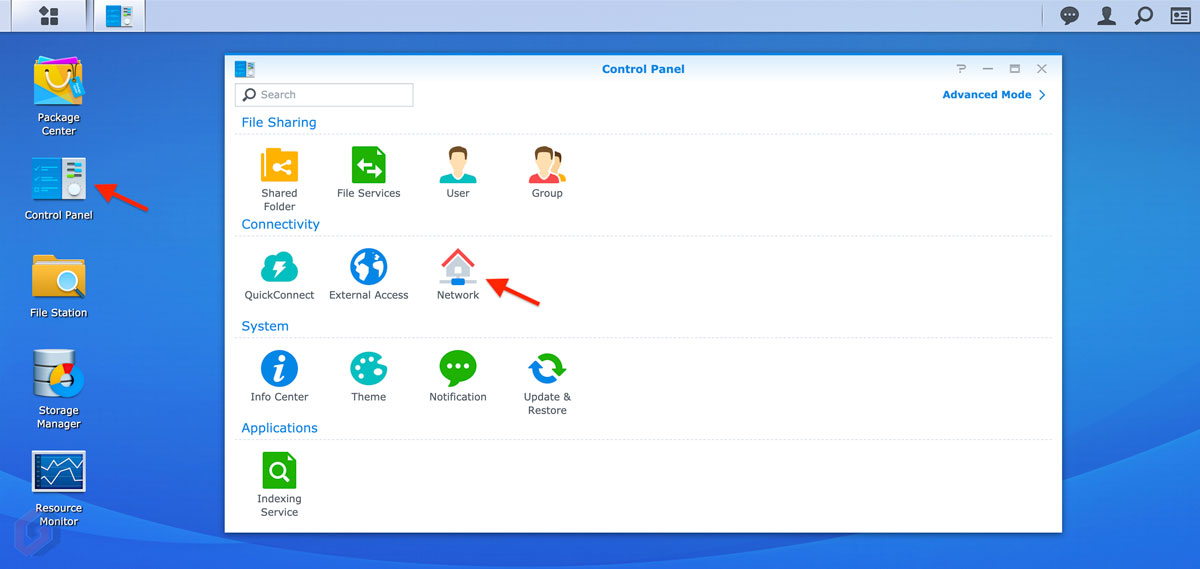
This step involves assigning a Static IP address to your Synology NAS. The process is almost the same for all Synology NAS devices. In the first step,
- Login to your NAS
- Open Control Panel
- than, open Network
In case you missed it: Synology BeeDrive Review: The Ultimate SSD for Seamless Storage and Effortless Backup
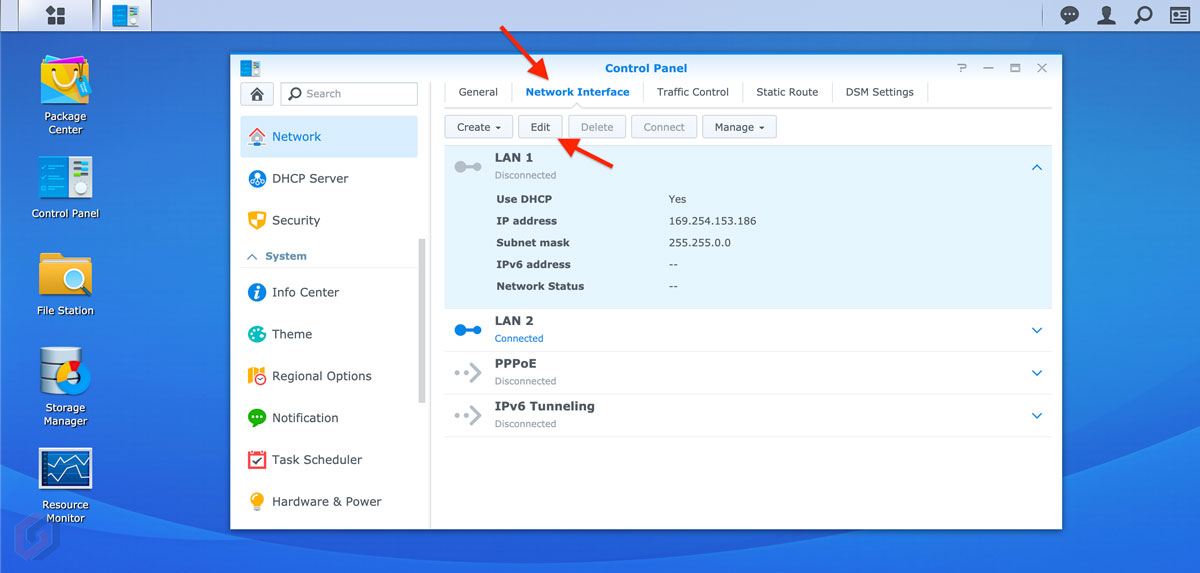
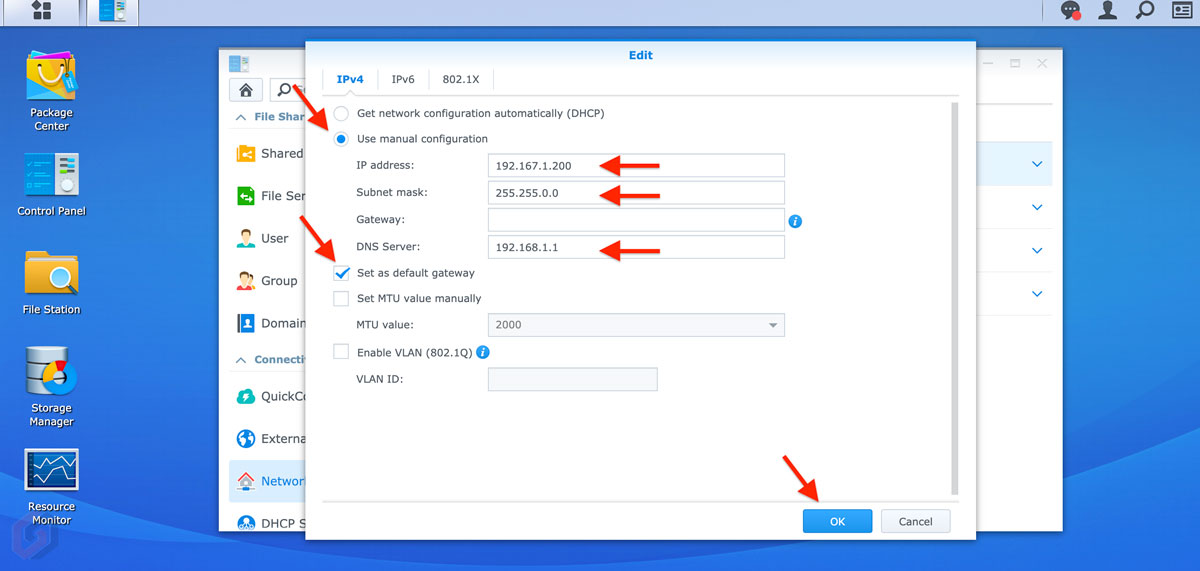
Here, I have used Synology DS220+ to demonstrate the process. The DS220+ NAS has two LAN ports. The LAN Port 2 is connected to the Router and the LAN Port 1 is connected to MacBook Pro via Ethernet port. To assign static IP address:
- Select Network Interface from the Network Settings
- Select LAN 1
- then, click on Edit button
- Enter the IP address as 192.167.1.200
- Enter Subnet mask as 255.255.0.0
- Enter DNS server as 192.168.1.1
- Enable the option Set as default gateway
- Select OK to set the IP address
Assign a Static IP Address to Mac or Windows PC
This step involves setting up a static IP address to Mac or Windows computer. The process of setting up the static IP address on Mac is quite different compared to Windows PC.
Assign a static IP address in Mac or MacBook:
- Go to System Preferences -> Network
- Select the Ethernet port or External USB Ethernet Adapter
- Change Configure IPv4 to Manually
- Enter IP address as 192.167.1.201
- Enter Subnet mask as 255.255.0.0
- Select Apply
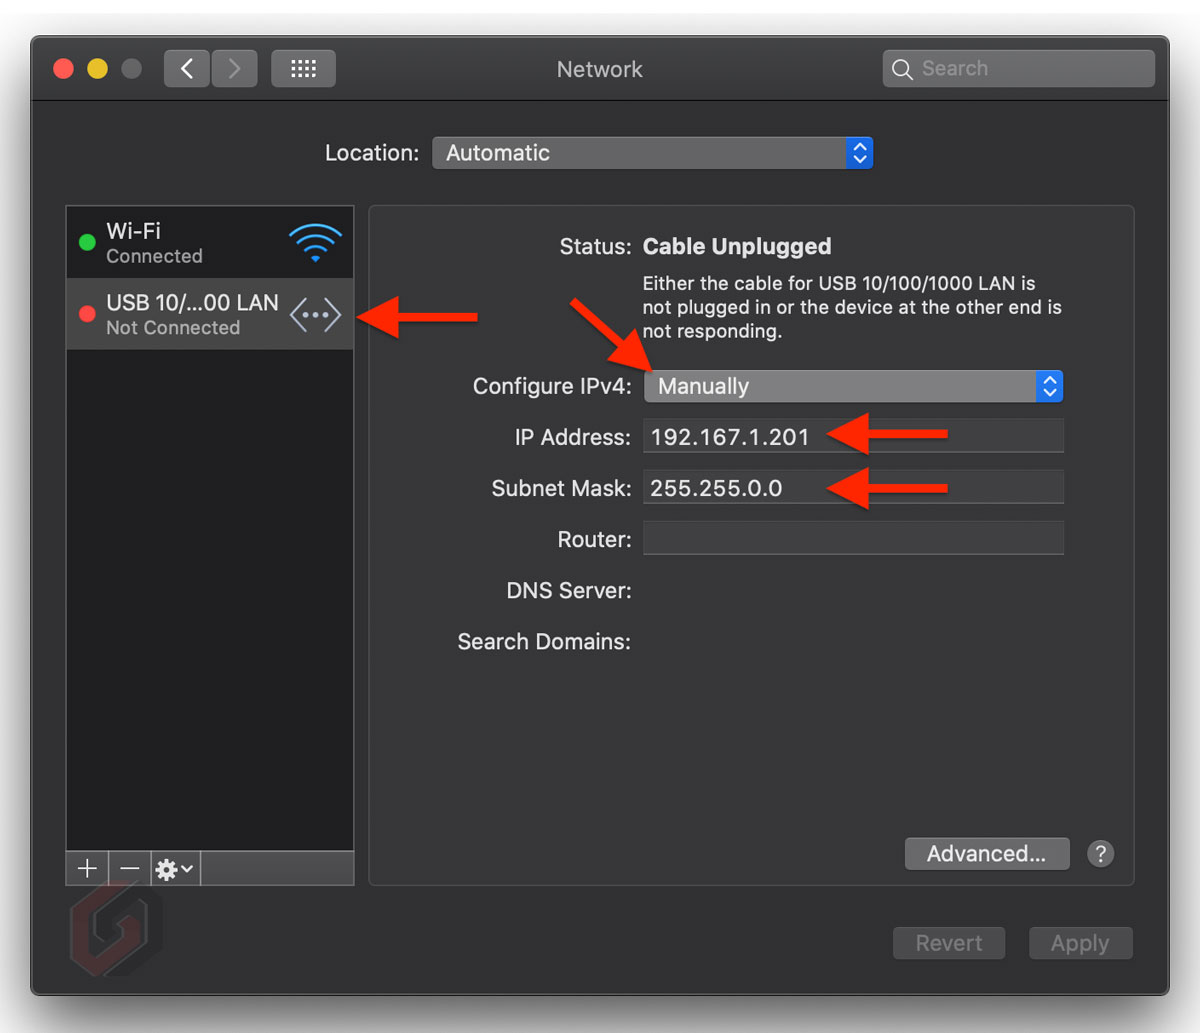
Note: The IP range mentioned here is only for reference and you can set it to any number, but make sure the IP addresses have the same range.
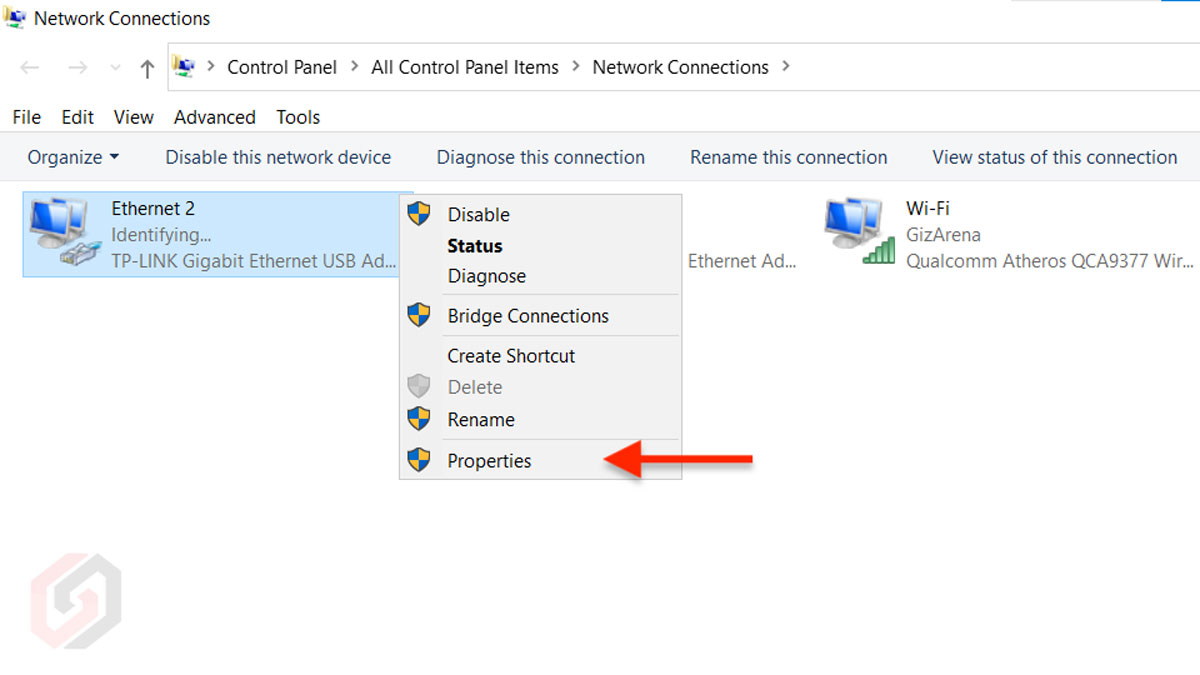
Assign a static IP address in Windows PC or Laptop:
- Click on the Start button -> Type ncpa.cpl and hit OK
- or Go to Settings -> Network & Internet -> Change adapter options
- Right click on the Ethernet adapter and select Properties
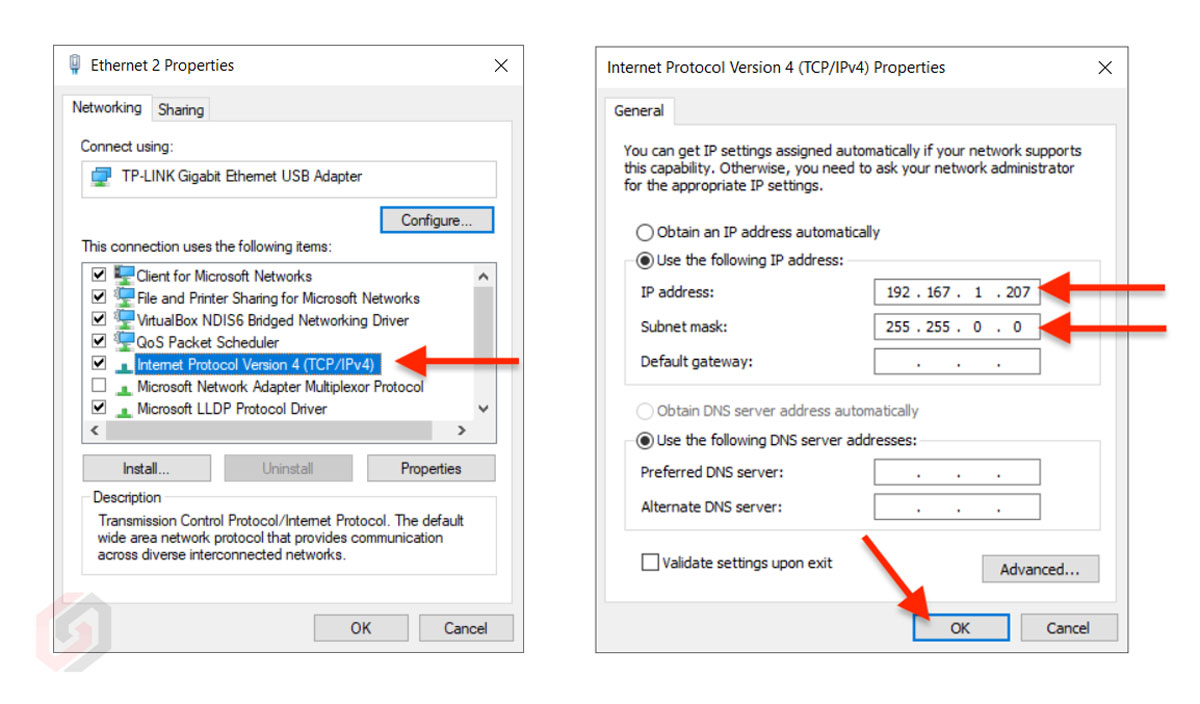
- Choose Internet Protocol Version (TCP/IPV4) and click on Properties
- Select Use the following IP Address
- Enter the IP address as 192.167.1.207
- Enter the Subnet mask as 255.255.0.0
- Select Apply
Access NAS over Ethernet using Synology Assistant
Once you’re done with assigning static IP addresses to both PC and NAS, connect the Synology NAS to Mac or PC using the Ethernet Cable. Here, I connected Port 1 to Mac because the static IP address is configured to Port 1. You can use an ethernet port on the NAS that has a static IP address, but you should use the same IP range on the PC.
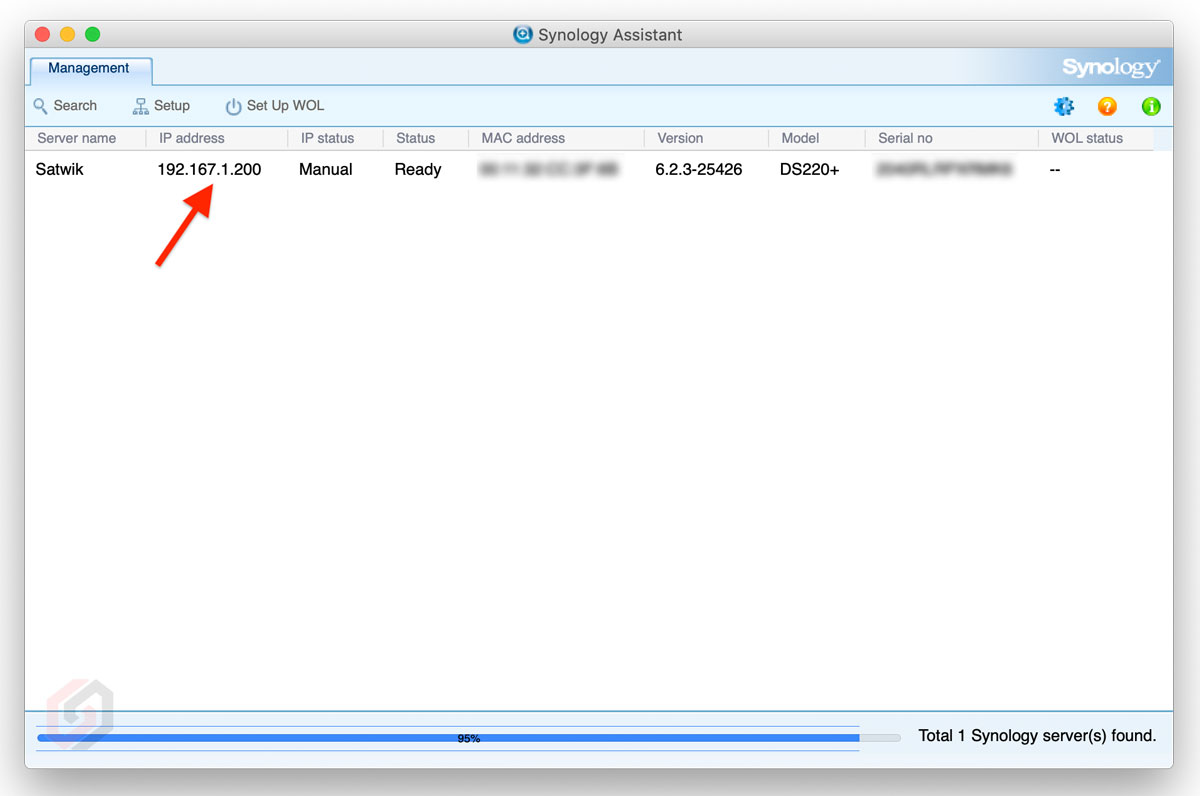
- Open Synology Assistant
- Click on Search
- Your PC or Laptop will detect the Synology NAS connected over Ethernet
- Enter the Username and Password and Login to NAS
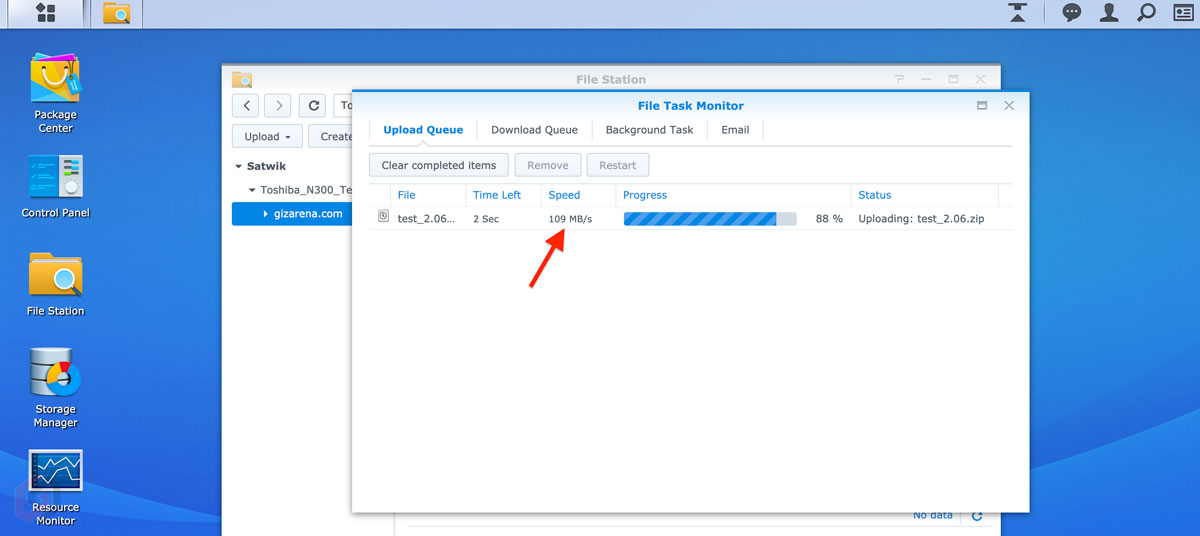
Once you log in, you can transfer data almost 10x faster compared to a 2.4GHz Wifi Router. During my testing, Synology DS220+ was able to achieve an average speed of 110 Mbps using a Gigabit Ethernet connection compared to approx. 8 Mbps over 2.4GHz WiFi.
Note: Make sure you’re using Gigabit Ethernet Port (10/100/1000) for higher data transfer speed. Most entry-level desktops and laptops come with Fast 10/100 Ethernet ports. Data transfer speed is average or low on such ports, almost similar to 2.4GHz WiFi routers. So, for better data transfer speed, use a Gigabit ethernet port such as TP-Link UE300.
That’s it. A quick tutorial to connect Synology NAS to PC or Mac using an Ethernet port. If you have any queries, do let me know in the comments. Follow GizArena on Facebook and Twitter for the latest updates.
I can no longer connect to my NAS server after this. It is saying “please connect to the internet” when I try to use open the website “quick connect.to”
I have a DS218play with only one ethernet port. I have link the ethernet port to my MacMini.
How can I use the MacMini wifi access as a hotspot so that the DS218 can have internet Access?
Thanks for this guide.
I’ve setup my DS720+, I began 1 drive of 16TB size, but after setting up my volume, I only get 14.6TB size.
It is supposed to have a little bit less than 16TB but taking 1,4TB for formating seems a lot. Why does this happen? Is there any way I can get more?.
This is necessary, and may take more or less depending on your RAID configuration. Look into it if you wish
Got it up and running but needed to turn wifi off (on both desktop and laptop when each was connecting) to get it to connect.
However write speeds are still crazy slow ~30mb/s.
So, I tried following these instructions and now I can’t seem to connect at all from my Macbook.
I have a DS1621 if that matters.
I tried turning my wifi off and then was able to connect. Once turned wifi back on all was working.
If I want my NAS for offline use only, do I really still need an ethernet cable or can a USB cable suffice?
You need an Ethernet cable. You cannot connect a NAS to your PC or Laptop using a USB Cable.
HI Christian – Came across your post. Deffo a newbe to the world of Synology NAS
How did you get on? I (like you) only really want my NAS for offline use. Am I able to set up via an ethernet cable (offline)
Any hints/tipswould be appreciated
TIA
Steve
My PC’s ethernet port gets saturated by downloading Linux iso’s from the Internet, which makes file transfers to/from my Synology really slow.
I’d like to a second ethernet port to my PC, connect that directly to the Synology, and them use that connection for data transfers between them.
That way, the Internet connected port can be saturated without slowing down data transfers to/from my Synology.
Can that be done?
Yes. You can do that. Buy a USB Gigabit Ethernet Adapter and connect the NAS to it.
Or you could just plug the NAS as it should be to a router and plug your computer to the same router and achieve the same results., True?! Any wont have to change any setting as it will be auto assigned with DHCP
If the PC and NAS are connected to the same router, no additional configuration is required. IP will be auto-assigned with DHCP.
IF “If the PC and NAS are connected to the same router, no additional configuration is required. IP will be auto-assigned with DHCP” Could I also have wi-fi (via-router) and Offline connections (via router) with two ethernet cables?
Would this work?
Using Mac
Hi, isn’t here any special requirement on the ethernet cable between NAS and PC? Do I need a crossover cable?
No. There is no need for any special cable. You can use the one which comes bundled with the NAS.
Is the NAS visible to other devices on the network that aren’t connected via cable, or does this only allow devices that are wired to access the content? My NAS is currently in another room with my router, but I was hoping to move it into the next room over with my desktop so it can be powered/protected with a UPS. Trying to avoid having to buy two UPS.
Hi, NAS is visible to all devices which are connected to the same network. Example: If your NAS is connected to a WiFi router, it will be visible to all devices which are connected to the same wifi network. You can even access the NAS on the devices which are connected through a WiFi range extender.
Now “Synology Assistant” can’t see my NAS to connect, and my internet won’t work (ok Barely, but is super slow) because it thinks the internet is coming through the ethernet connecting to a modem I guess. But I can still access the folders that I created on my NAS when it was connected to my router. Did I do something wrong?
Hi, Seems like something is wrong with the configuration or there is an IP conflict. Try to find the NAS using find.synology.com.
I had this problem too. Apple helped me with the slow internet issue. It seems that when I entered the static IP information, my Mac gave it priority over WiFi. I just switched off ethernet and switched it back on again (re-entered the IP information) and it corrected itself.
I successfully connected NAS via LAN cable. However, everytime I turn on WIFI of my laptop, I get disconnected with NAS (I use Synology DS218). Do you have any idea the cause?
Thanks!
Does the NAS still need to be connected to the router?
No. you can access the NAS over ethernet without help from the router.