Synology has recently launched a new password management service called ‘C2 Password‘ that allows you to generate, store, and autofill passwords for a seamless online experience. The C2 Password uses AES 256-bit end-to-end encryption and provides a convenient yet secure way to manage passwords using a web browser or a browser extension.

Three are two plans – Free and Plus. The free plan allows you to store up to 10,000 passwords and other features such as password generator, cross-device syncing, end-to-end encryption, etc. Right now, Synology has only announced the Free plan, and the Plus plan is slated to release in Q1 2022 with advanced features.
Synology C2 Password Features
- File transfer with Two-factor authentication (2FA)
- AES 256-bit end-to-end encryption
- C2 Encryption Key for a secured access
- Cross-device synchronization across desktops
- Generate time-based one-time passwords (TOTPs)
- Strong password generator with Password strength detector
- Manually access passwords through a C2 Password account on Apple Safari
- Recover deleted items
- Import passwords using CSV
- Dedicated browser extension – Chrome, Edge
- Auto sign with the browser extension
- Zero-knowledge design – Reducing the risk of credential leaks over insecure networks
Synology has even confirmed that an official iOS app will be available on the App Store by the end of 2021 followed by an Android app on the Google Play Store in 2022. I have been using the Synology C2 Password for over a month and it does its job very well. Check out my detailed C2 Password setup guide below.
Note: Synology C2 Password is a free service and you don’t have to provide any payment information to sign up for the service. You need to opt up for a Plus plan only if you need advanced features. Also, you can easily migrate to the Plus plan once the service is launched.
Synology C2 Password Setup
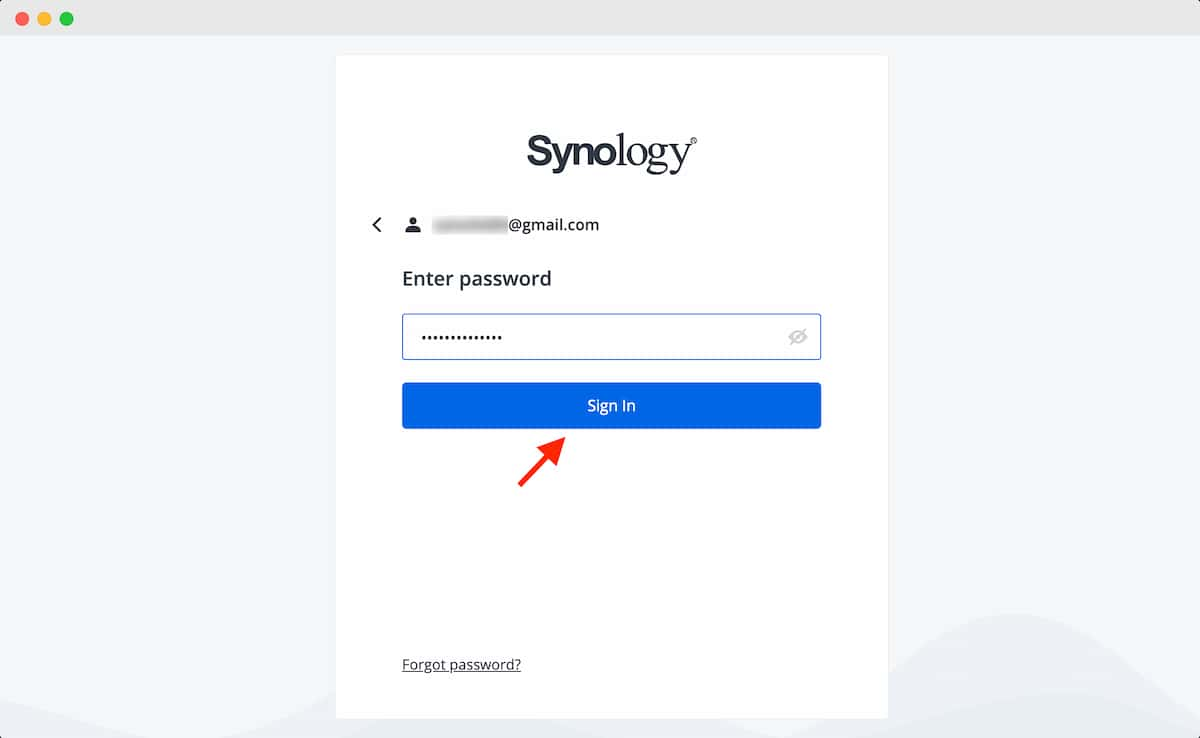
Login to Synology Account
To get started, you need a Synology account. If you already have a Synology account, you can use the existing one for C2 Password, or create a new Synology account by visiting this link. Once the account is created, go to this link and log in to the C2 Password portal.
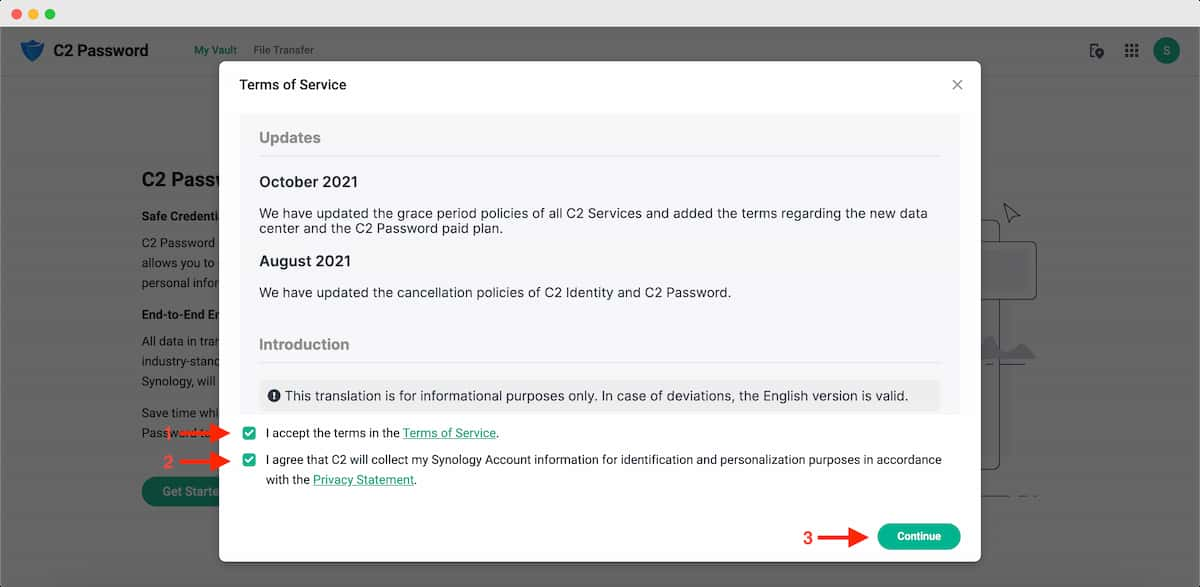
Once you sign in, you’ll be asked to accept the privacy policy and terms. Tick mark both the checkboxes and click on the Continue button at the bottom.
Select Plan & Data Center
In the next step, you need to select the C2 Password Plan and the Datacenter. While writing this post, only the Free plan was available, and it was selected by default. On the same screen, you also need to select the Datacenter from the dropdown While writing this post, there were two data centers – North America – Seattle, and Europe – Frankfurt.
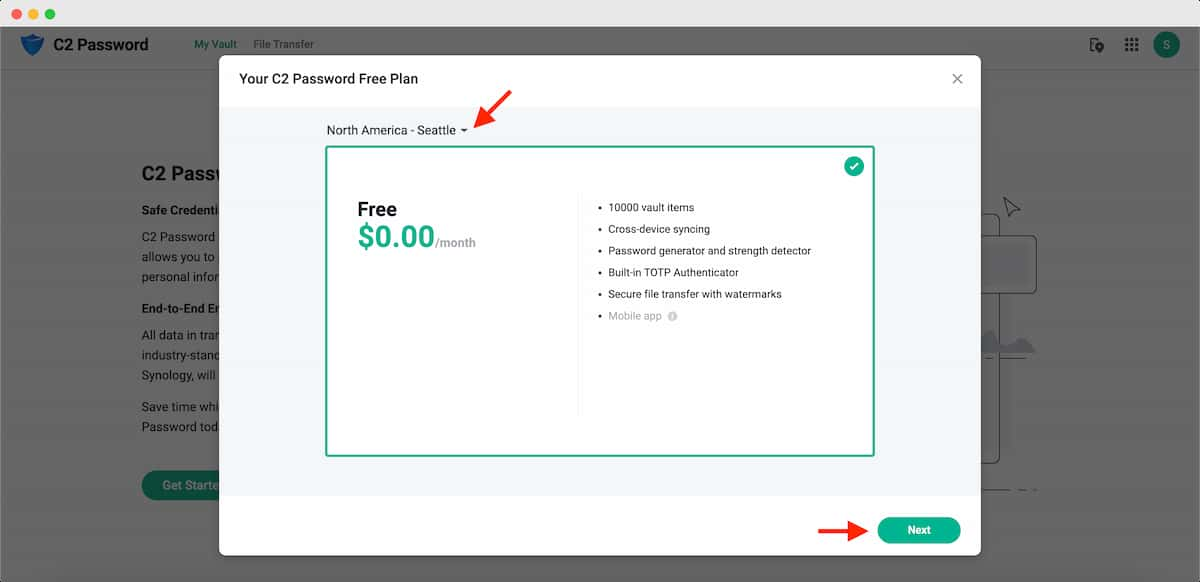
The default data center is set to Seattle. If you need a different data center, click on the down arrow and select the data center as per your requirements. Once done, click on the Next button. You can even change the data center anytime after the setup.
Set C2 Encryption Key
This completes the Synology C2 account creation. Now, you need to set a C2 Encryption Key. It’s just like a password to encrypt all the data in the C2 services. The Password must include eight characters, at least one uppercase letter, one lowercase letter, and one number. This key will be used across all C2 services, such as C2 Transfer, C2 Backup, etc.
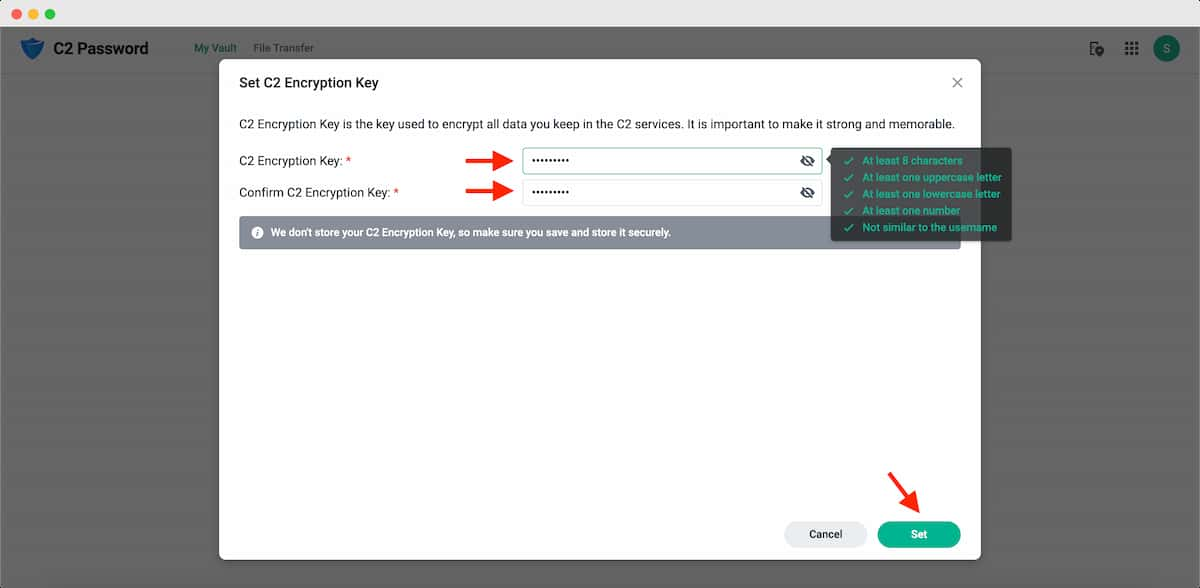
Make a note that Synology doesn’t store or remember the password you created in this step. Make sure you remember the password or make a note of it. Once you type the password, click on the Set button.
Copy or Download the Recovery Code
In the next step, you need to download a Recovery code. It’s like an additional layer of security that helps you access the C2 Password service if you forgot the C2 encryption key which you had created in the previous step. You can either press the copy button and paste the code into a text editor. Or, click the Download button to download a text file containing the key.
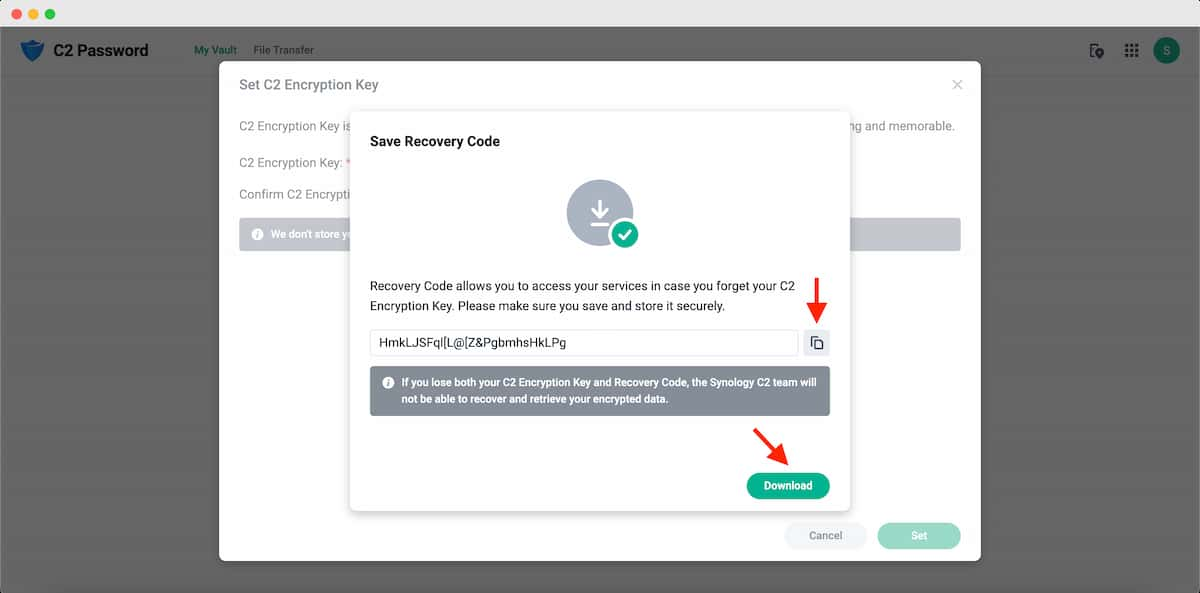
Note: if you lose both your C2 Encryption Key and Recovery code, you’ll lose access to the C2 Password manager and there is no way to access or recover the data. Also, the Synology team cannot recover and retrieve your encrypted data. Keep the Recovery code in a safe location.
Installing the Browser Extension
Now, it’s time to download the Browser extension to automate the process. The browser extension automatically fills the stored username and password on the sites you visit. For example, if you visit the Facebook login page, the plugin automatically enters the Username and Password of your Facebook account. You only need to hit the Sign-in button. Click on the Browser Extension button, and it will take you to the Chrome web store.
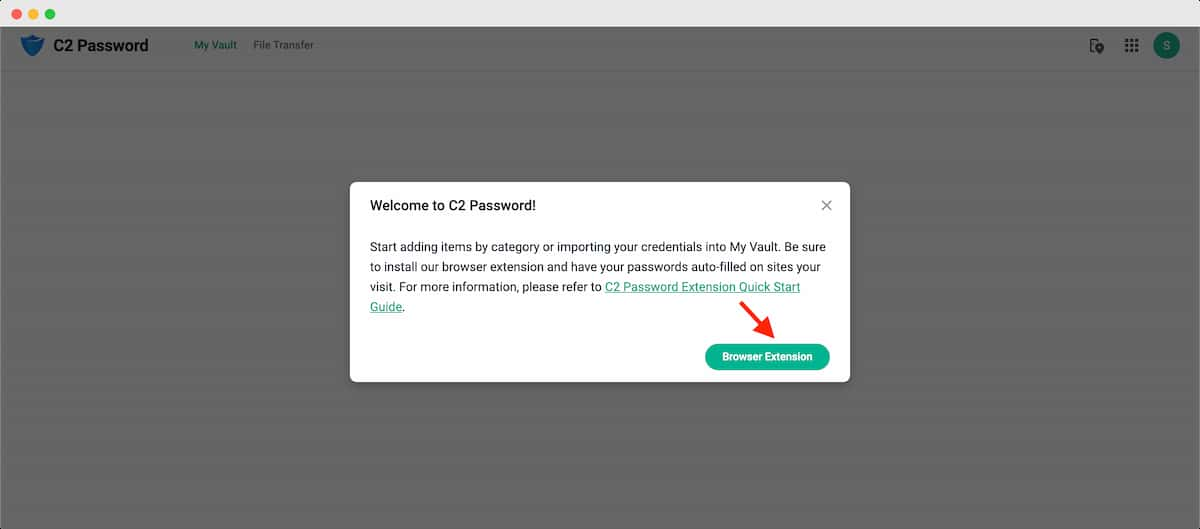
Click here to download the Synology C2 browser extension for Chrome. Click on Add to Chrome and select Add extension from the pop-up. You’ll get a pop-up saying, ‘C2 Password has been added to Chrome’. The process is the same for the Edge browser.

Note: The browser extension is available only for Google Chrome and Microsoft Edge. If you are an Apple Safari or Mozilla Firefox user, you must manually copy and paste the username and password from the C2 Password account.
Setting up Browser Extension
Once you install the C2 Password browser extension, now it’s time to set up the extension.
- Click on the Synology C2 Extension icon.
- Click on Login. You’ll be redirected to the Synology login page.
- Enter the Synology account Username and Password.
- Click on Sign in.
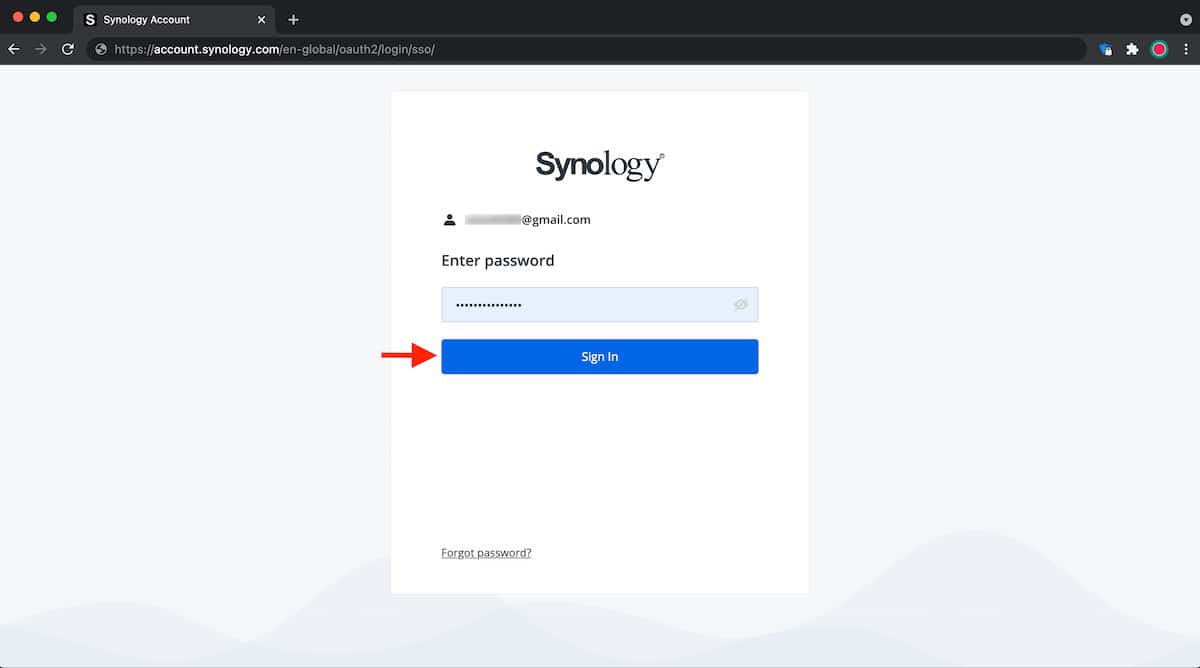
- Once you login, Click on the C2 Password Extension icon again.
- Enter your C2 Encryption Key.
- Click on Unblock.
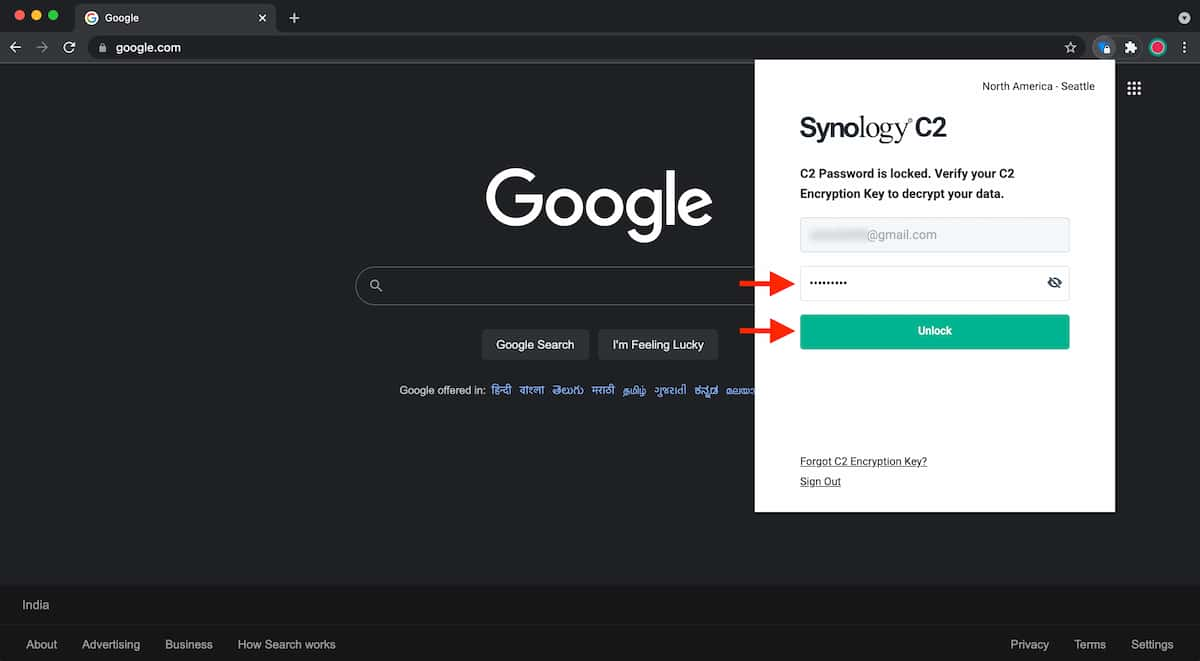
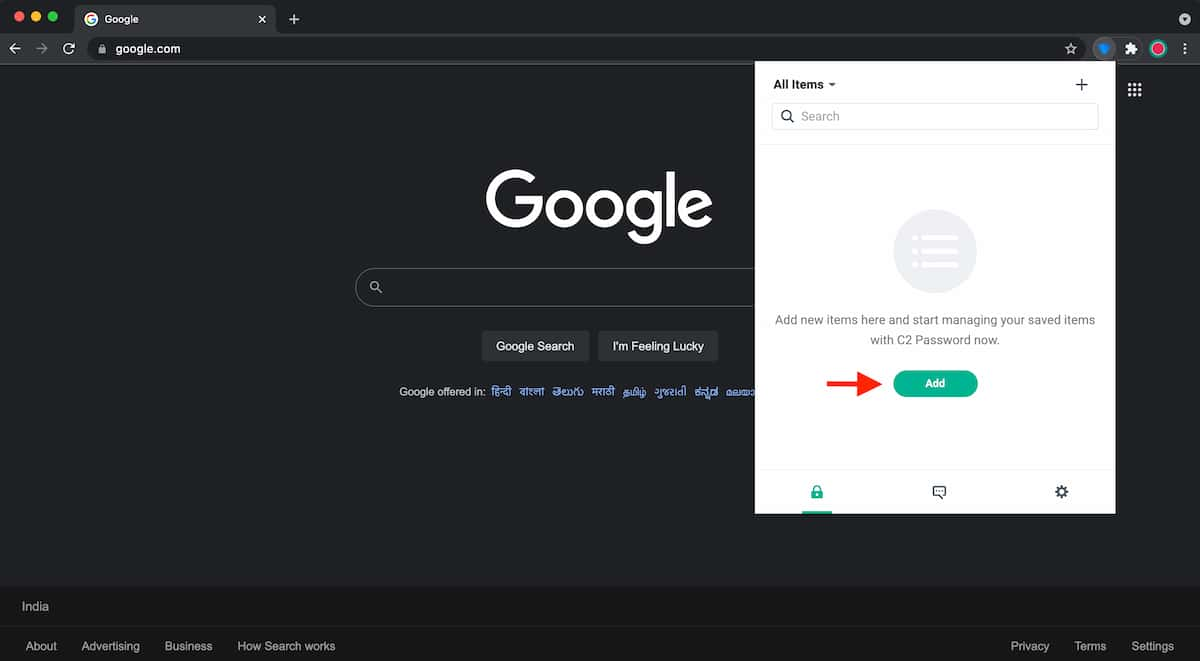
That’s it. This completes the Extension configuration. Now, you need to enter all your account details (Username, Password, Login URL, etc.), such as Gmail, Facebook, and Twitter, etc. in the C2 Password control panel. It’s called My Vault in which all your usernames and passwords are stored. Click on Add button to go to My Vault (Synology C2 Password website).
Adding Passwords to My Vault
Once you finish the Extension setup, it’s time to add all your site data, such as Username, Password, Login URL, etc., to My Vault. To add a new Item:
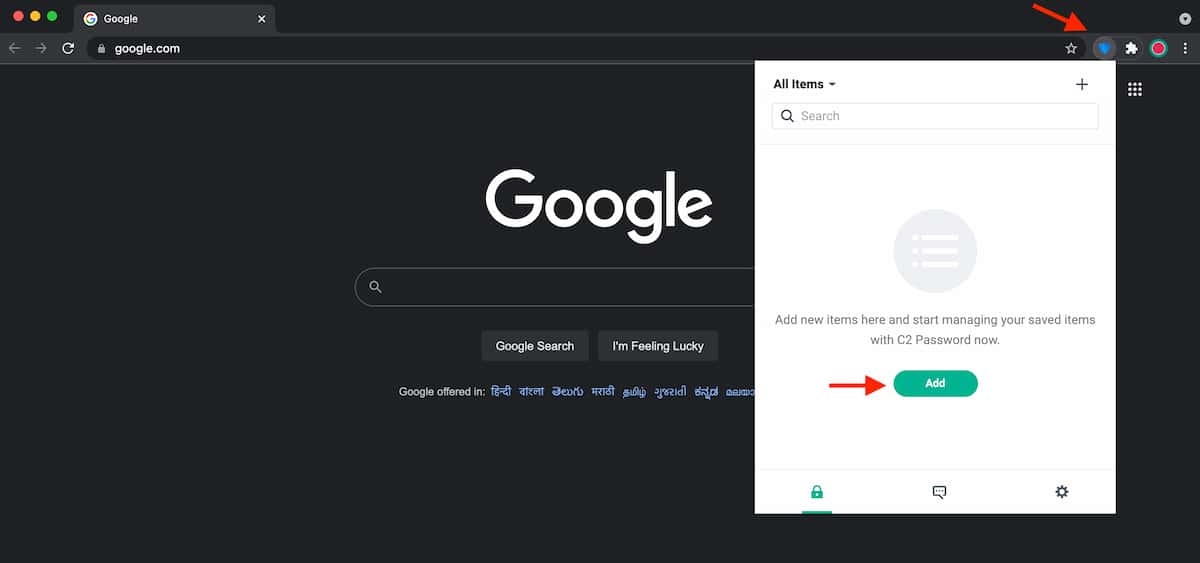
- Click the C2 Password extension icon on Chrome.
- Click on the Add button. It will redirect you to the C2 Password website.
- Enter your current C2 Encryption Key.
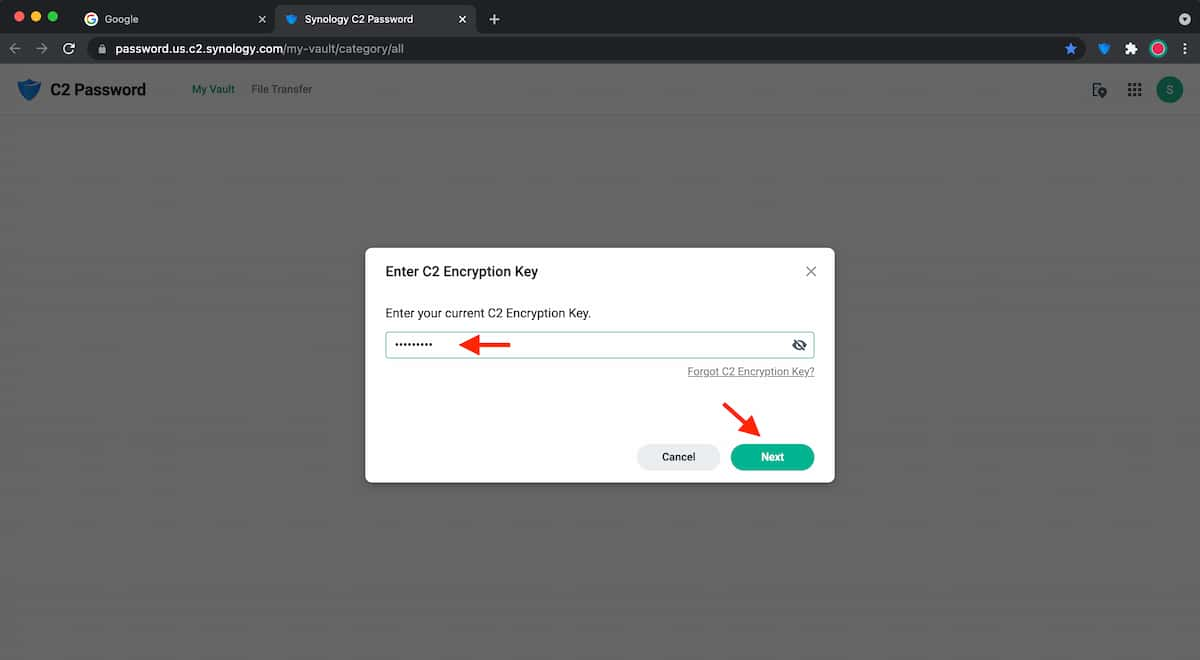
You need to enter the C2 Encryption Key every time while opening the My Vault or adding items to the Vault. Once you enter the C2 Encryption Key, you’ll get access to My Vault. Now, add the items to My Vault. To add:
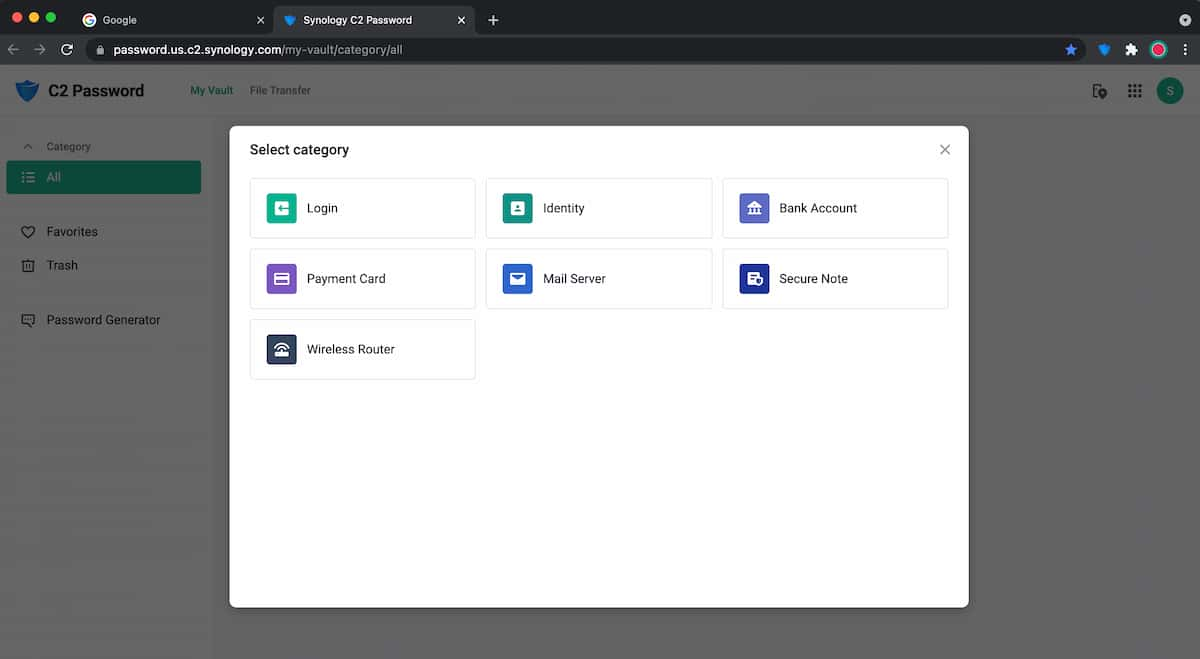
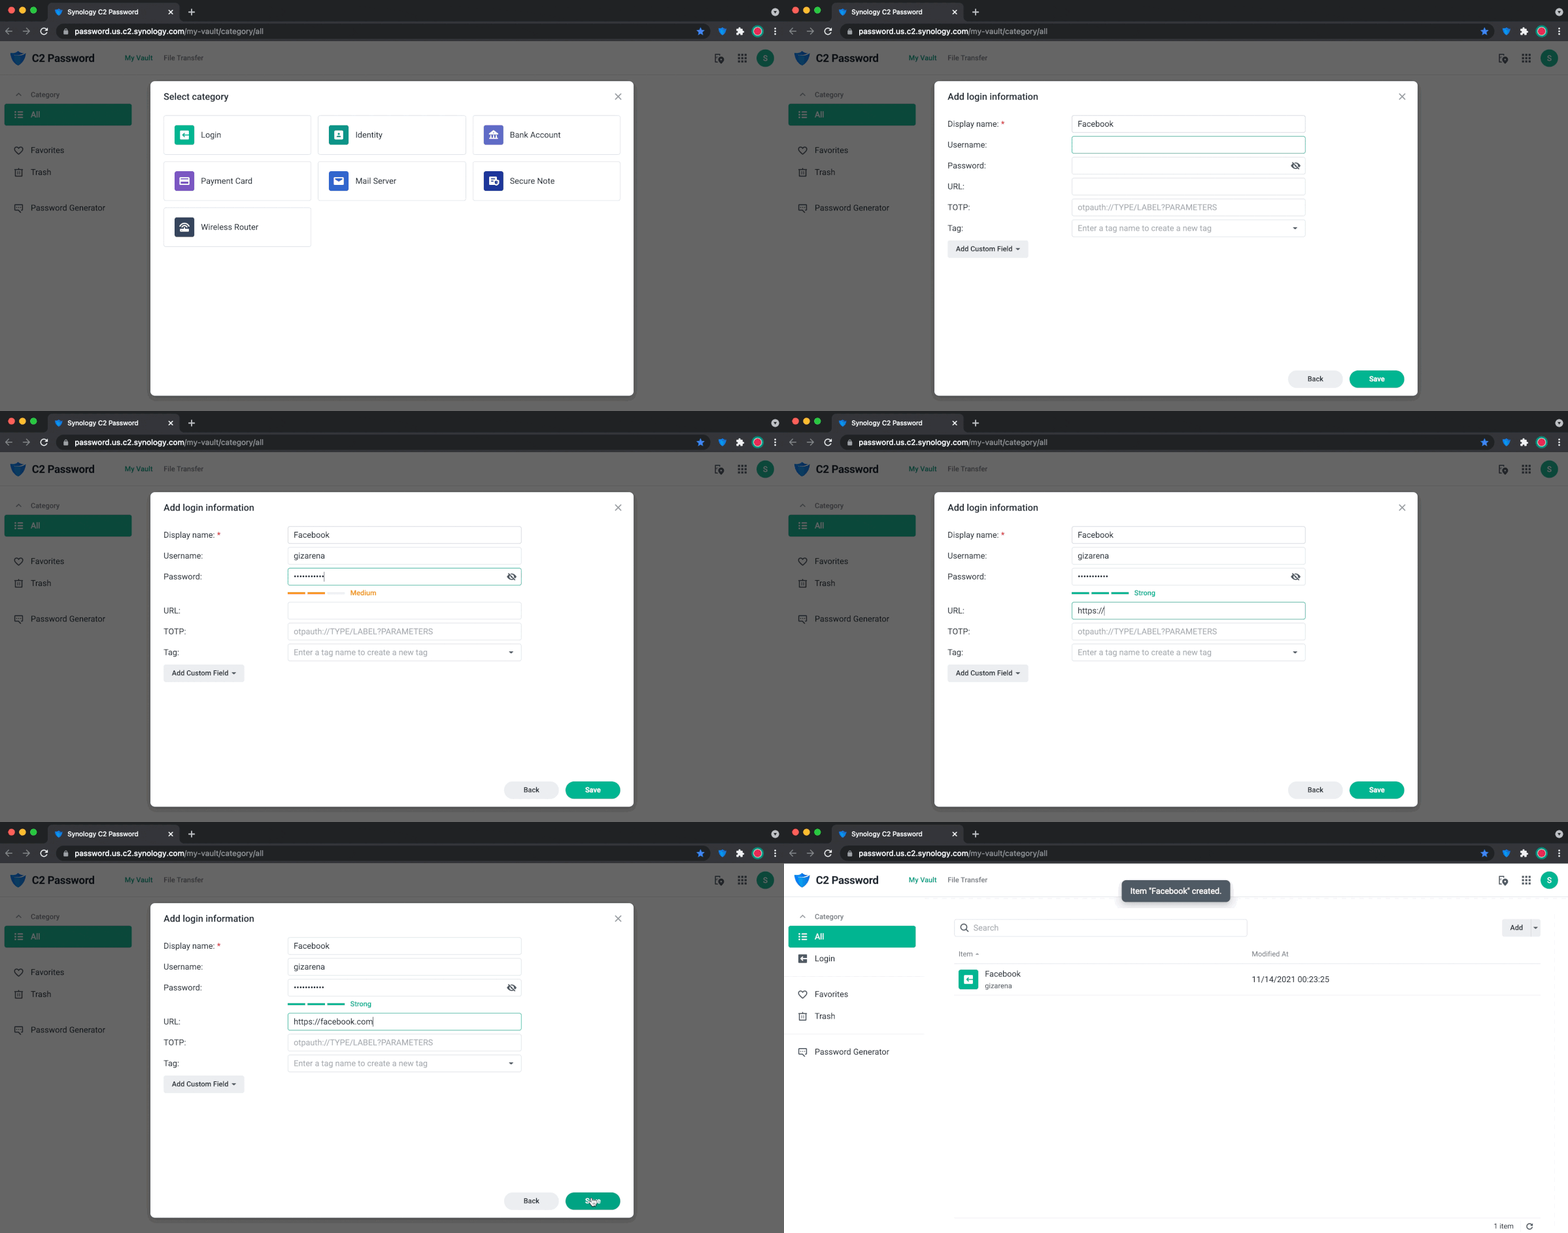
- Click on Add from the home screen.
- Select the item Category. Ex: Login, Bank Account, etc.
- Click on the Login.
- Enter the following details:
- Display name – Name of the website (Ex: Facebook)
- Username – (Name or Email ID)
- Password – (Website password)
- URL – (Website address)
- TOTP (Optional)
- Tag (Optional)
- Click on the Save button
After adding your login details, such as Username, Password, and URL, go to the website and check how the autofill works. Once you enter the Facebook URL in the address bar, the Username and Password field fills automatically. Simply, hit the Log In button, and you’ll get access to your Facebook account. In the password field, the blue color icon indicates that the credentials are filled automatically by the C2 Password extension.
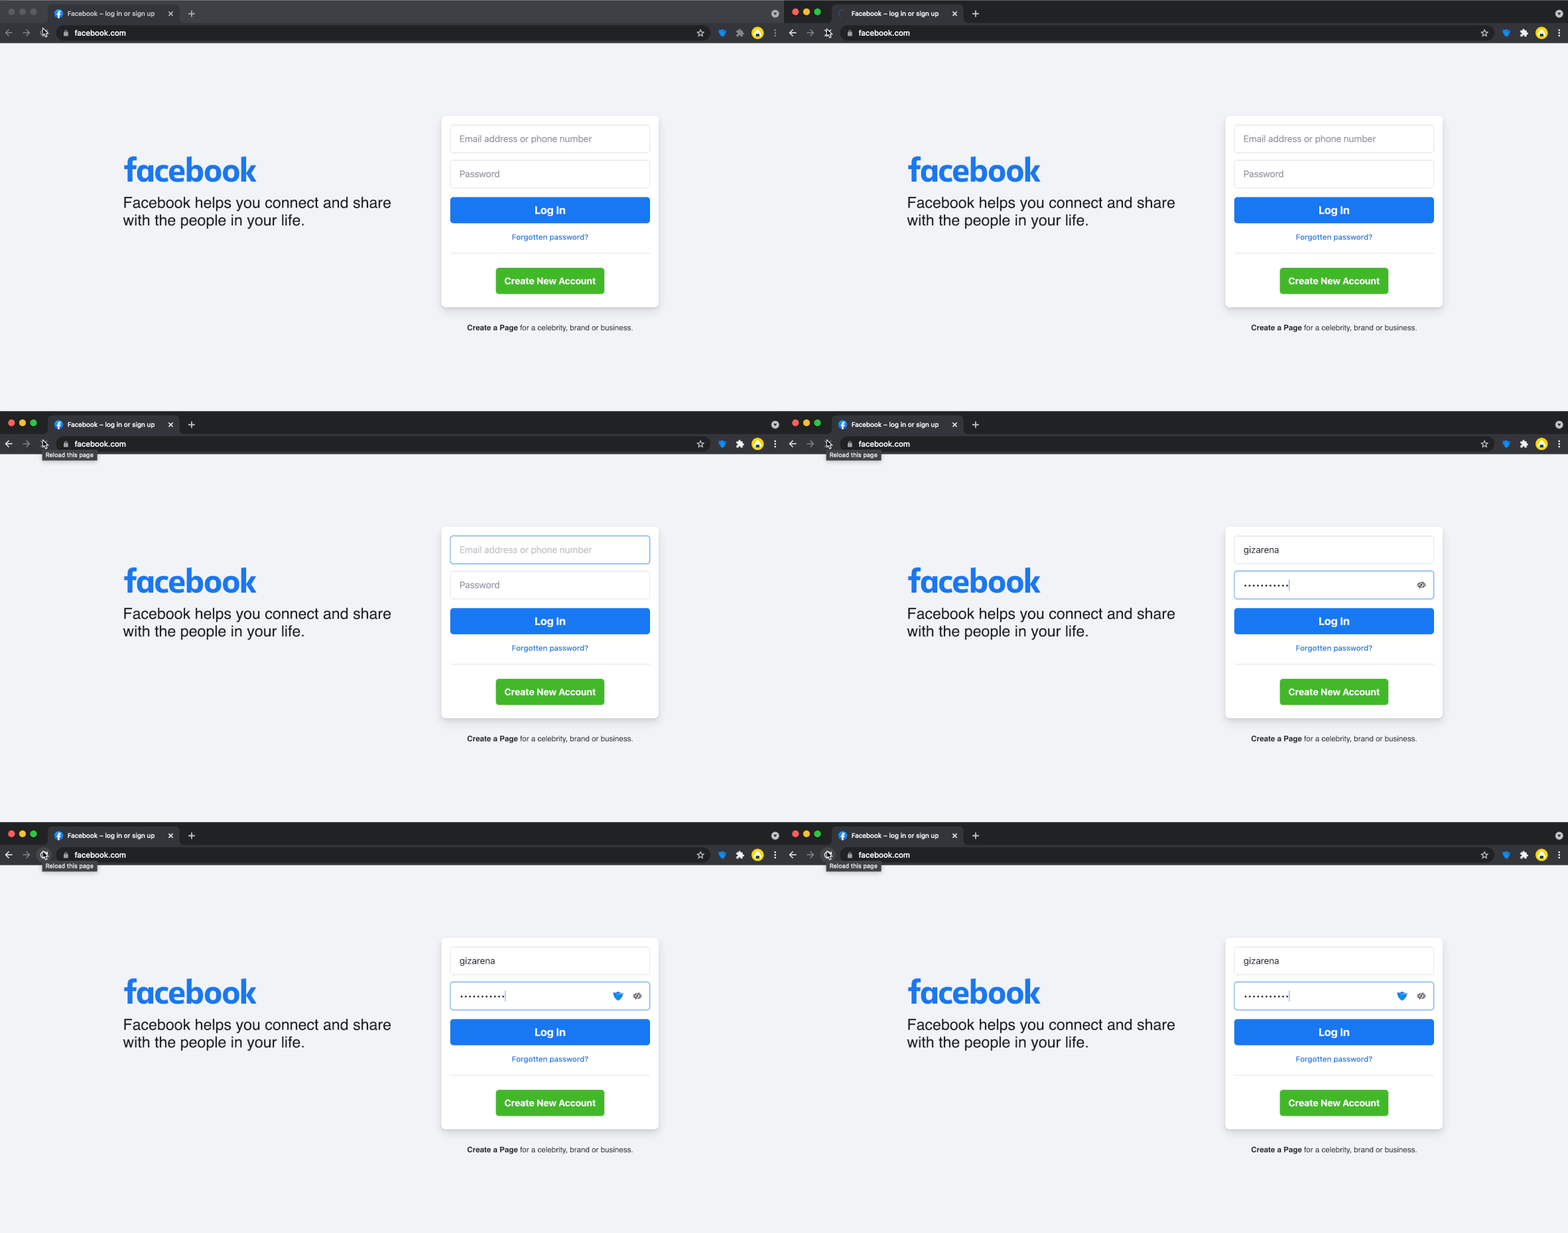
In case if you added multiple Facebook accounts in the My Vault, click on the Username field and select the username from the dropdown, the password field fills automatically. Repeat the process for all other websites like Gmail, Twitter, etc.
Password Generator
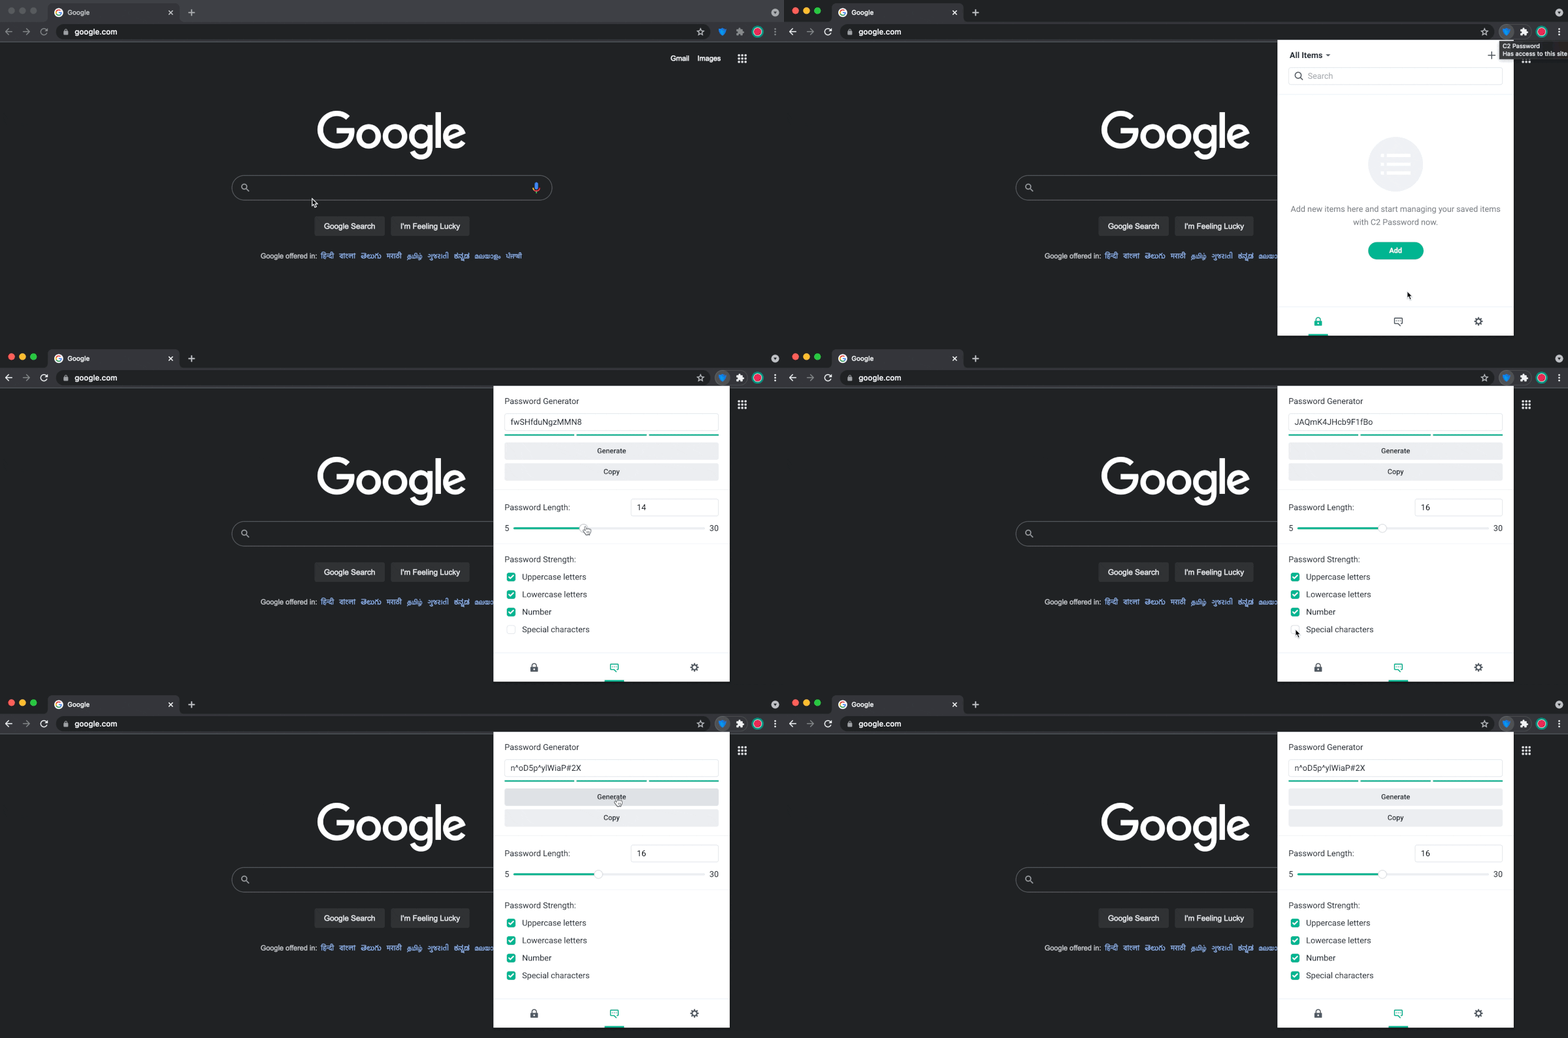
You can also use a built-in Password Generator tool to generate strong passwords to increase your account security. This tool is built into the C2 Password browser extension and you can easily select the password length and strength based on your requirements. To access the password generator:
- Click the C2 Password extension icon on Chrome
- Click on the Password Generator
- Adjust the Password Length by adjusting the slider
- Set the Password Strength
- Lowercase letters
- Uppercase letters
- Numbers
- Special characters
- Click Generate to generate a random password
- Click Copy to copy the generated password
Advanced Extension Settings
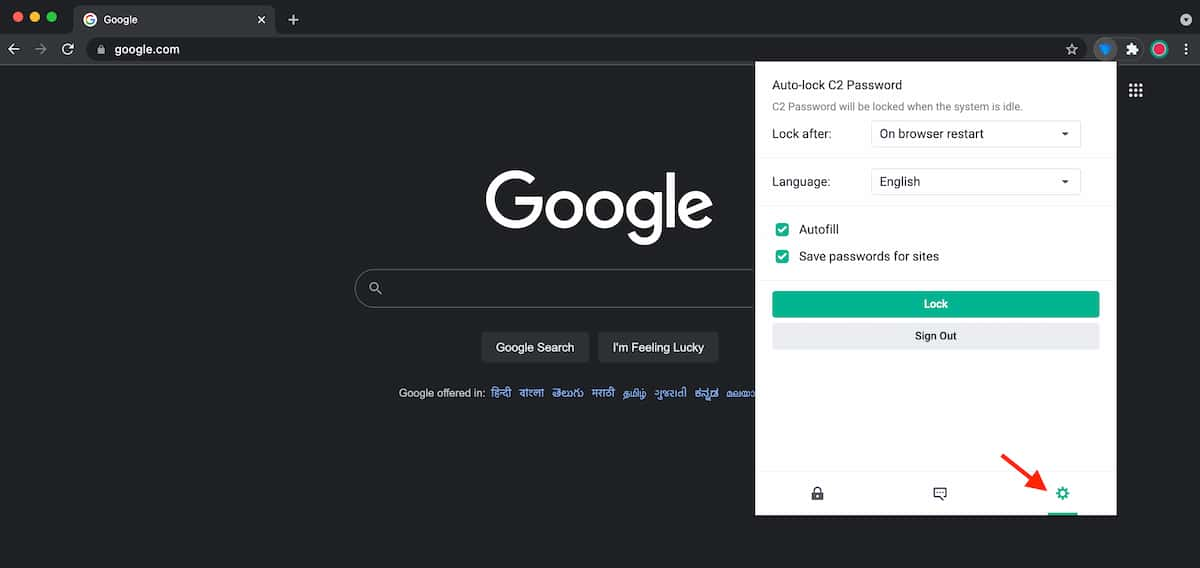
The extension also includes a few advanced settings such as Auto-lock, Autofill, etc. These settings can be directly charged from the Extension settings without navigation to the C2 Password control panel. To change advanced settings:
- Click the C2 Password extension icon on Chrome.
- Click on the Settings icon and modify the settings as per your requirements.
- Auto-lock: Set extension idle time for the extension to be locked. The idle time starts when the extension pop-up is closed. Once the extension is locked, you must re-enter your C2 Encryption Key to access it again.
- Autofill: Offer to show login items in a dropdown list at a login screen to autofill username and password. The default option is set to ON.
- Change language: Select your preferred language.
- Lock now: Lock the C2 Password extension right away.
- Sign out: Sign out from the current Synology Account.
Auto Save Passwords
This option allows you to save passwords for new or unsaved websites in the My Vault. When you sign into a website for which C2 Password does not have a corresponding login item, the C2 password extension will offer to remember the information for you.
- Open a website (Ex: Twitter.com).
- Enter your Username and Password in the respective field.
- The Save in C2 Password option will be displayed in the dropdown field when you enter your password.
- Click the Save in C2 Password option to open the pop-up interface.
- You may change the username and password shown in the pop-up.
- Click Save to save the username, password, and URL as a new login item in your C2 Password (My Vault).
Update an Existing Password
When you sign in to a website for which the Username and Password are already stored in the My Vault, but the password entered does not match (Ex: Recent password reset). In such cases, the C2 Password extension will offer to update the information. If the password doesn’t match, the Save in C2 Password option will be displayed in the dropdown field when you enter your password. Click the Save in C2 Password option to open the pop-up interface and Click on the Update button to update the password to the existing login item in your C2 Password.
Note: Your stored data will be available in the C2 Password account for as long as your account remains active. Your content will only be removed if your account has been deemed inactive for more than 365 days. Also, the system will keep your deleted items in the Trash for a maximum of 365 days.
Import Data from Other Password Managers
One of the key highlights of C2 Password Manager is the ability to import data from other service providers such as Google Password Manager, Microsoft Edge, 1Password, etc. C2 Password allows you to import passwords from other providers using a CSV file. If you already use Google Password Manager, you can easily import all your passwords from your Google account to your Synology C2 password account in less than 5 minutes. Check out this detailed tutorial to import all passwords from Google Password Manager to Synology C2 password account.
C2 Password File Transfer
Apart from password management, the C2 Password also includes a useful feature called File Transfer that allows you to share files securely with others. The File Transfer service uses end-to-end encryption to ensure that only the file owner has full control over the data, and also the server has no way to acquire knowledge of the content.
Once you upload a file and share the link with others, the receiver must authenticate the link to download the files. Apart from that, you can add text or image watermarks, or allow them to be downloaded only once. Follow the guide to transfer your files securely.
- Login to C2 Password account.
- Enter the C2 Encryption key.
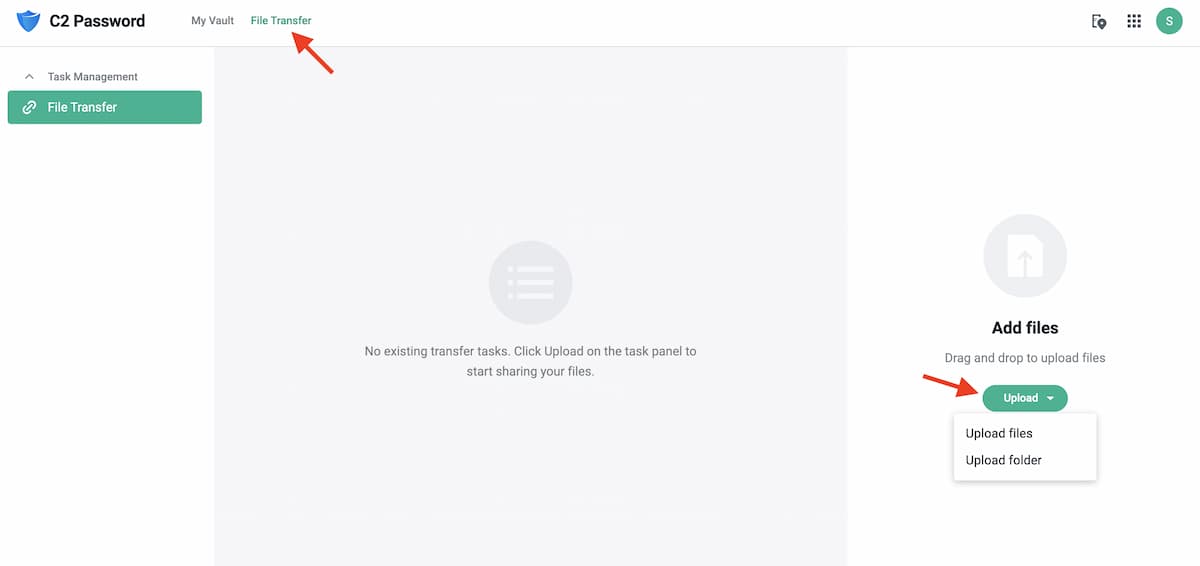
- Click on File Transfer on the menu bar.
- Then, Click on Upload. If you want to send multiple files, select Upload files. You can also send an entire folder by selecting the Upload folder option.
- Select the files you want to send.
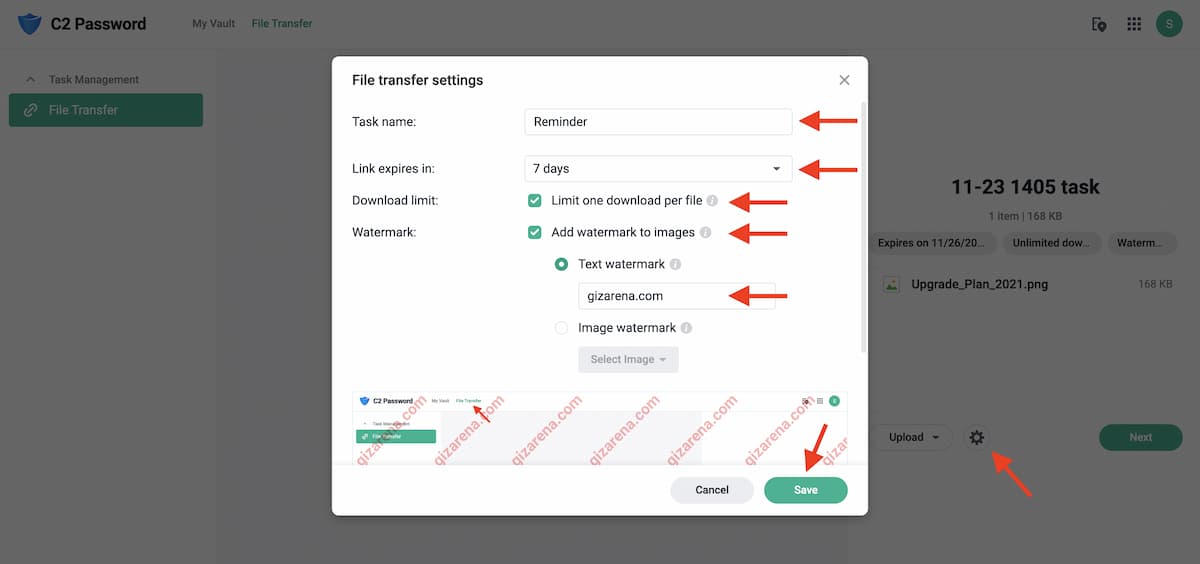
- Once you select the files or folder, click on the Settings icon, as shown in the image below.
- Change the File transfer settings as per your requirements.
- Task name: Enter any name for your reference.
- Link expires in: Task links can be set to expire in 30 minutes, 3 hours, 24 hours, 72 hours, 7 days, etc. Once expired, transferred files are no longer accessible to anyone with the link.
- Download limit: Once enabled, each file can only be downloaded once. This improves security.
- Watermark: Select Text watermark and enter the text (up to 30 characters) in the input field provided or upload an image (.jpg, .jpeg, or .png. ) to use as a watermark. The file size must not exceed 100 MB.
- Click on Save.
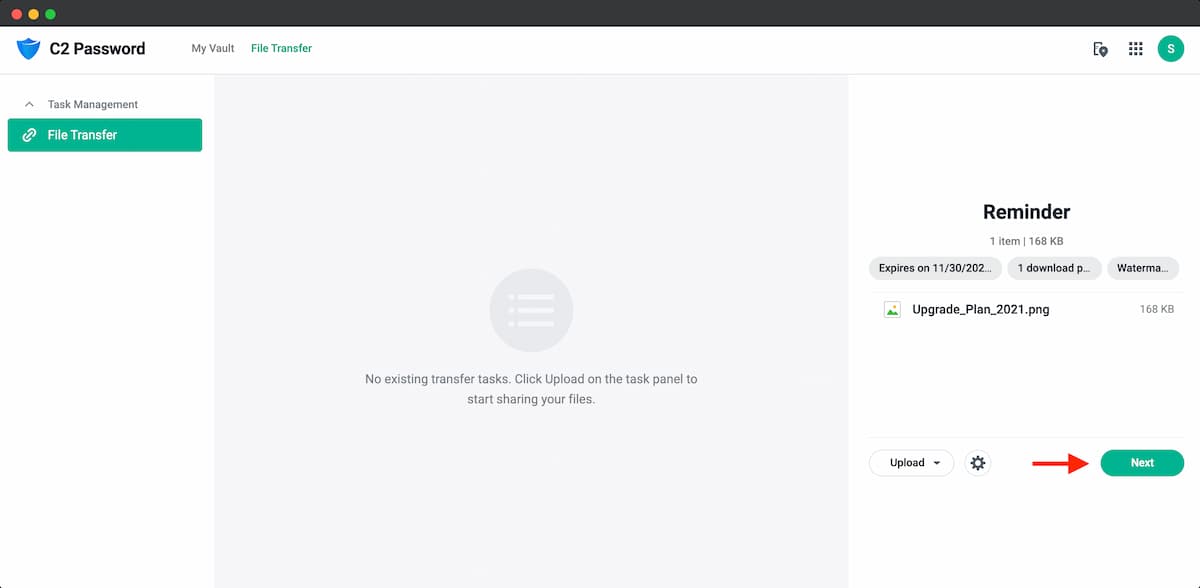
Once you save the settings, click on the Next button.
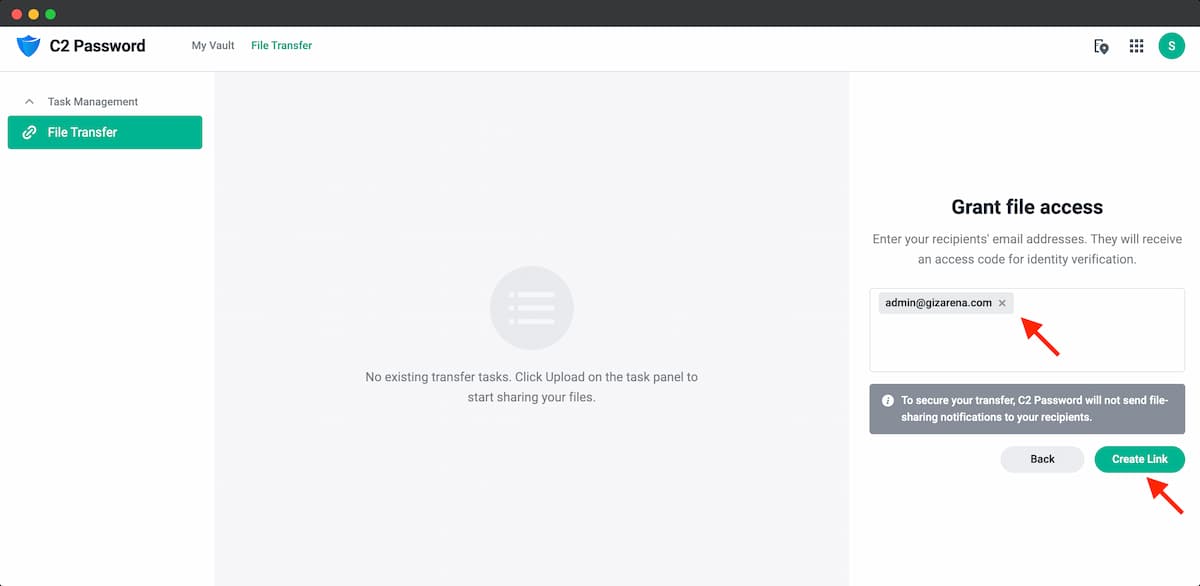
In the next step, you need to choose to verify by email (or phone in select countries). A recipient must enter the verification code sent to their email (or phone) to access the content. Here I’ve entered the email id as admin@gizarena.com. Click on Create Link to continue. Upon clicking Create Link, selected files will be encrypted and uploaded to Synology’s server.
Once your transfer link is created, click on the Copy icon to copy the link. You can also click on the Mail icon to redirect to your default mail client or click on the QR code icon to generate the QR code. Make a note that C2 Password will not send file-sharing notifications to them. For security purposes, you must manually send the link to your recipients. Now, share the copied link through email, WhatsApp, or any other medium as per your requirement.

Receiving Files
C2 Password allows the receiver to access the link or download the files without a Synology account. Once you share the link:
- The receiver needs to click on the link sent by you.
- Enter email address.
- Click Send Access Code and wait for the access code to be delivered. In this tutorial, I have added the recipient’s email as admin@gizarena.com. So the receiver needs to enter the same email address (as entered by the sender) to get the Access code. The access code will be sent e-mail ID immediately.

- Copy the access code received in the email.
- Enter the code in the verification window. Each access code is valid for 300 seconds. If you don’t receive the code or the code is expired, click on the Resend link to get the new code.

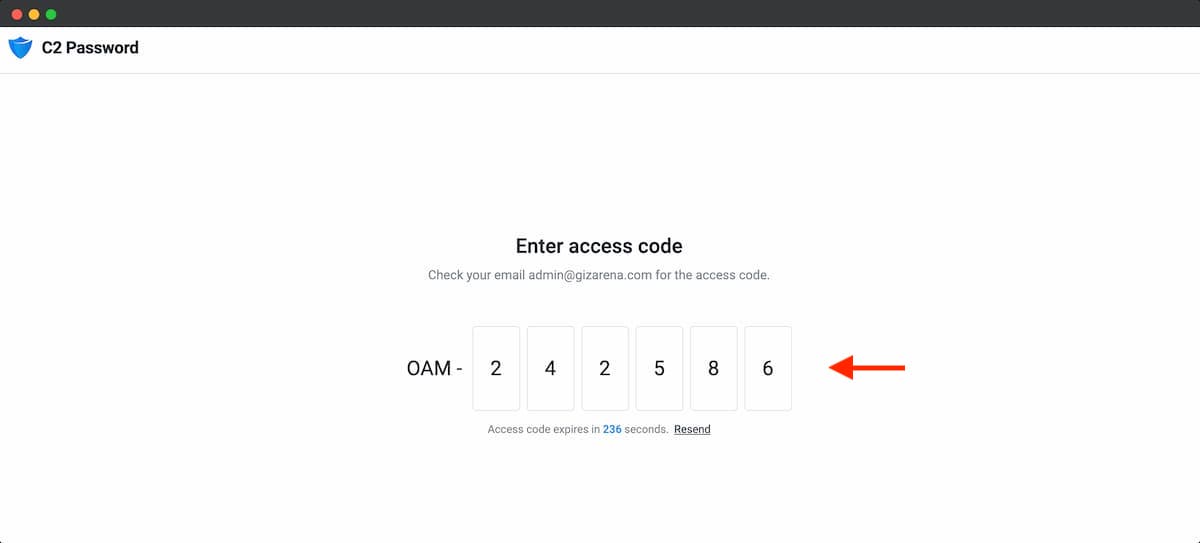
- Once the code is verified, you will see a list of your files.
- Hover over a file to preview or download the file.
- If the task includes multiple files, click on the Download All button to download all files at the same time. These files will be merged into a single .zip file downloaded to your browser’s default download location. If the sender sets the option as ‘Limit one download per file,’. The file cannot be previewed or downloaded and becomes inaccessible once the first-time download completes.
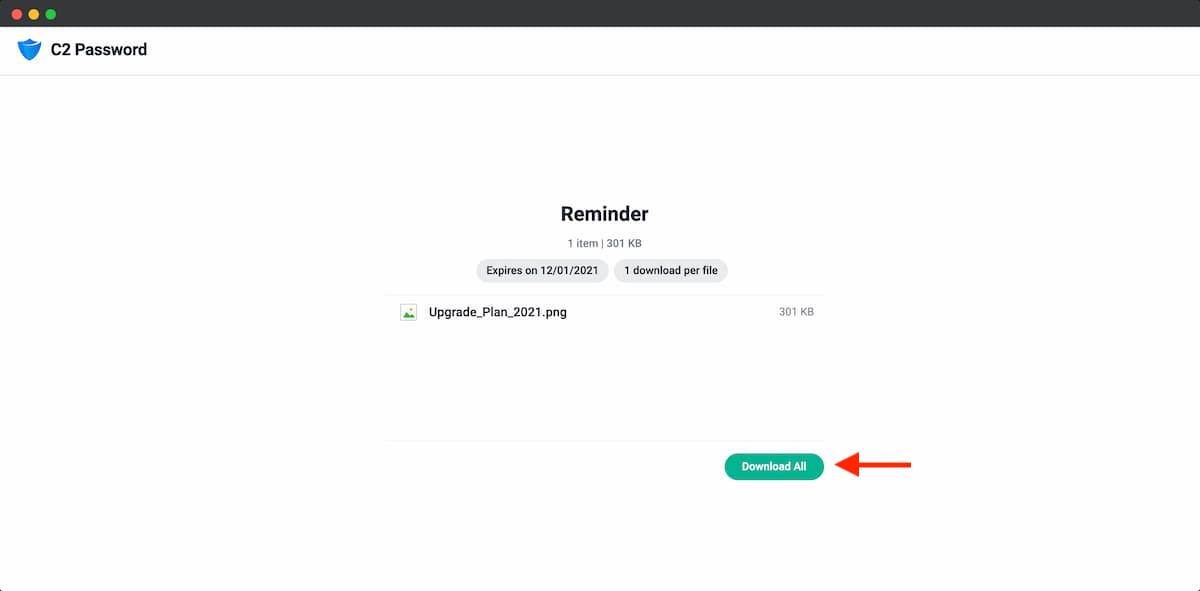
Note: The maximum number of transfers allowed in the Free plan is 1, and the Maximum upload size is 100MB. So, if you want to send another file or send files larger than 100MB, you need to delete the previous transfer or use Synology’s dedicated C2 Transfer service.
That’s a wrap. If you have any questions, do let me know in the comment section. Follow GizArena on Facebook and Twitter for the latest tech updates.