In June, Synology introduced a fresh product line named Bee, marking its entry with the release of the inaugural product, BeeDrive {review). This solid-state drive (SSD) is designed to seamlessly handle all backup requirements for PCs, laptops, and mobile devices, accompanied by a dedicated app for efficient data management. Expanding this innovative lineup, Synology has now unveiled the BeeStation, a device that enables you to store and access photos and documents from your phone or PC, providing the flexibility to retrieve them from any location worldwide.
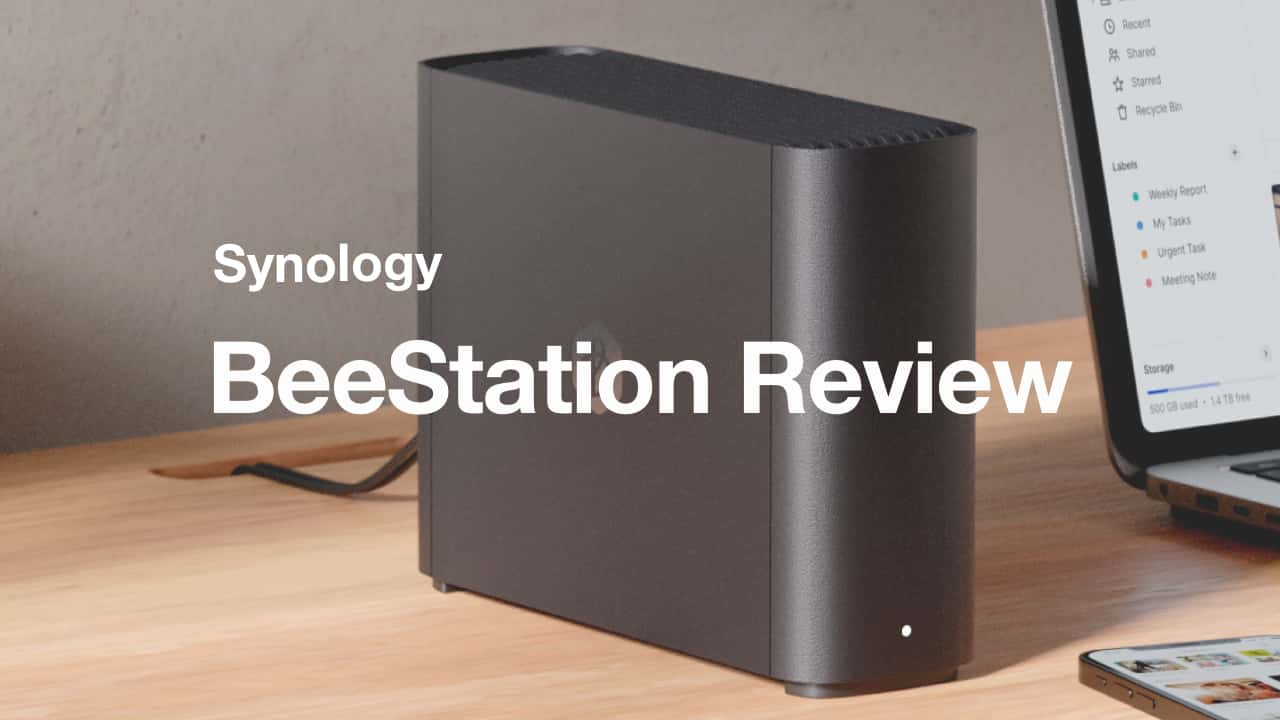
The BeeStation works Similar to platforms like Google Drive, Google Photos, iCloud, OneDrive, etc. Your backed-up data will be securely stored in the Synology BeeStation, and you can conveniently access it from both your phone and PC through Synology’s dedicated apps or a web interface. I have been using the device for a couple of weeks now and have compiled my detailed review below.
Synology BeeStation Specifications
| Model Number | BST7150-4 |
| Capacity | 4TB |
| File System | Btrfs |
| Processor | Realtek RTD1618B Quad-core 1.7 GHz |
| RAM | 1GB DDR4 |
| Ports | 1 x USB-A 3.2 Gen 1 1 x LAN Port (1GbE) 1 x USB-C 3.2 Gen 1 Power Port |
| Buttons | Power Button Reset Button |
| Speed | Up to 1050MB/s |
| PC Requirements | Windows 10 64-bit (build 17063 or above) Windows 11 macOS 12.3 or above |
| Supported Browsers | Google Chrome Mozilla Firefox Microsoft Edge Apple Safari 14 and above |
| Mobile Requirements | iOS 15 or above Android 8 or above |
| Network Protocols | DHCP, Static IP |
| Dimensions | 148.0 x 62.6 x 196.3 mm |
| Weight | 802g |
| Operating Temperature | 0°C to 35°C |
| Storage Temperature | -20°C to 60°C |
| Certifications | FCC, CE, BSMI, RCM, EAC, UKCA, KC, VCCI |
| Environmental Safety | RoHS |
| Warranty | 3-years |
| Country of Origin | Made in Taiwan |
In the Box
- BeeStation
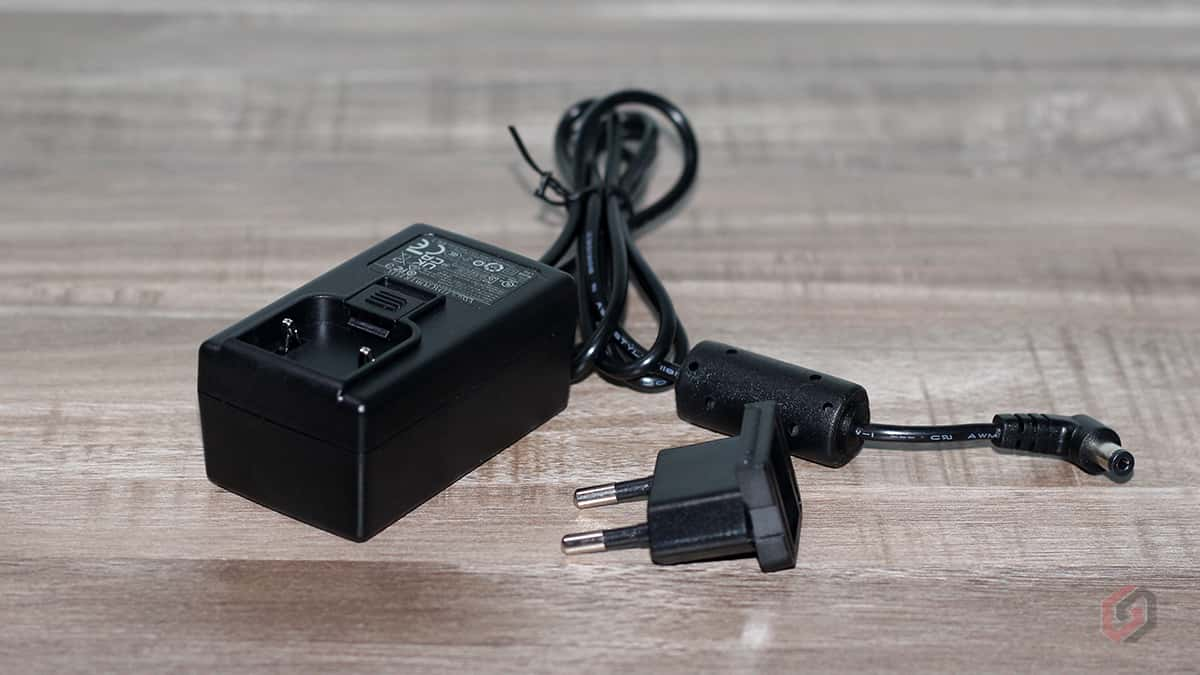
- Power Adapter
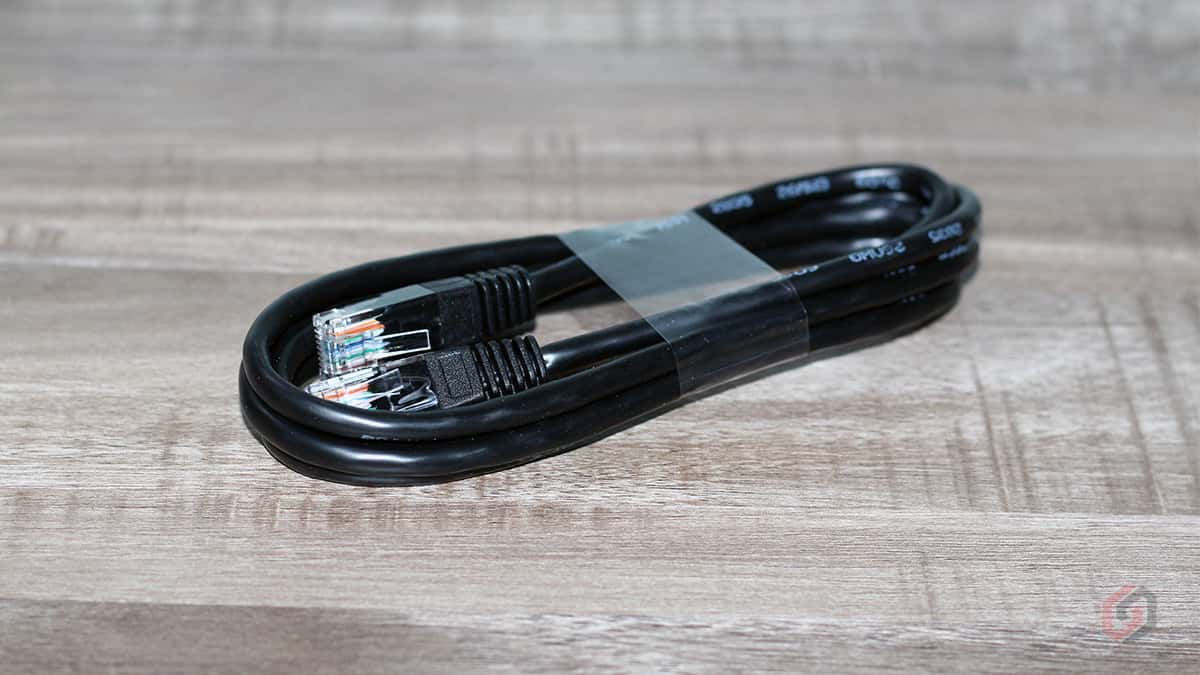
- RJ-45 Cable
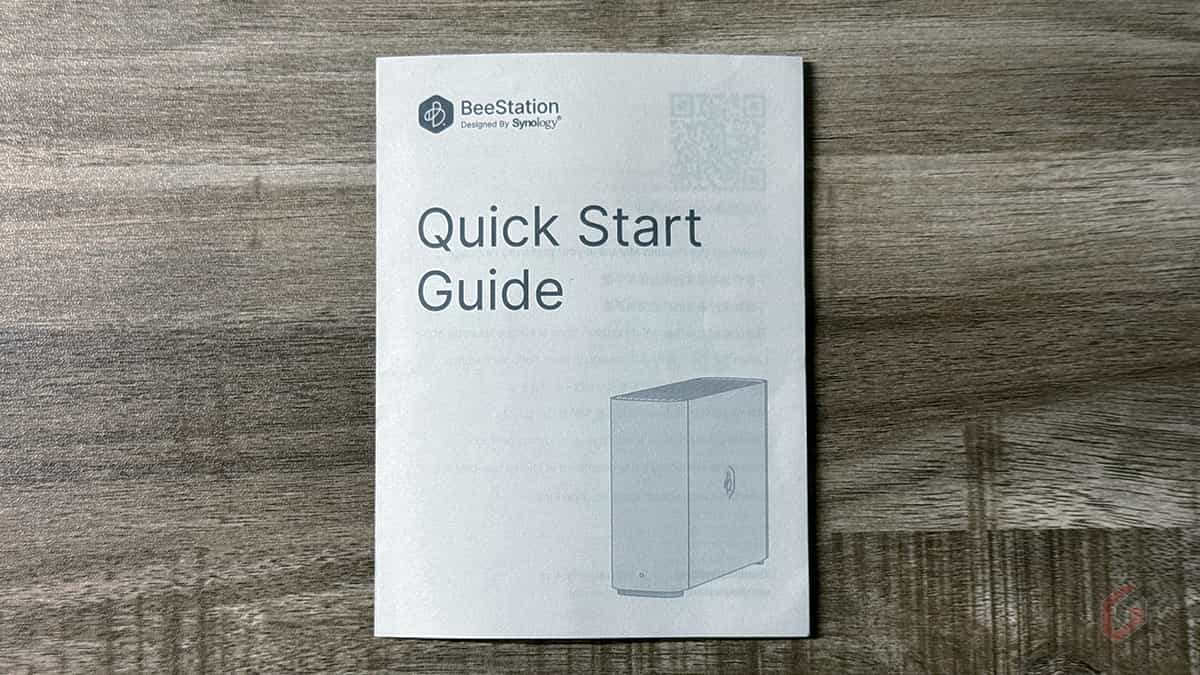
- User Manual
Synology BeeStation Design
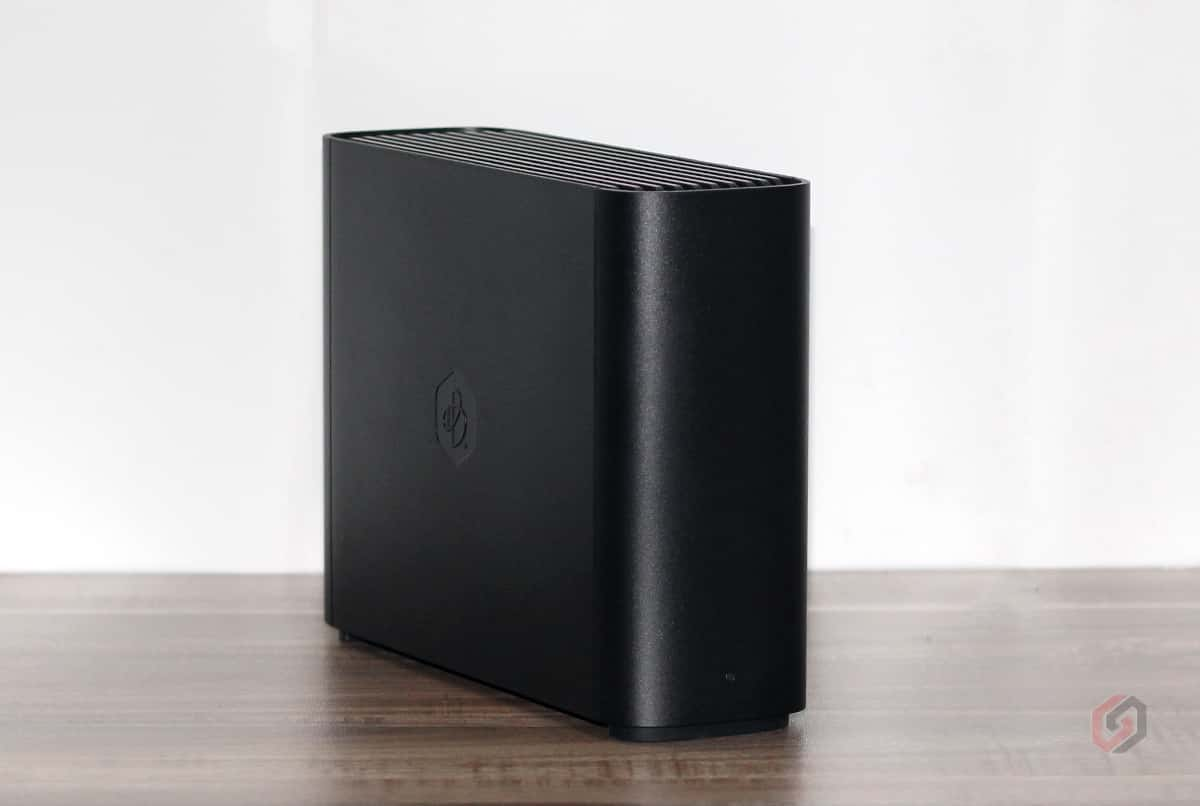
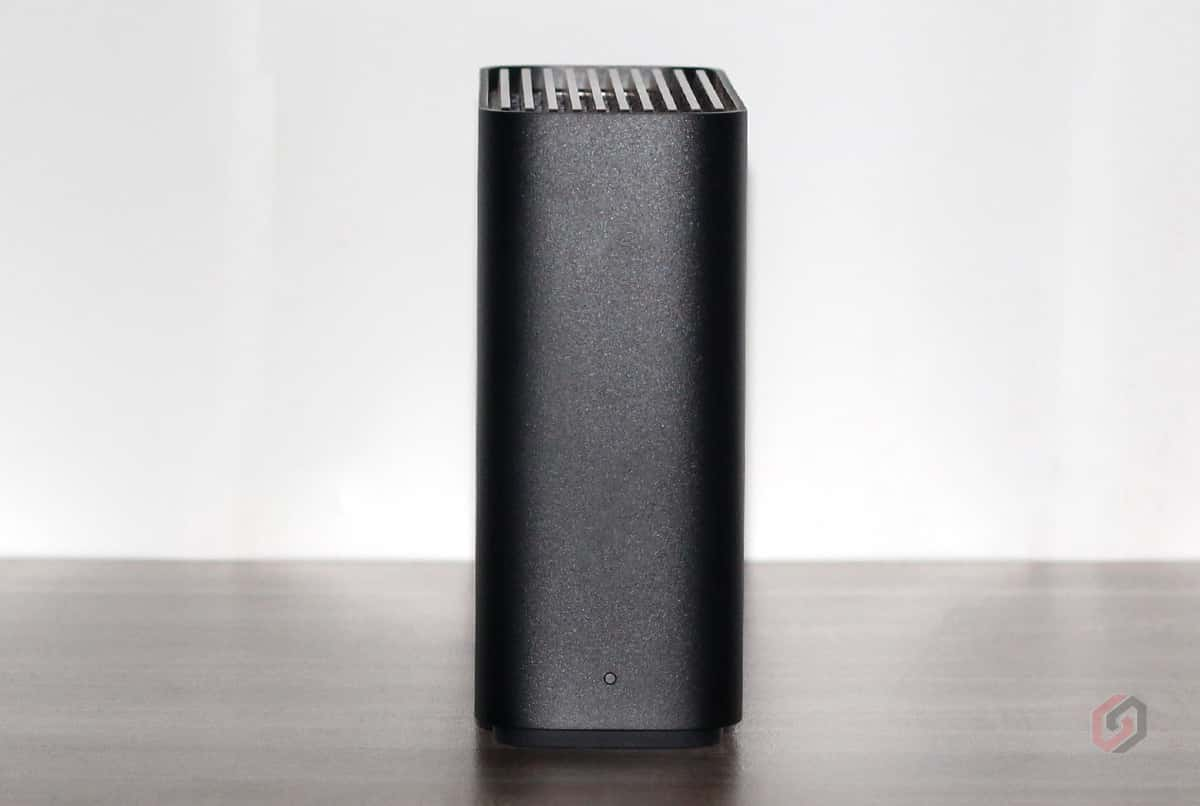
The Synology BeeStation features the classic Synology aesthetic, constructed from premium plastic with a matte texture. The front panel is equipped with an LED indicator to display the device’s status. The BeeStation is elegantly designed to stand upright on a flat surface, supported by rubber feet at the bottom that secures it firmly on a table. While the device is prone to attracting fingerprints, it can be effortlessly wiped off, maintaining the sleek and clean appearance of the device.
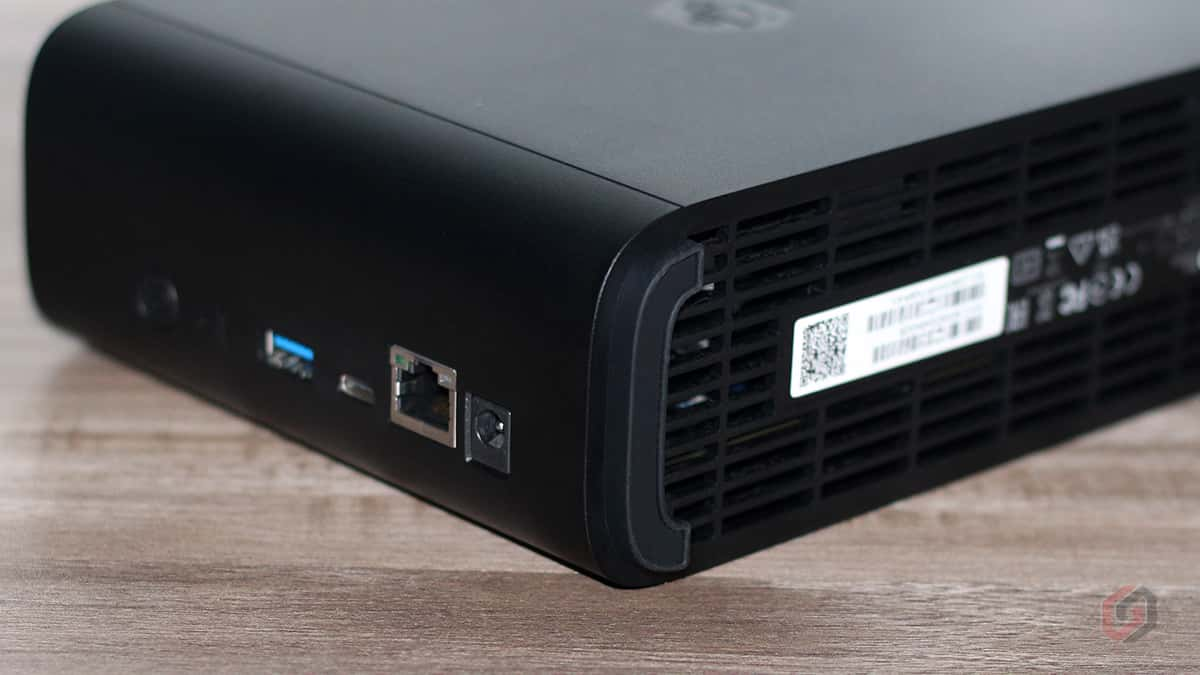
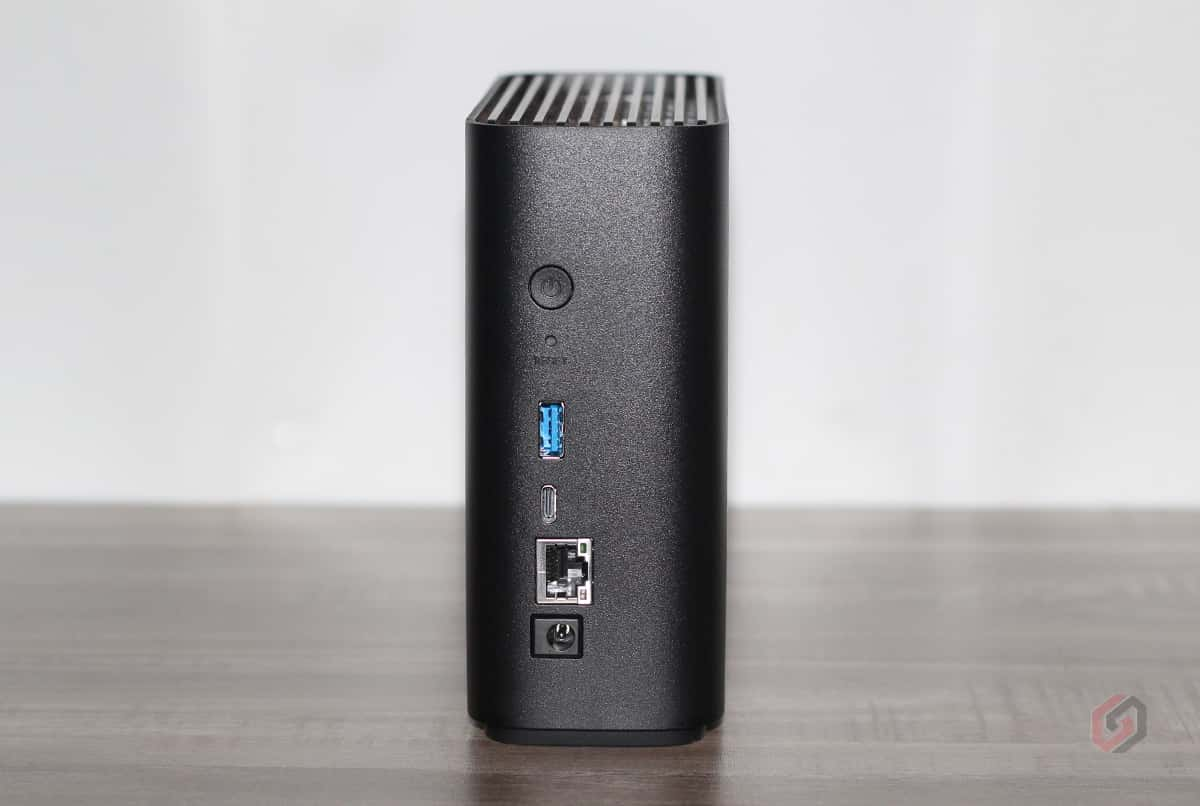
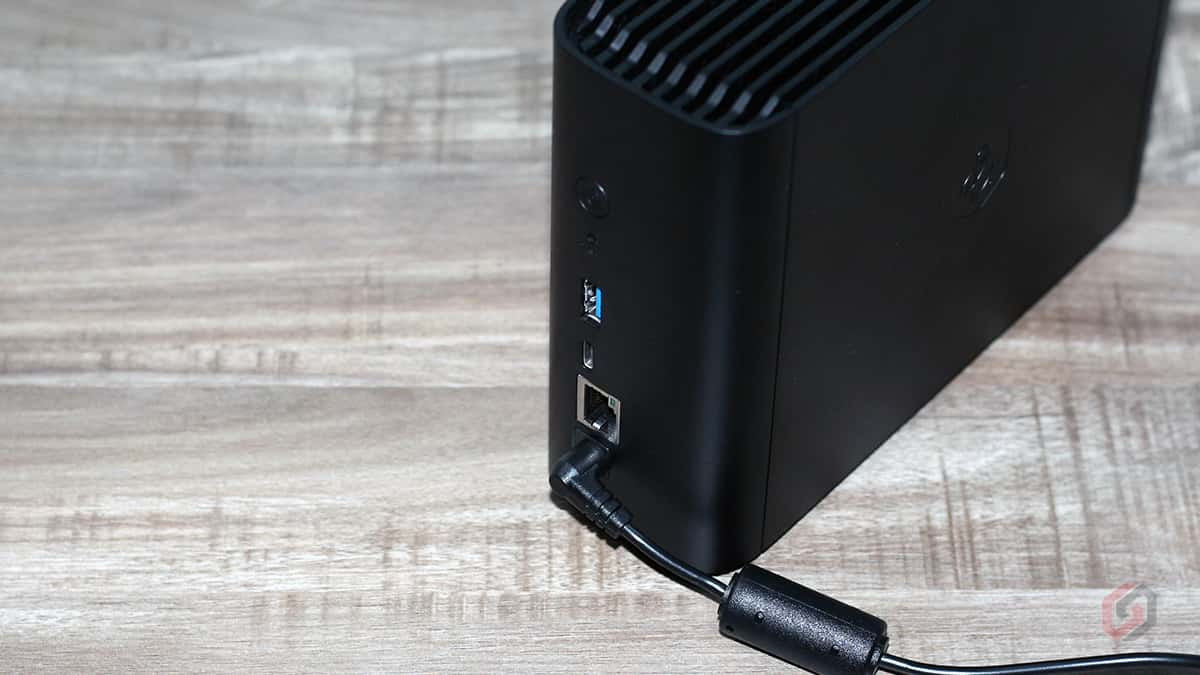
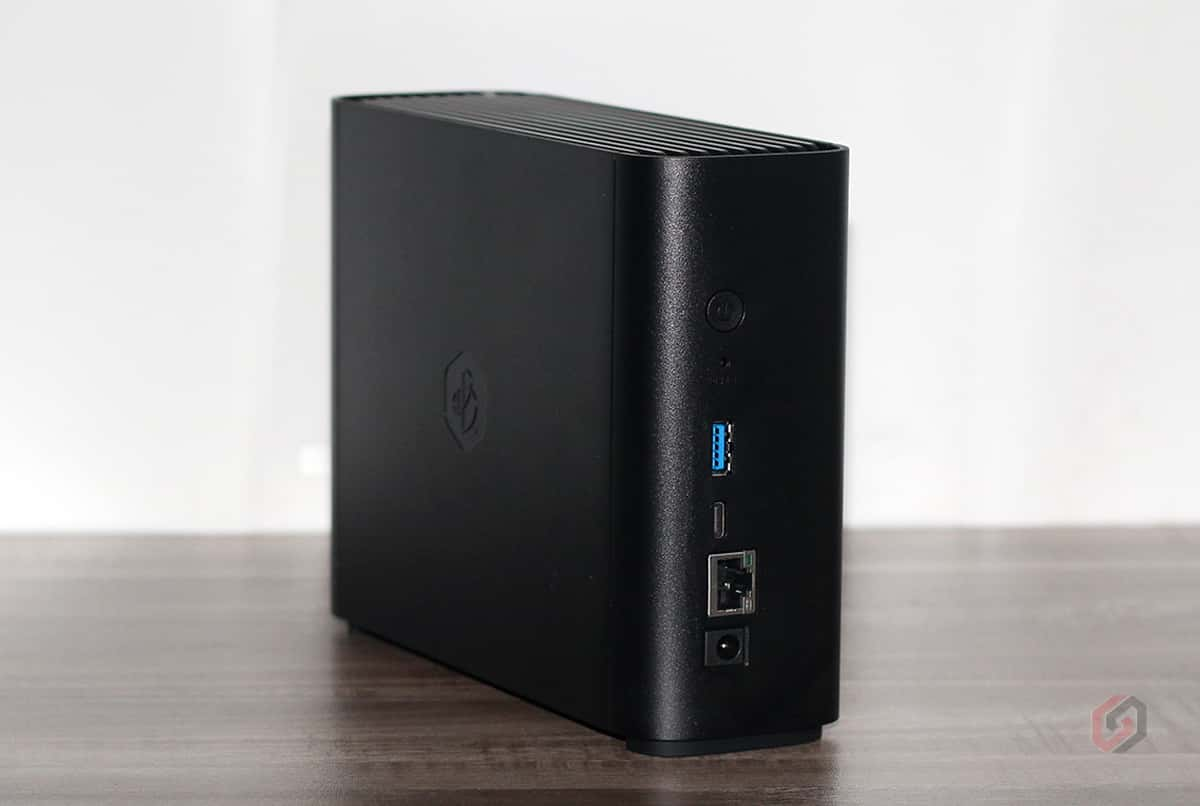
On the rear, BeeStation houses a variety of connections, including a Power button, a power button, a reset button, a USB-A 3.2 Gen 1 port, a USB-C 3.2 Gen 1 port, a 1GbE LAN port, and a power port, all aligned vertically. Both USB-C / USB-A ports allow you to connect external drives effortlessly. Whether it’s your BeeDrive connected directly to the USB-C port or a USB-A Flash drive to the USB-A port, this eliminates the need for adapters and simplifies the connectivity process. Both ports are Gen 1 and support speeds up to 5Gbps.
The BeeStation is powered by the Realtek RTD1619B CPU, complemented by 1GB of DDR4 RAM, a configuration reminiscent of Synology’s entry-level NAS models such as the DS124. Weighing approximately 183 grams, the BeeStation boasts a fan-less design.
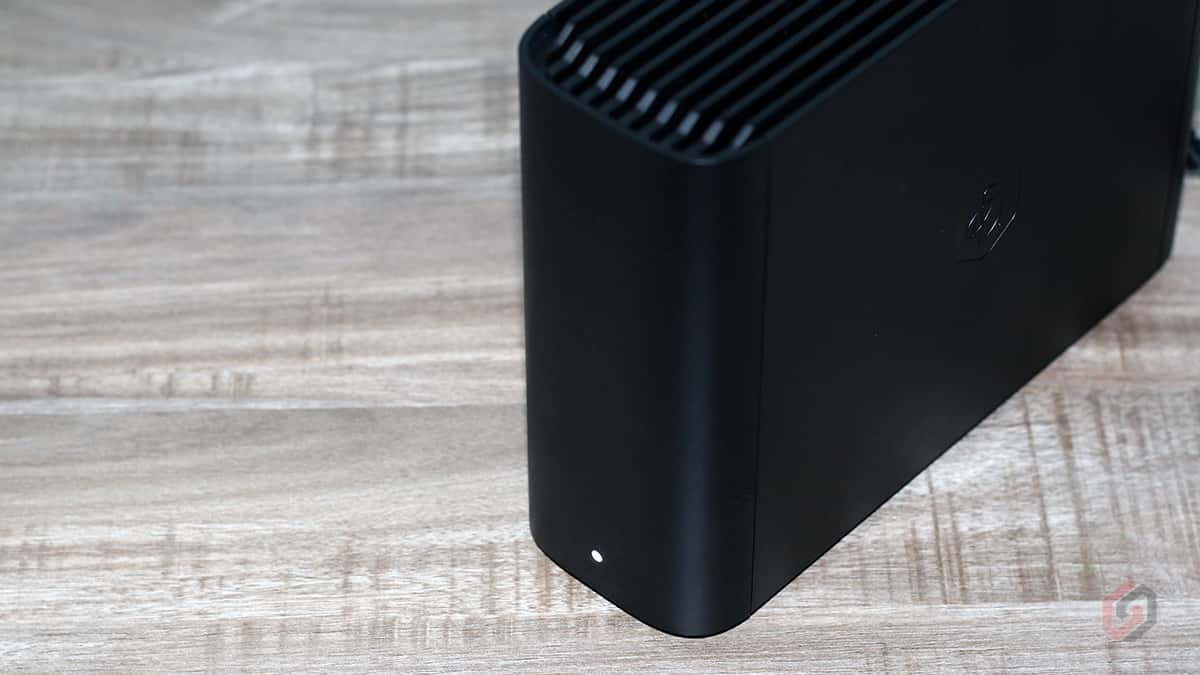
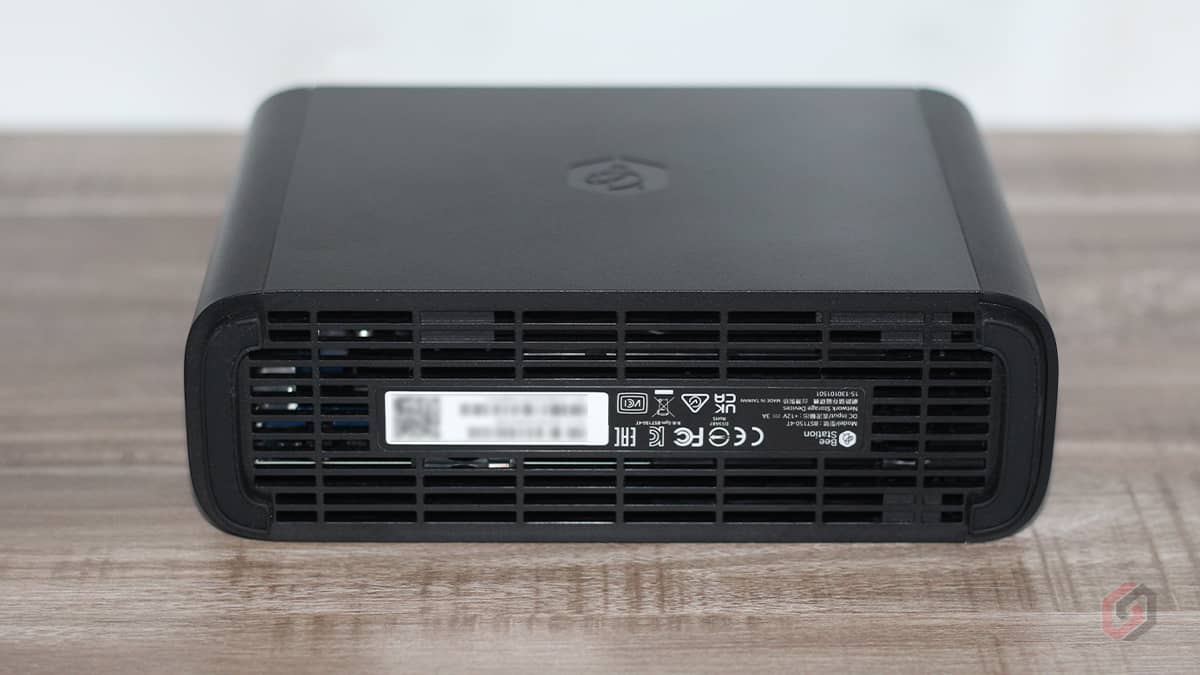
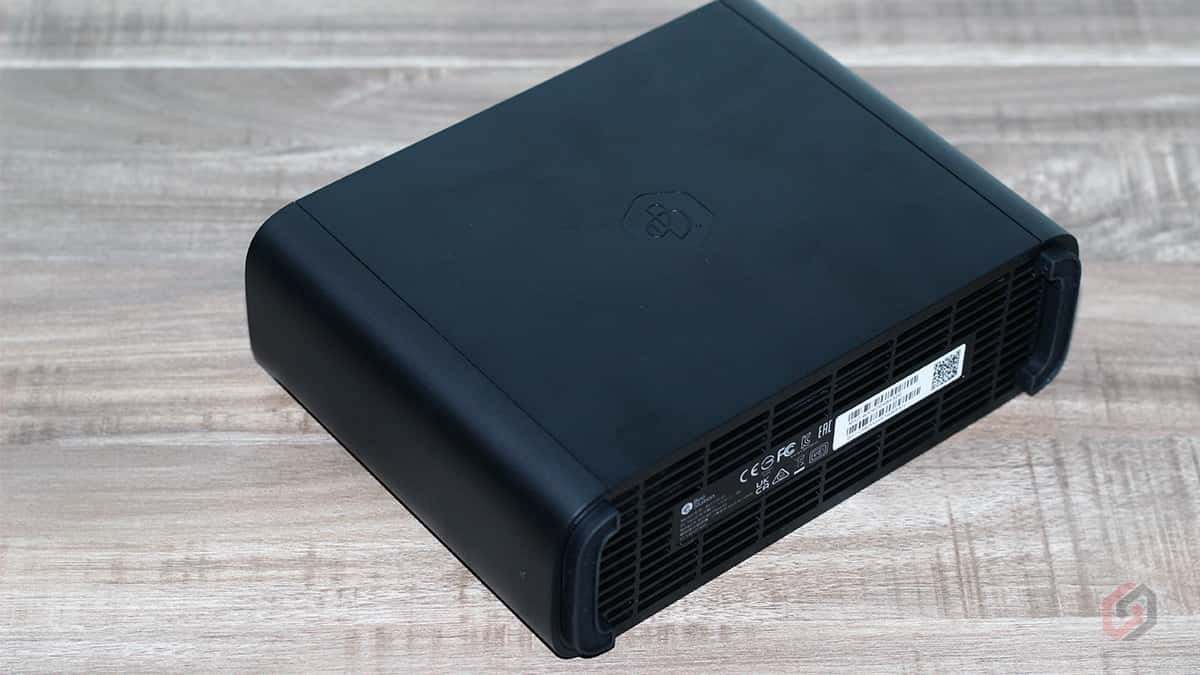
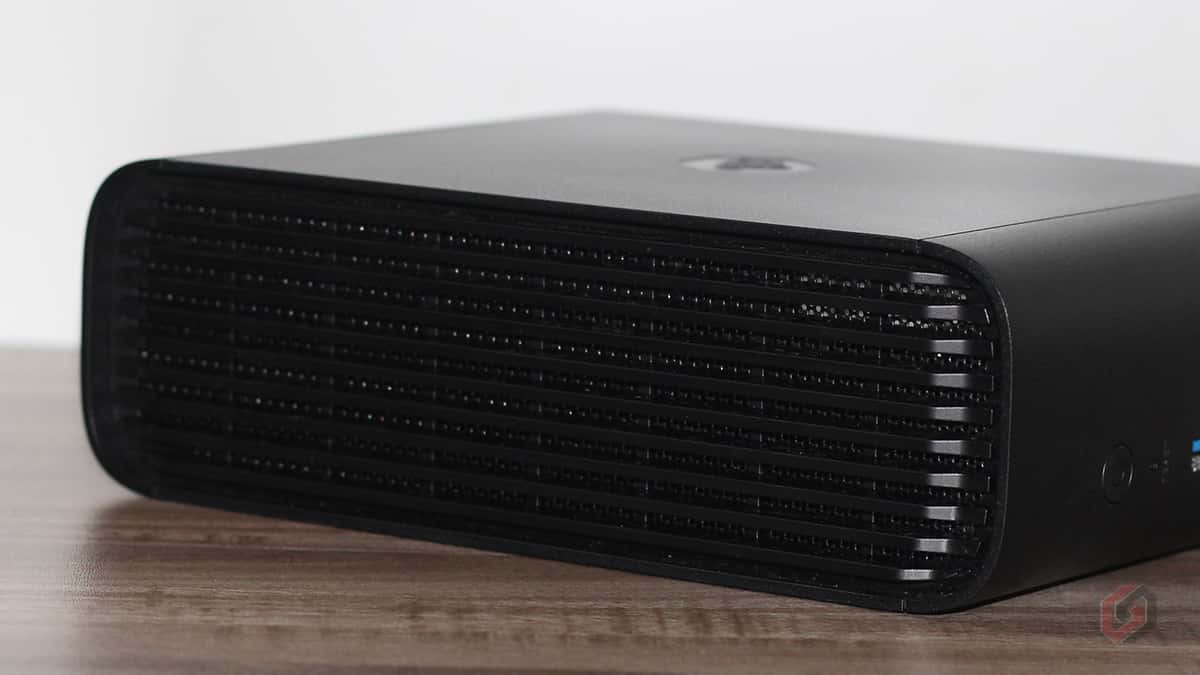
Despite the absence of active cooling, Synology has incorporated numerous vents on both the top and bottom of the device to effectively dissipate heat. Additionally, a meshed frame on the inside helps minimize the collection of dust. The device maintains a clean aesthetic with only the BeeDrive logo present on either side, devoid of any additional branding.
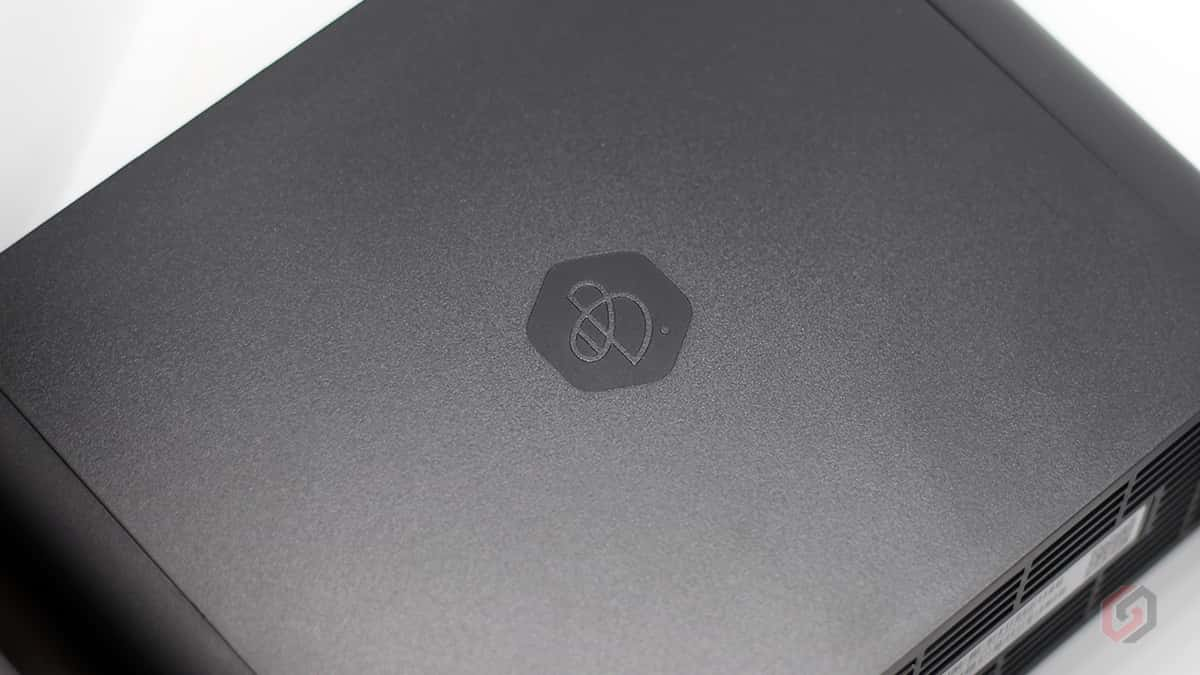
The BeeStation operates silently without any noise from the fan, but there might be minimal HDD noise, which is considered normal. When placed on a desk, you may notice some audible noise from the BeeStation, particularly when the hard drive spins at a higher RPM. It’s worth noting that the device comes with an integrated hard drive that cannot be replaced or upgraded.
One of the significant advantages of the BeeStation is its NAS drive. Instead of a standard hard drive, Synology has included the Synology Plus Series HAT3300-4T 4TB drive. NAS drives outperform regular desktop drives, and although they can be more expensive, they are specifically designed for continuous operation, making them a reliable choice for prolonged usage.
Synology BeeStation Setup
Synology has significantly streamlined the setup process for BeeStation compared to NAS devices. Everything is straightforward, and there are no options to select during the setup; everything comes preconfigured. You can easily set up the device on your phone or your PC/laptop. The setup process is demonstrated here on an iPhone, but it remains the same for both Android mobile phones and computers.
Scanning the QR Code
Before powering on the BeeStation, it is necessary to scan the QR code first located at the bottom of the device. Alternatively, Synology includes a sticker with the same QR code in the quick start guide, which can be used as well.
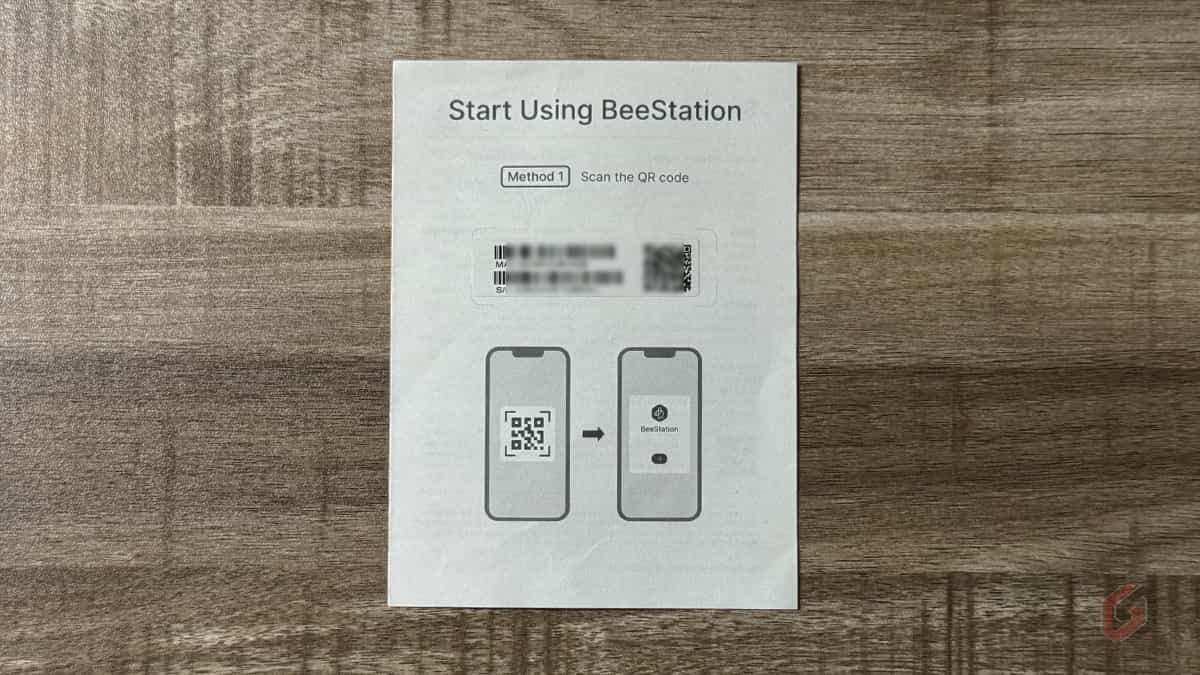
Note: It’s important to scan the QR code on the bottom of the device prior to turning it on to avoid the need to invert the BeeStation while it is actively reading or writing data to the hard drive.
Setting up the BeeStation
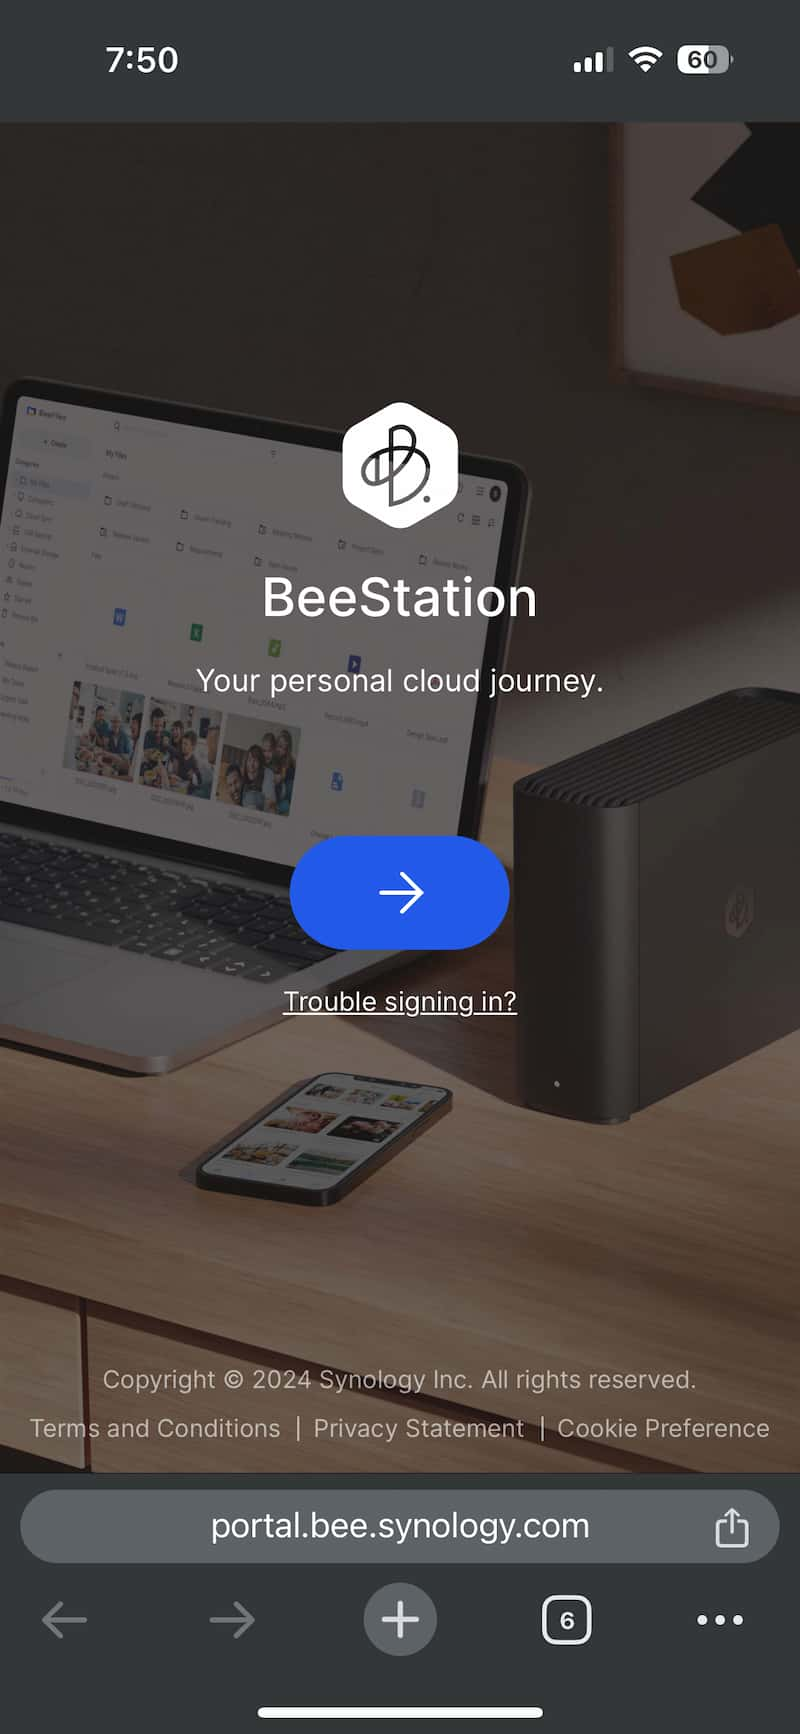
- After scanning the QR code, you will be directed to the BeeStation’s website to set up your device. Click on the Enter icon, which is blue.
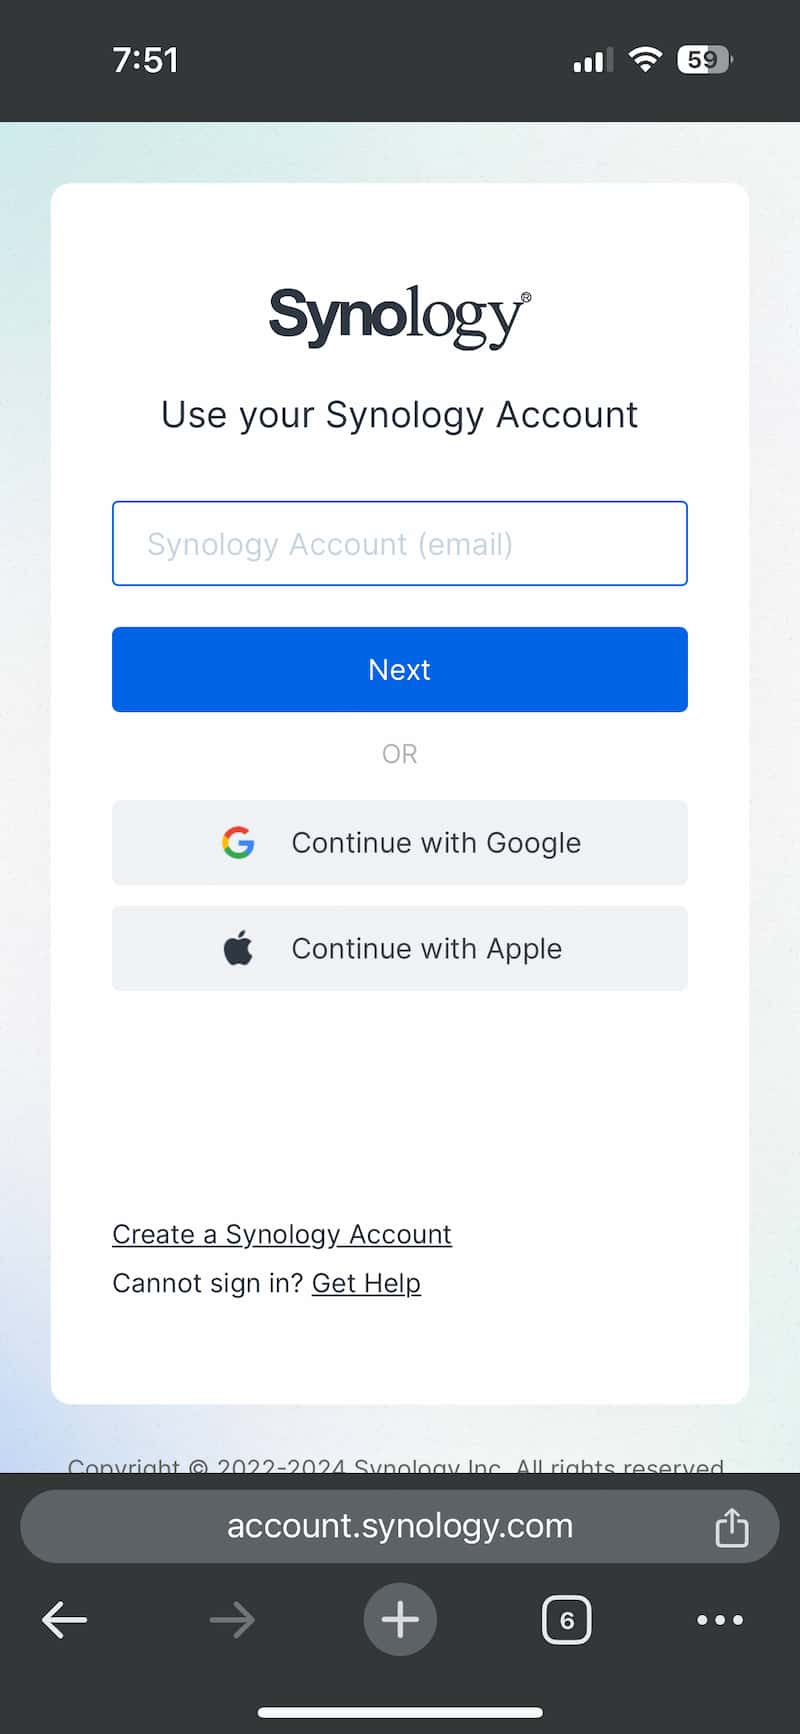
- You will then be prompted to log in to your Synology account. Similar to using a cloud service, you have the option to use your preferred cloud account for future sign-ins to the BeeStation, eliminating the need for additional credentials. If you already have a Synology account, you can use it as well.
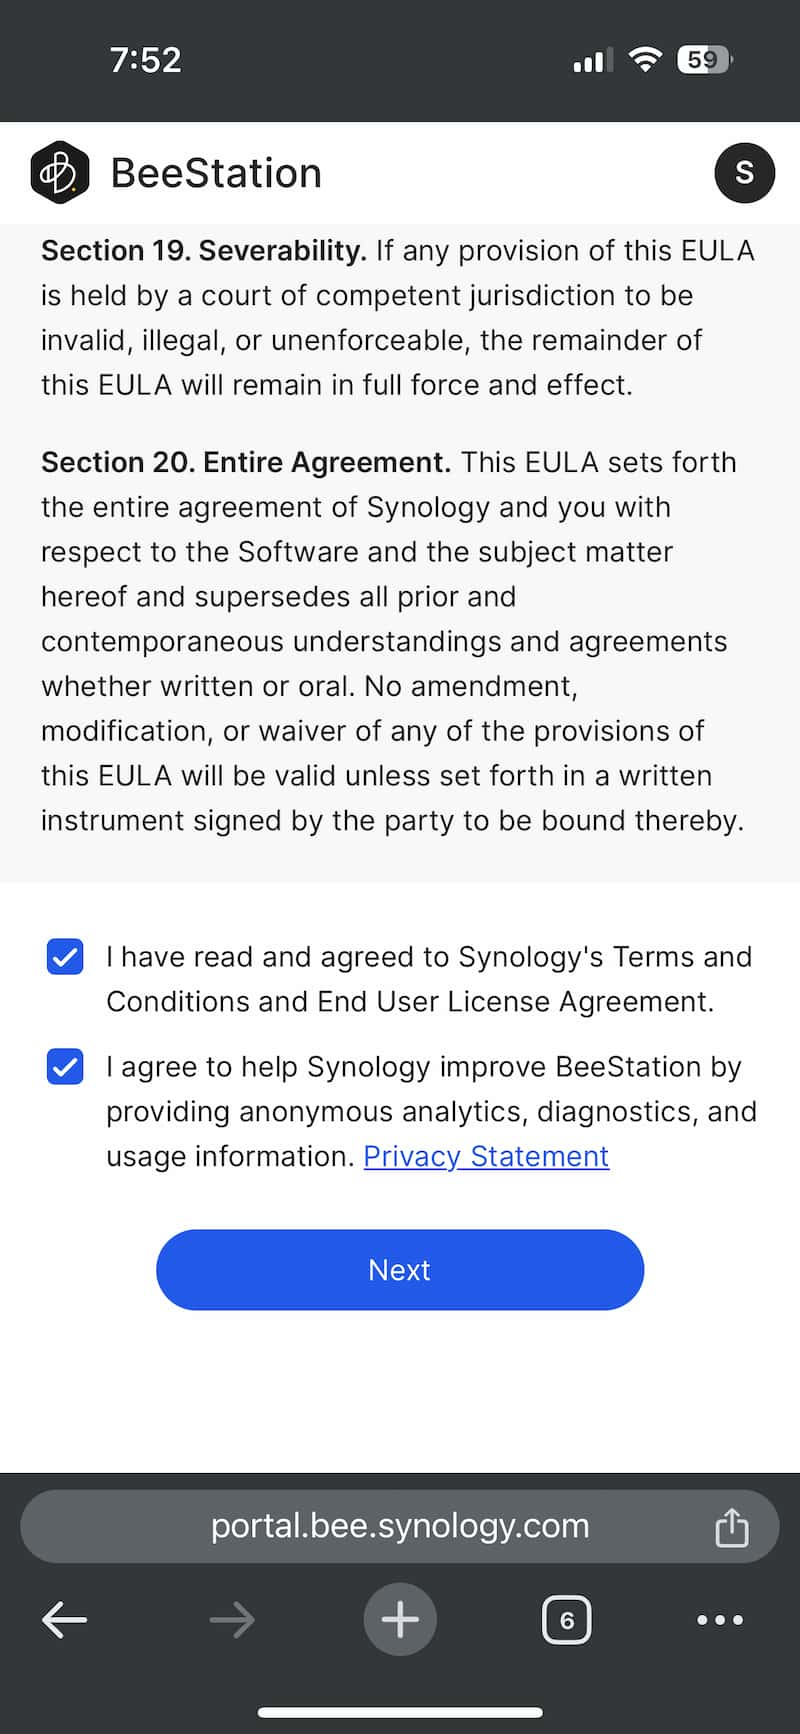
- You will be prompted to agree to Synology’s terms and conditions. Proceed by tapping on the Next button.
Turning on the Device
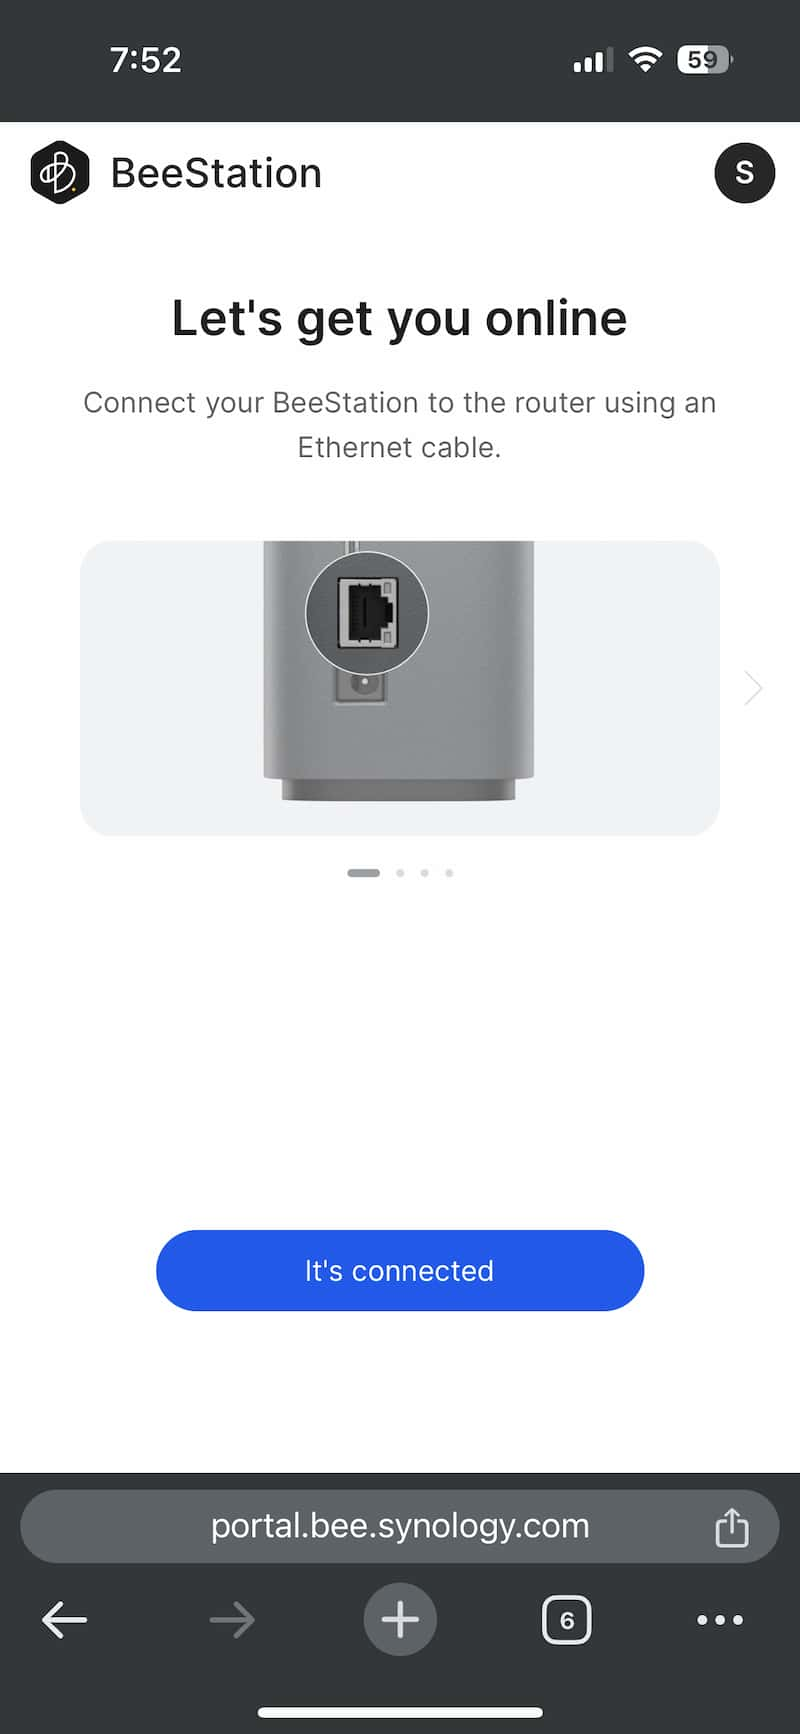
- Connect the BeeStation to your router using the provided RJ45 cable for internet access. The Ethernet port is located on the device’s rear side.
- Plug the BeeStation into a power source using the included adapter and press the power button on the front of the device.
- Ensure that the front LED indicator turns to a solid orange color.
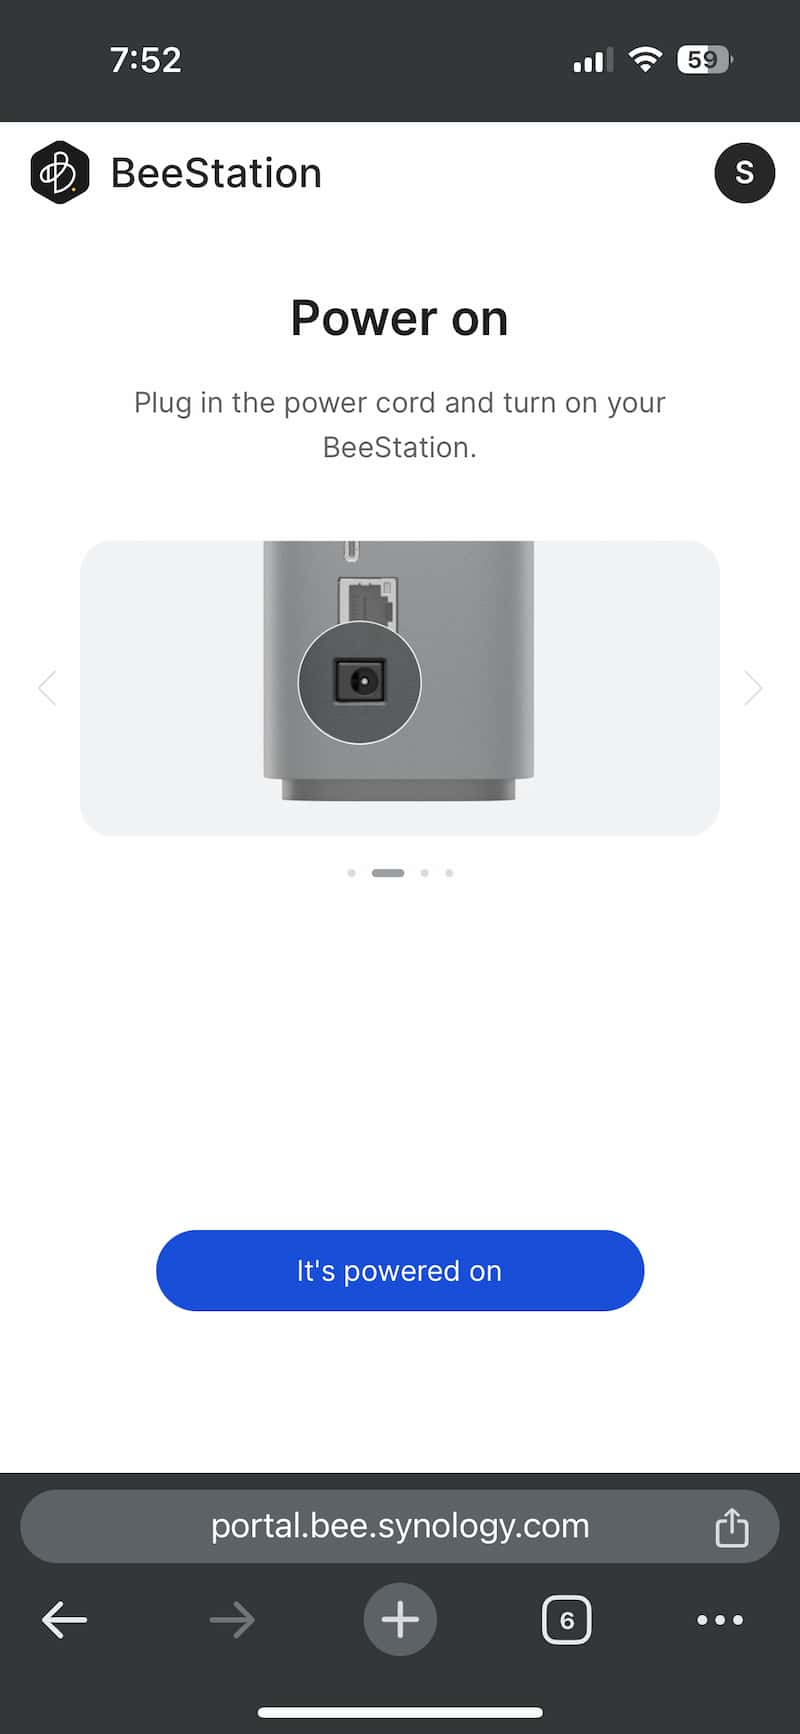
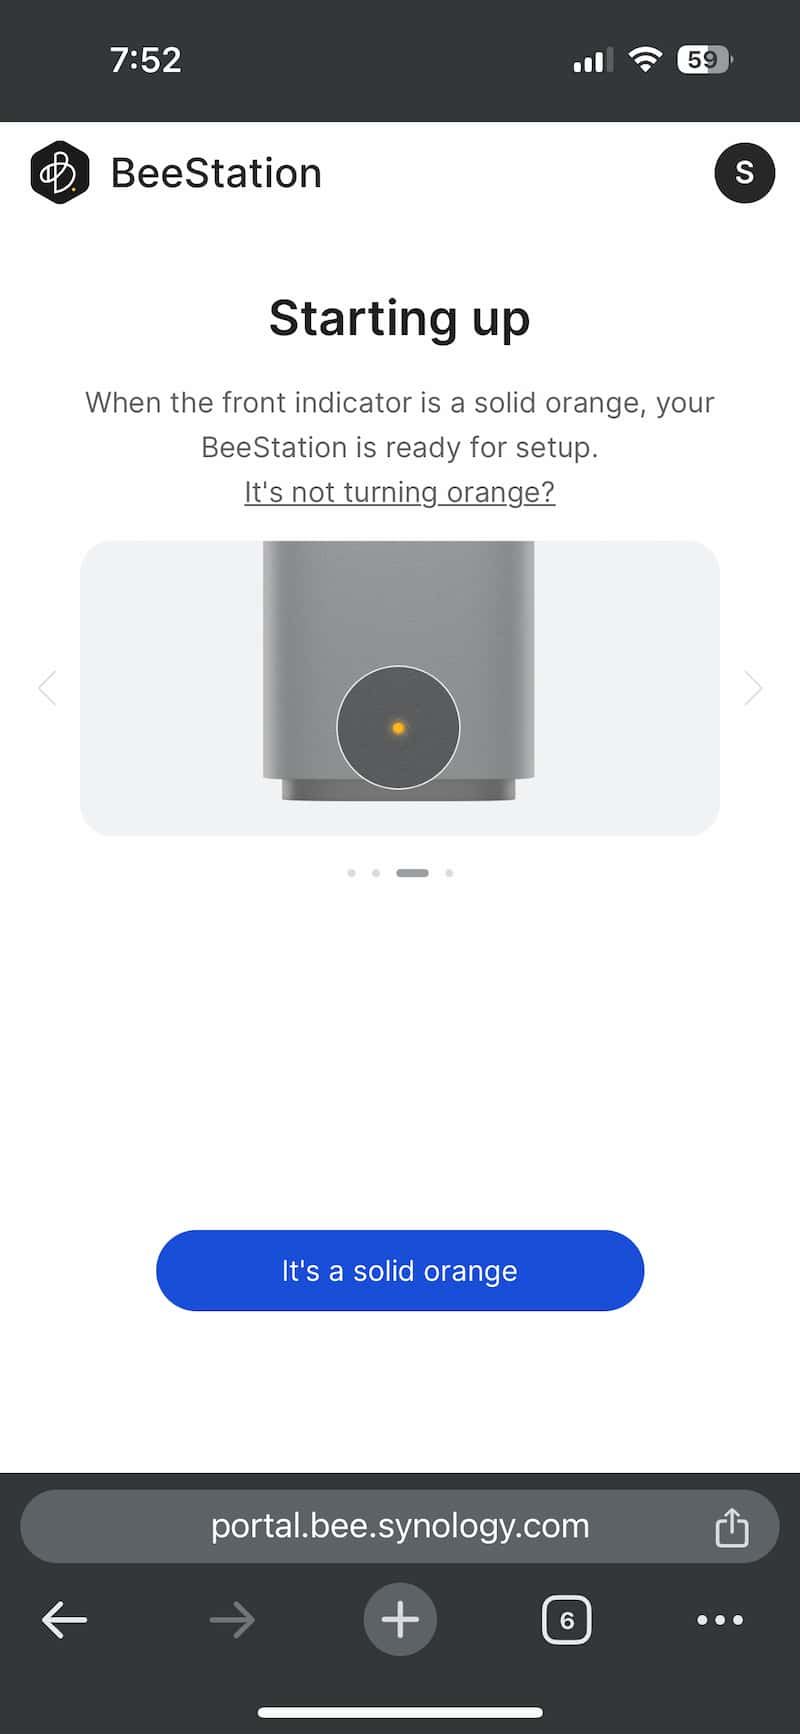
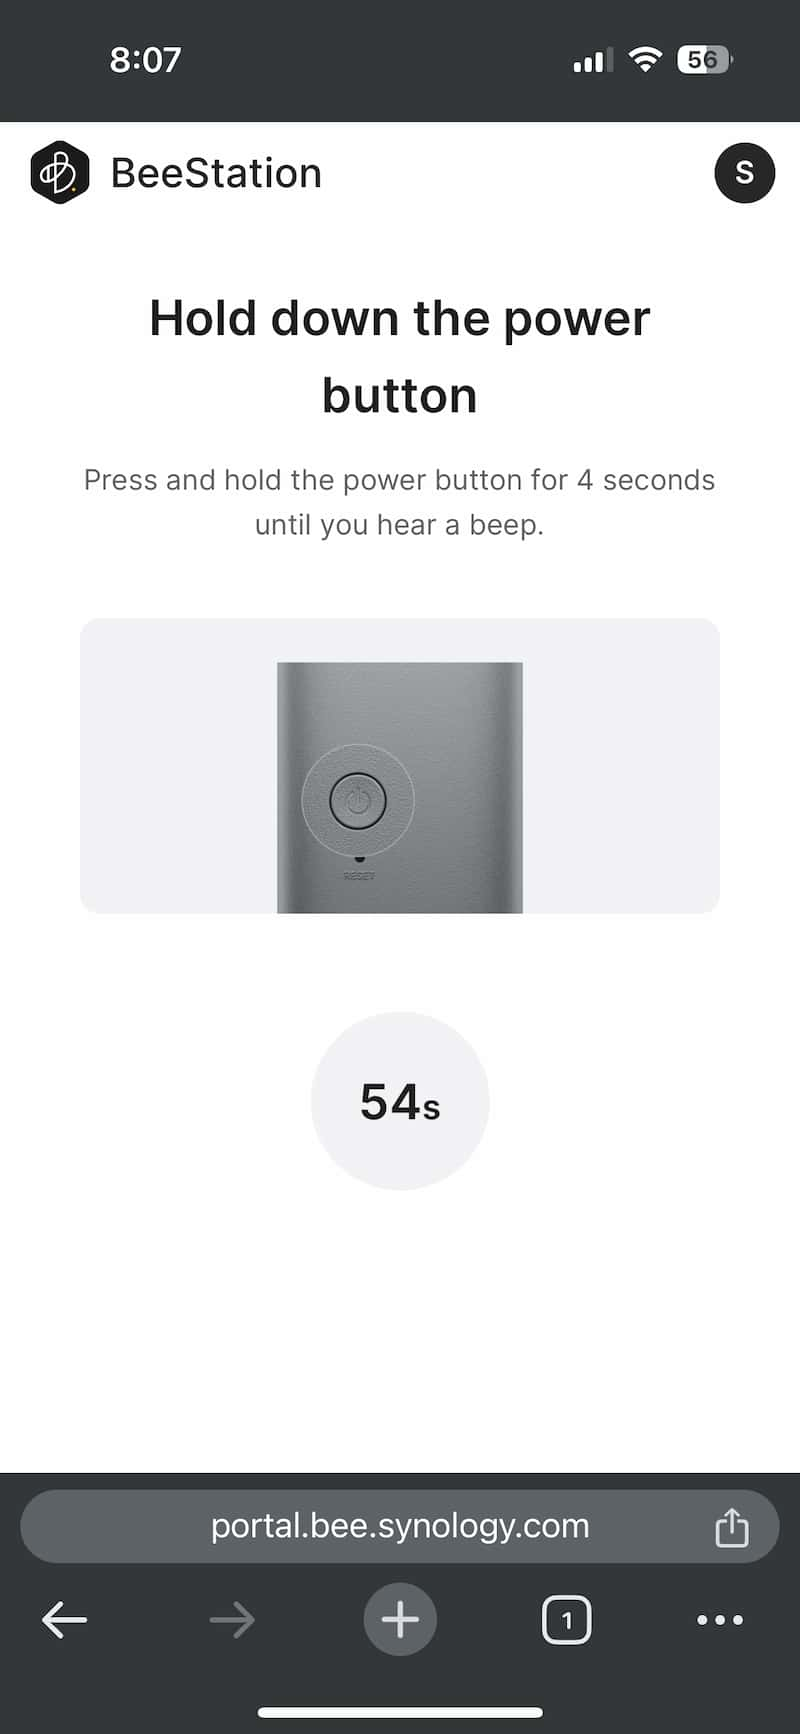
- Press and hold the power button on the BeeStation for 4 seconds. This step is to verify that you, the physical owner of the BeeStation, are attempting to claim ownership rather than someone else. Once you hear a beep, immediately release the button. Be cautious not to hold the button for too long, as this may unintentionally power off the BeeStation. Release it as soon as you hear the beep sound.
- Once your BeeStation is identified, it will start preparing to set up.
In case you missed it: Synology BeeDrive Review: The Ultimate SSD for Seamless Storage and Effortless Backup
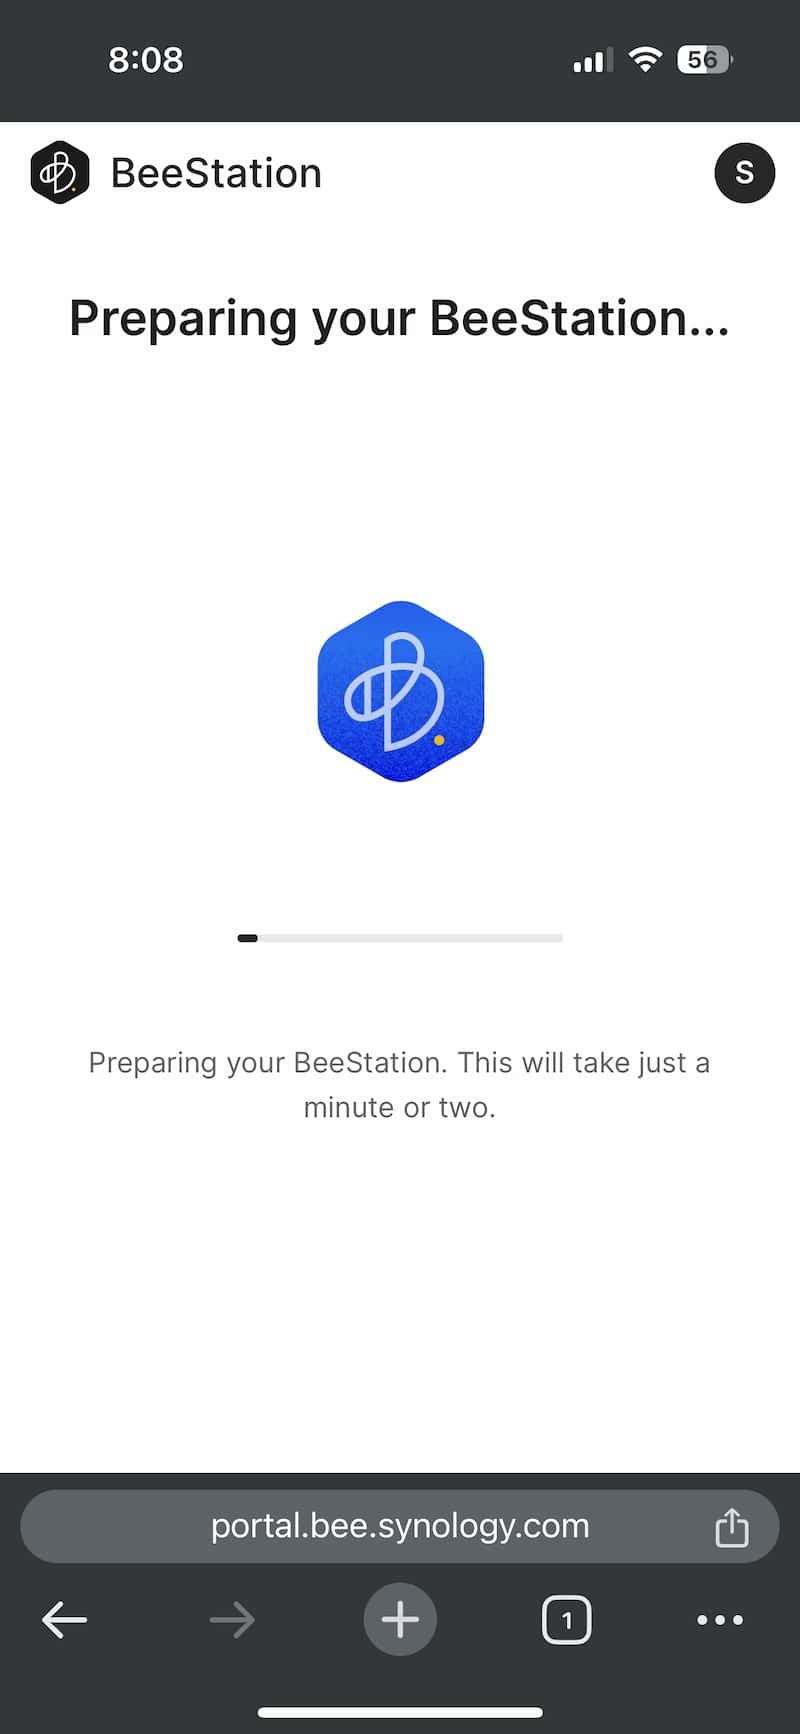
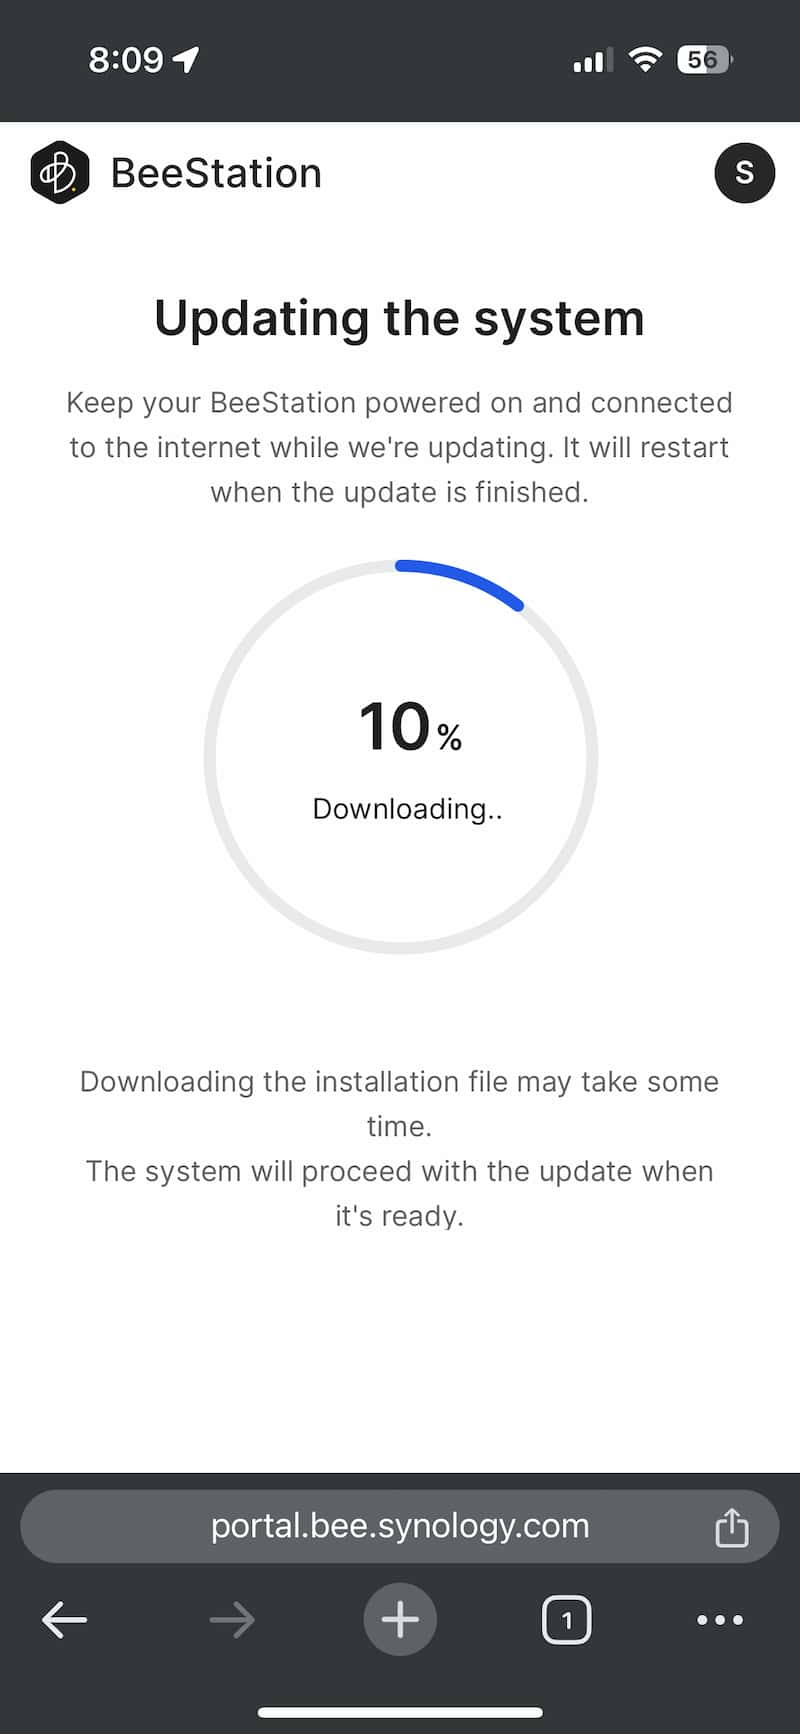
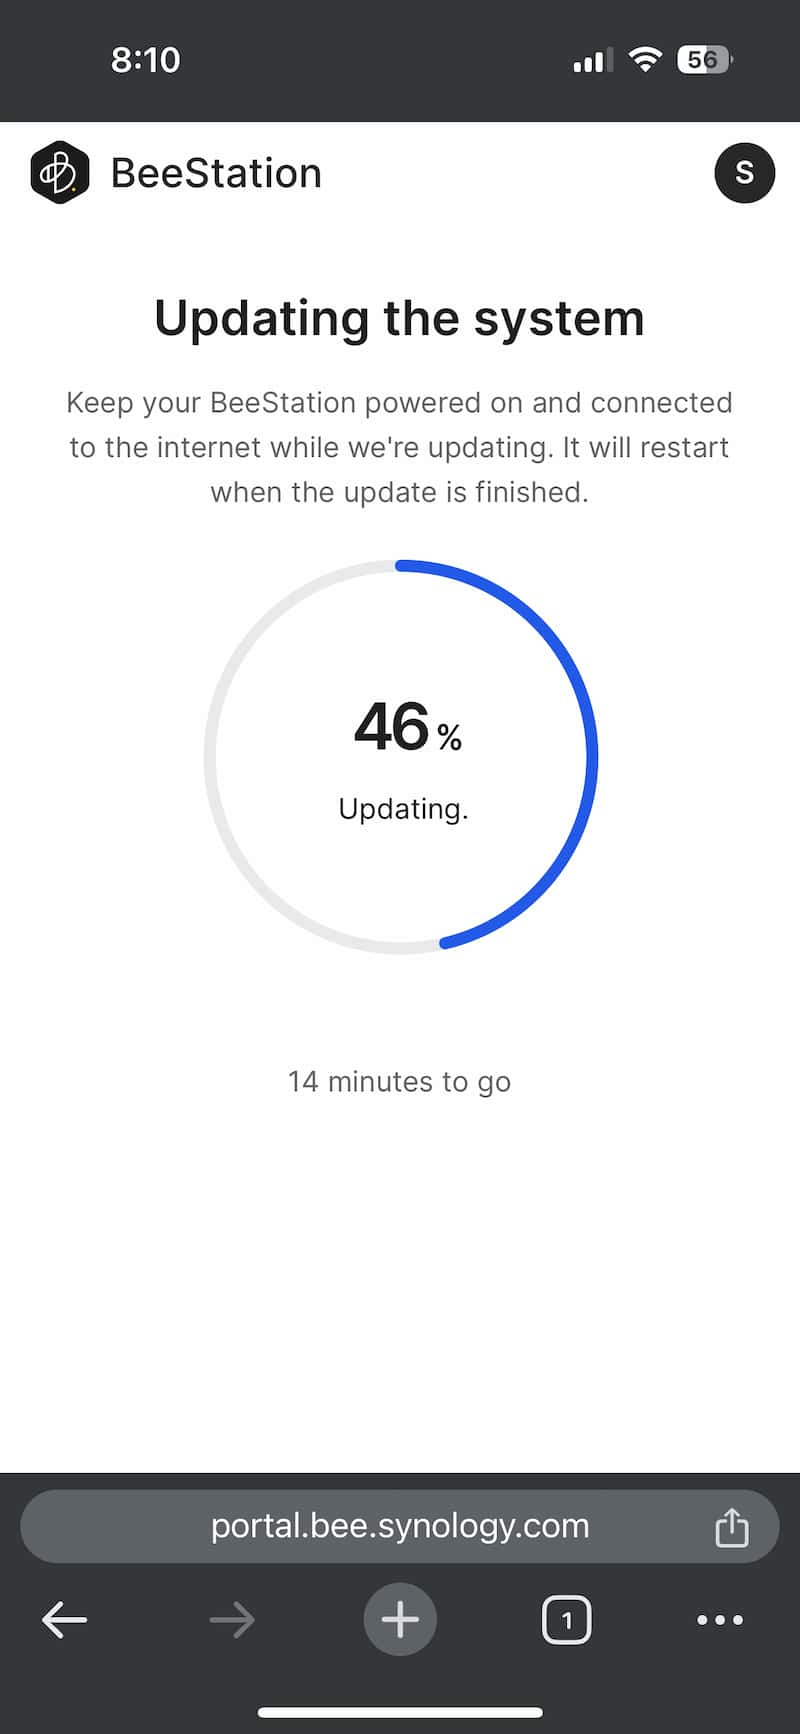
Note: Sometimes, during the device setup, it will automatically update its software to give you new features and security fixes. This might take about 20 minutes, but the time can vary depending on how fast your internet is. You don’t need to do anything during this update – it happens on its own.
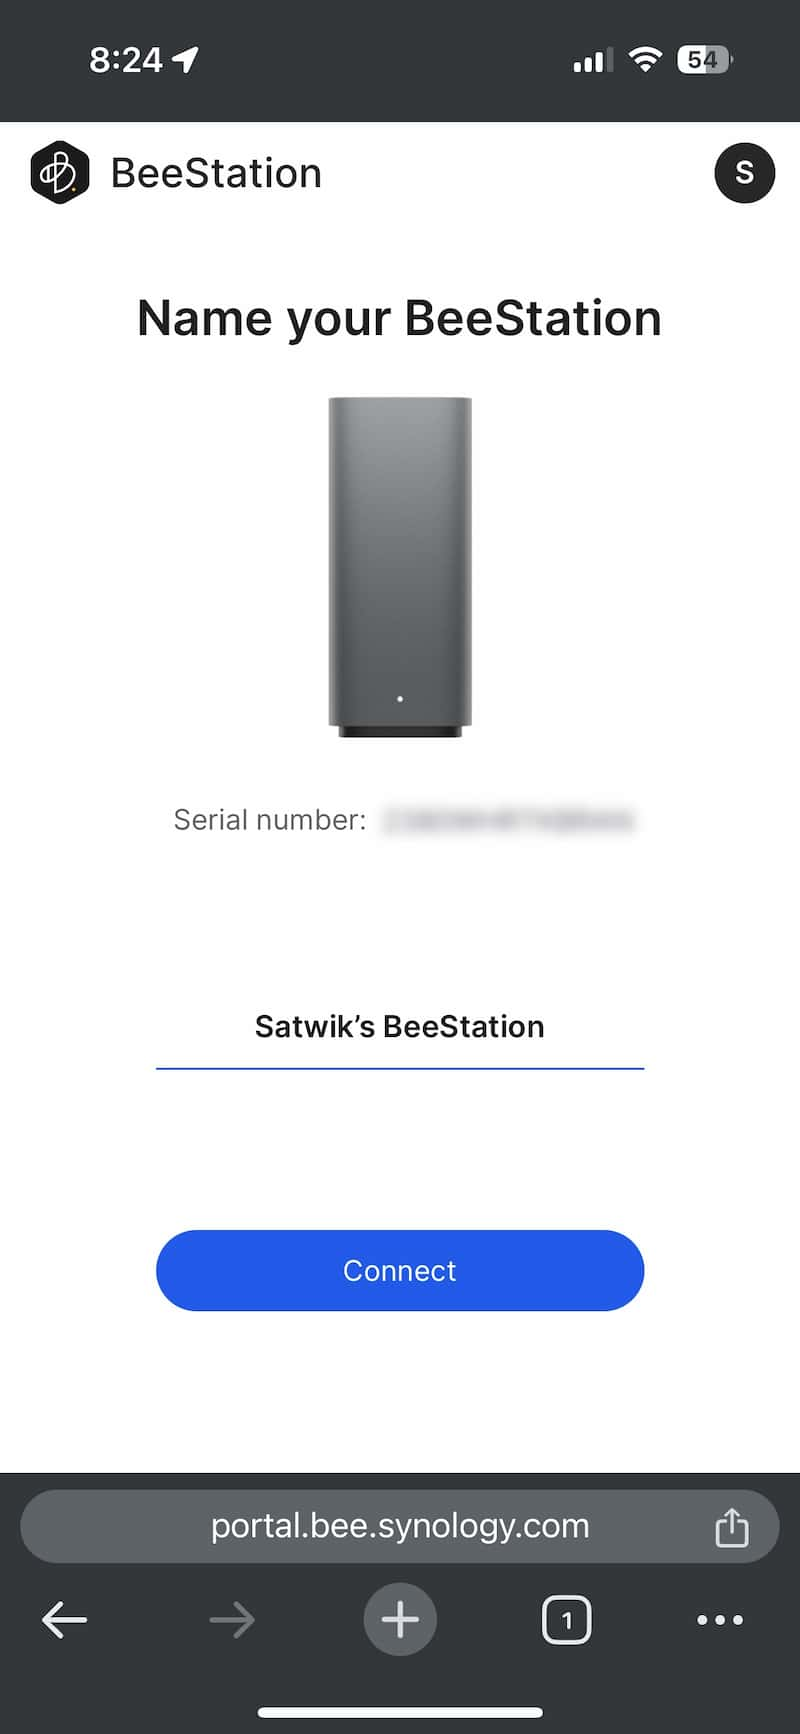
- Next, you will be prompted to name your device. Enter the desired name and click on Connect. Your setup is now complete.
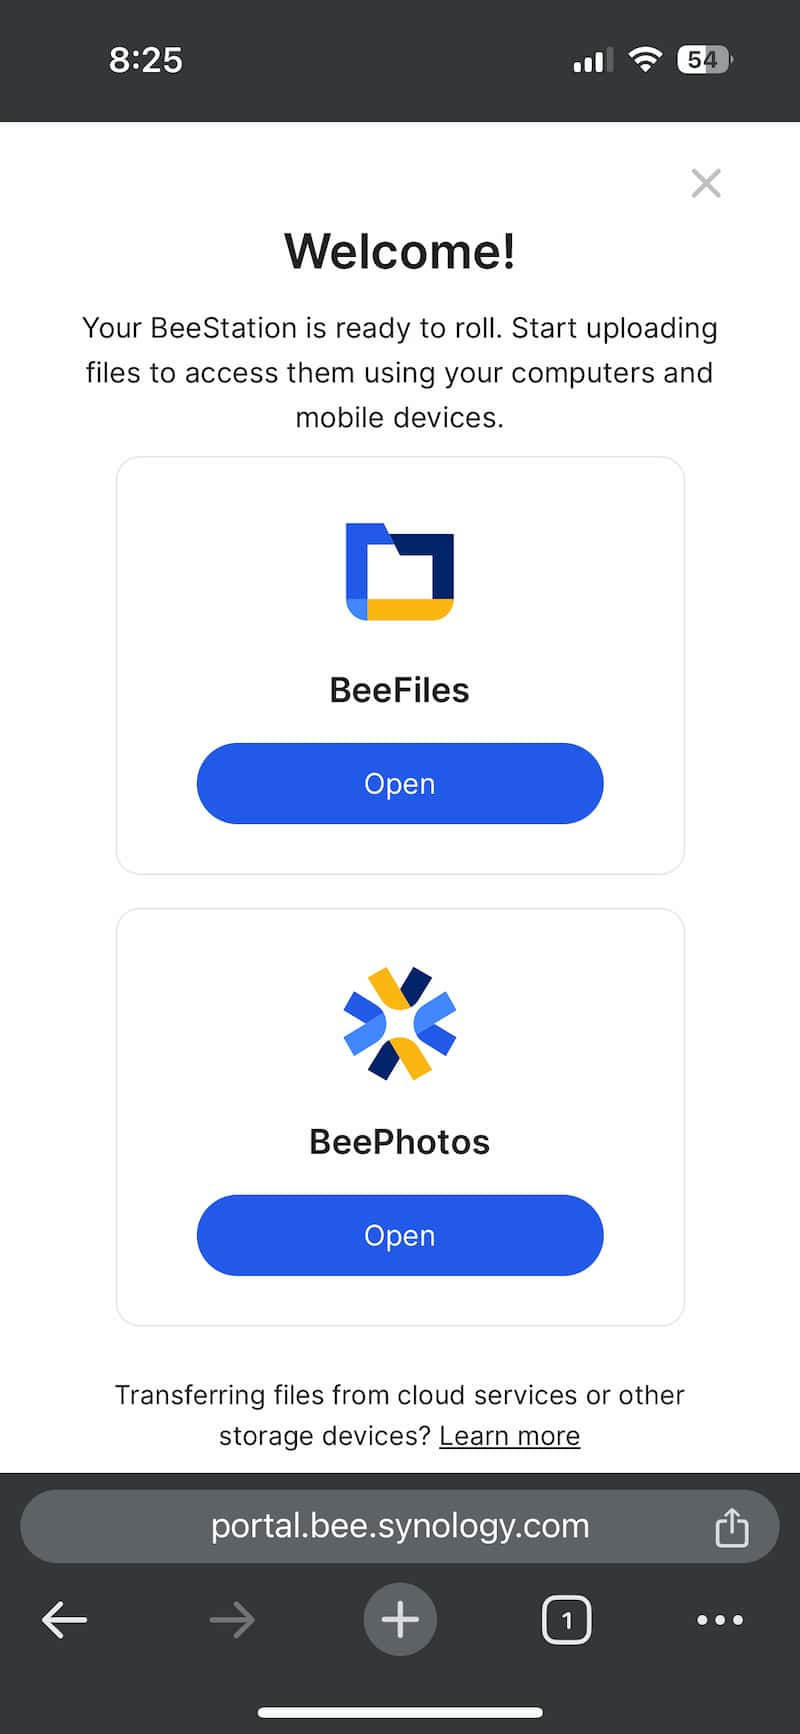
- Next, tap on Open. This will redirect you to download the BeeFiles and BeePhotos mobile apps from either Google Play or the App Store. BeeFiles, similar to Google Drive, allows you to manage all your files, while BeePhotos, akin to Google Photos, is a dedicated app for managing all your photos and videos. After downloading both apps, return to the browser and click on the Close icon located at the top right.
- Upon redirection to the BeeStation homepage, you can control and customize various BeeStation settings.
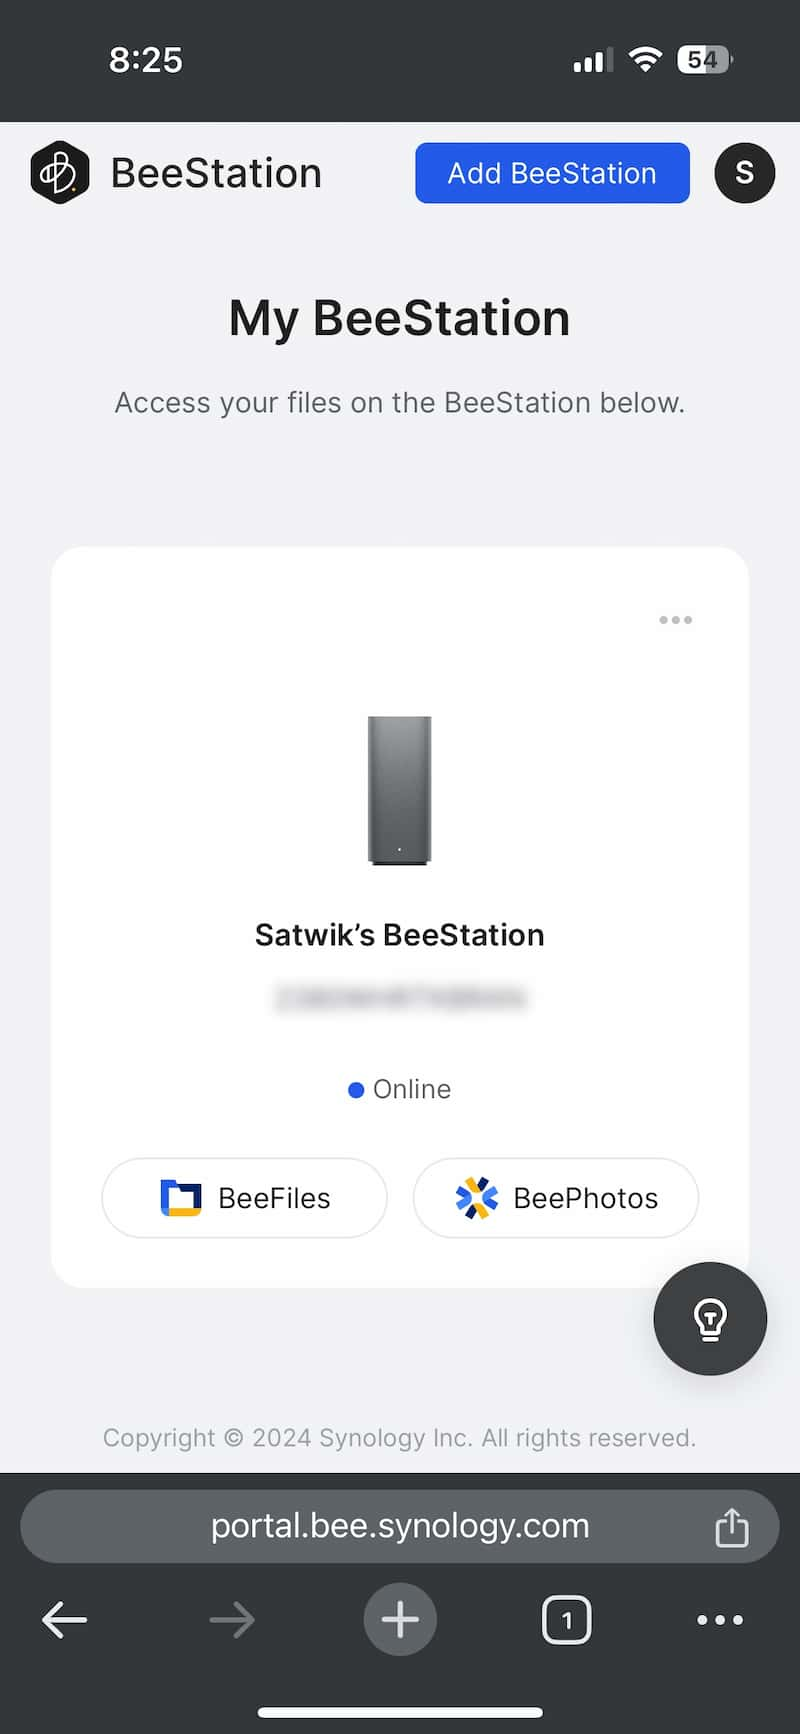
The Synology BeeStation operates on a lightweight operating system known as BeeStation Manager (BSM). It offers limited customization options, as the device is purposefully designed for hassle-free photo and file backup. It does not support the installation of additional apps or 3rd party apps on the BeeStation like Synology NAS’s. You can access the BeeStation at https://portal.bee.synology.com/.
Note: BeeStation doesn’t have an App Store like Synology NAS devices. It already has the operating system and apps ready to use when you get it, so you don’t need to install anything extra. Synology may release a new version with extra features or security updates in the near future if necessary.
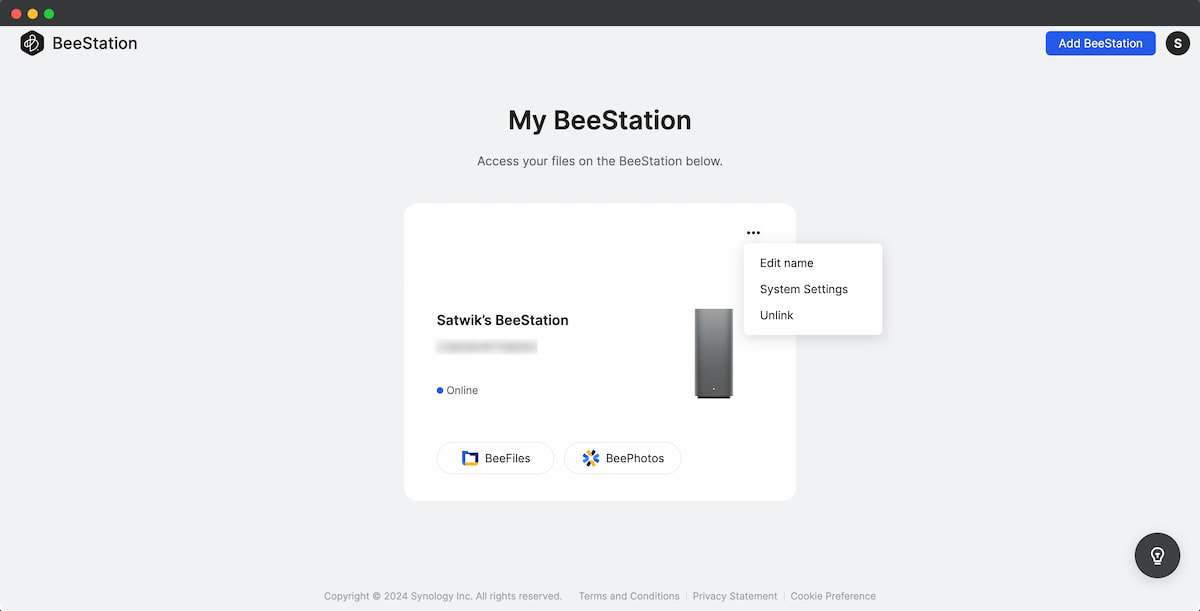
Remember: On the BeeStaton homepage, you’ll find links to BeeFiles and BeePhotos, which have different web addresses. When you click on BeePhotos/BeeFiles, it opens in a new window. Save the link for quick access next time. If you want BeeFiles/BeeFiles, click on the bookmark, and it will open. The example URL is shown below.
- BeeFiles – https:/xxxxxxxxx.sg3.quickconnect.to/BeeFiles/#/
- BeePhotos – https:/xxxxxxxxx.sg3.quickconnect.to/BeePhots/#/
Synology BeeStation Settings
Within the Main menu, you will get three options: Edit Name allows you to modify the device name; System Settings enables adjustments to the device settings; and Unlink permits the removal of the device from the logged-in account. Selecting System Settings provides access to all system settings.
Note: Clicking on BeeFiles will launch the BeeFiles web portal, and similarly, clicking on BeePhotos will open the BeePhotos web portal. These are essentially dedicated web applications, much like the BeeFiles and BeePhotos apps on your phone. You can download all the official BeeStation apps from BeeStation’s official website. Synology has provided dedicated apps for Android and iOS devices as well as Windows and Mac computers.
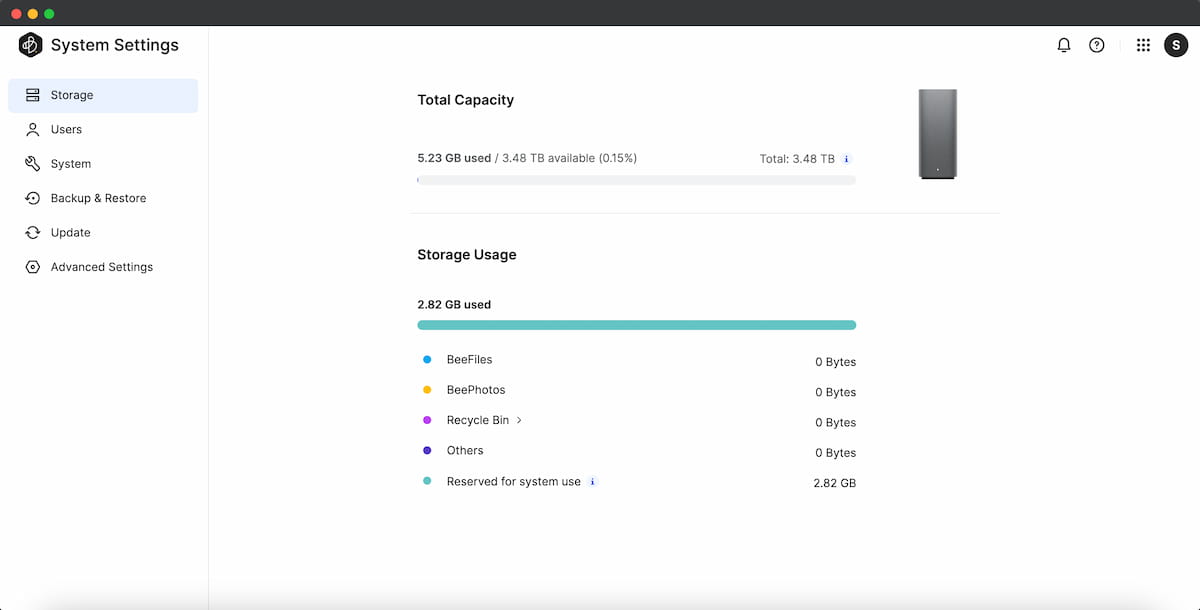
- Storage: Check how much space is left on BeeDrive and see how much storage is used by Files and Photos.
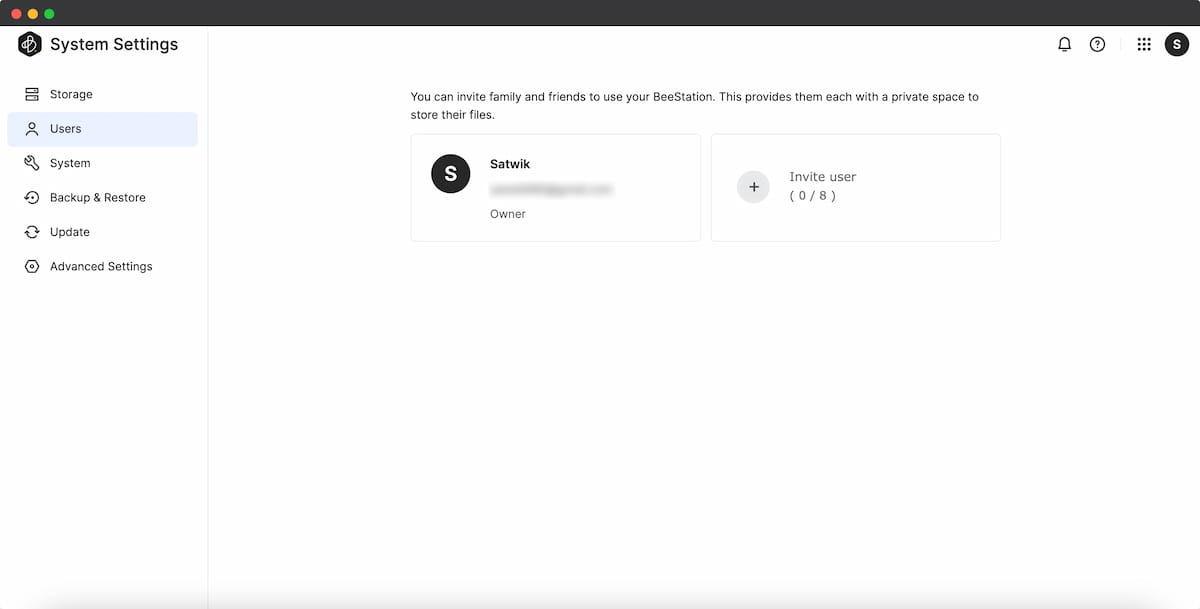
- Users: Invite your family and friends to use BeeStation. You can give them their own private space to store their files.
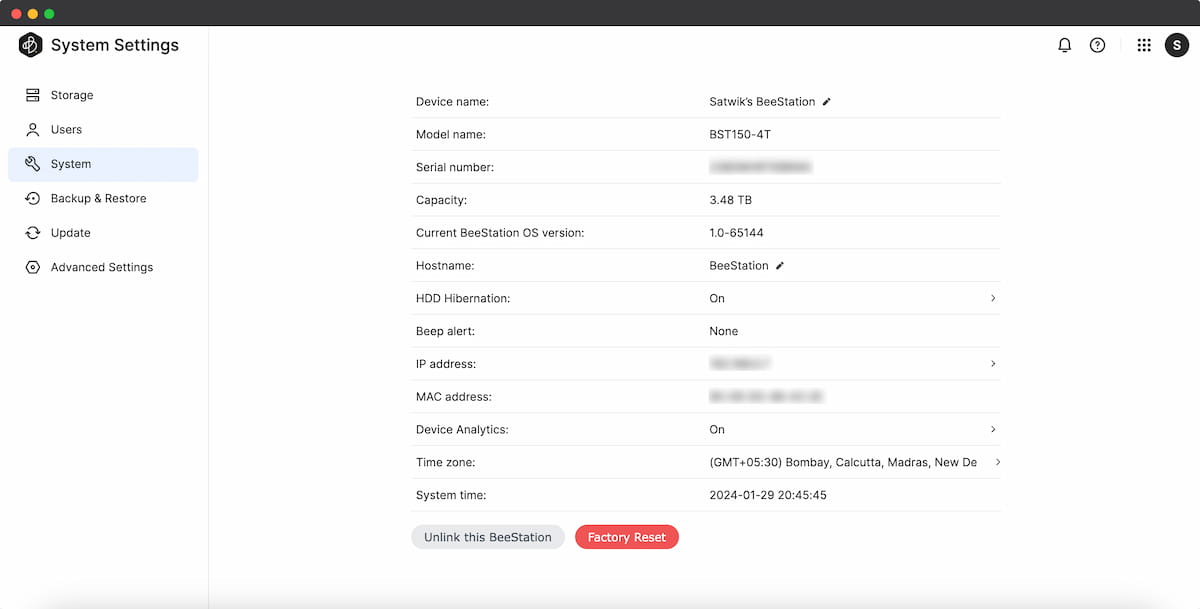
- System: Find details about your device, like the serial number and operating system version, in the System section. Change things like the device name, hostname, and IP address. You can also control features such as turning HDD hibernation on or off, sharing device analytics, and setting the time zone. In this section, you can also unlink the device and do a factory reset for BeeStation.
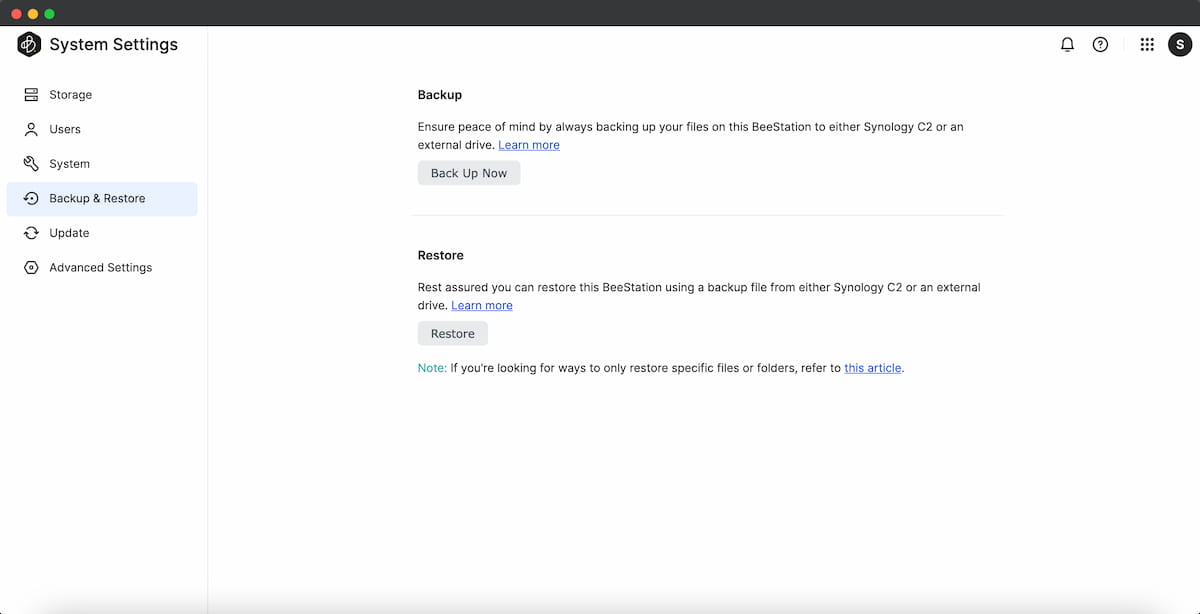
- Backup & Restore: Secure your BeeStation data by creating backups to Synology C2 or an external hard drive. Additionally, you can restore data from a backup stored on Synology C2 or an external hard drive.
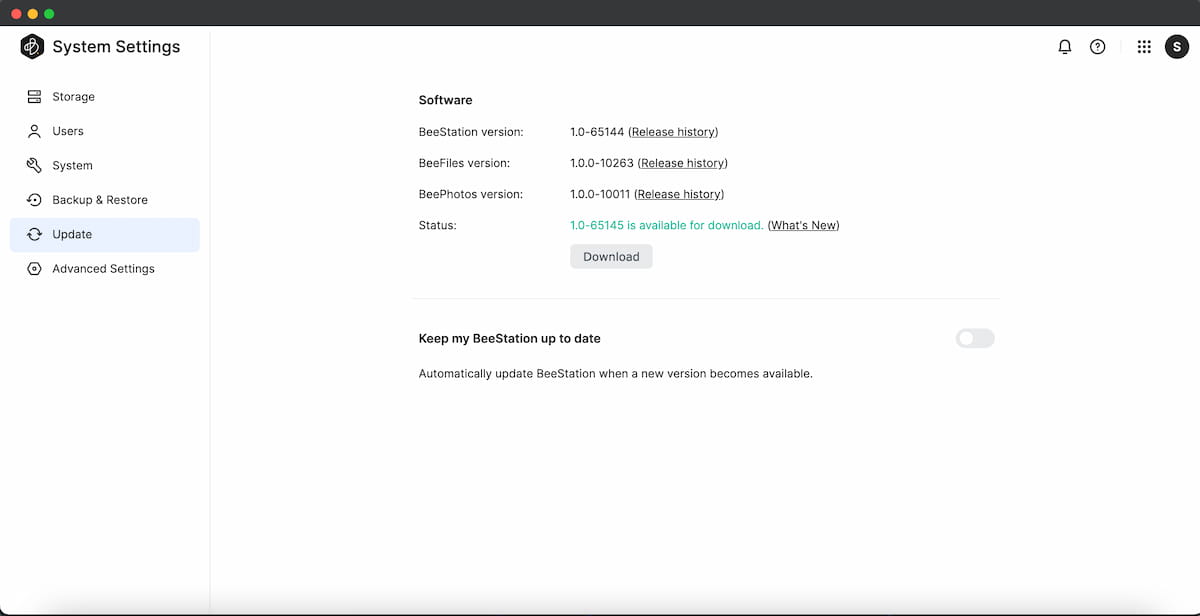
- Update: Keep your BeeStation up-to-date by installing the latest firmware, if available.
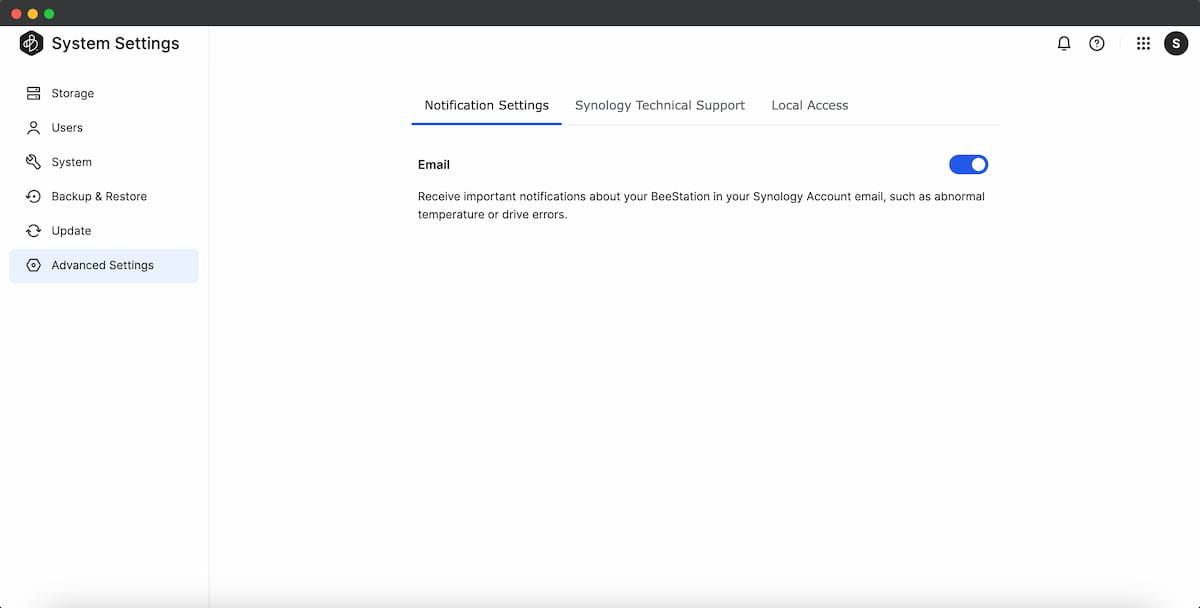
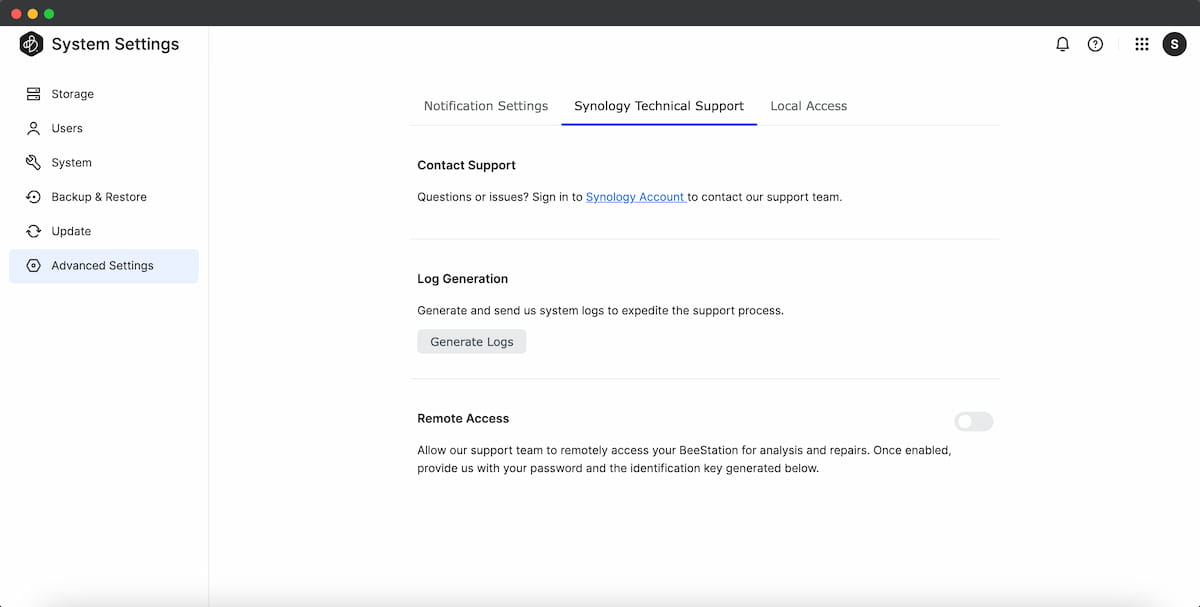
- Notification Settings: Decide if you want to get emails about things like unusual temperature or drive errors. If you turn it on, you’ll receive notifications through email.
- Synology Technical Support: If you need help, you can contact support, generate logs, and allow remote access. This way, Synology support can assist with repairs and analysis.
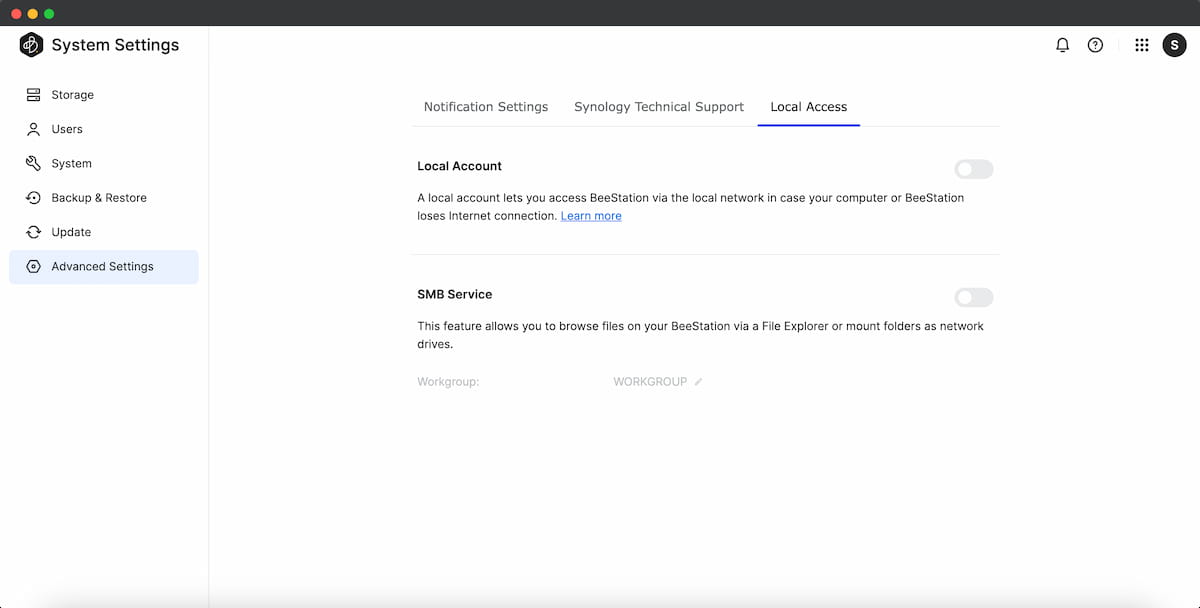
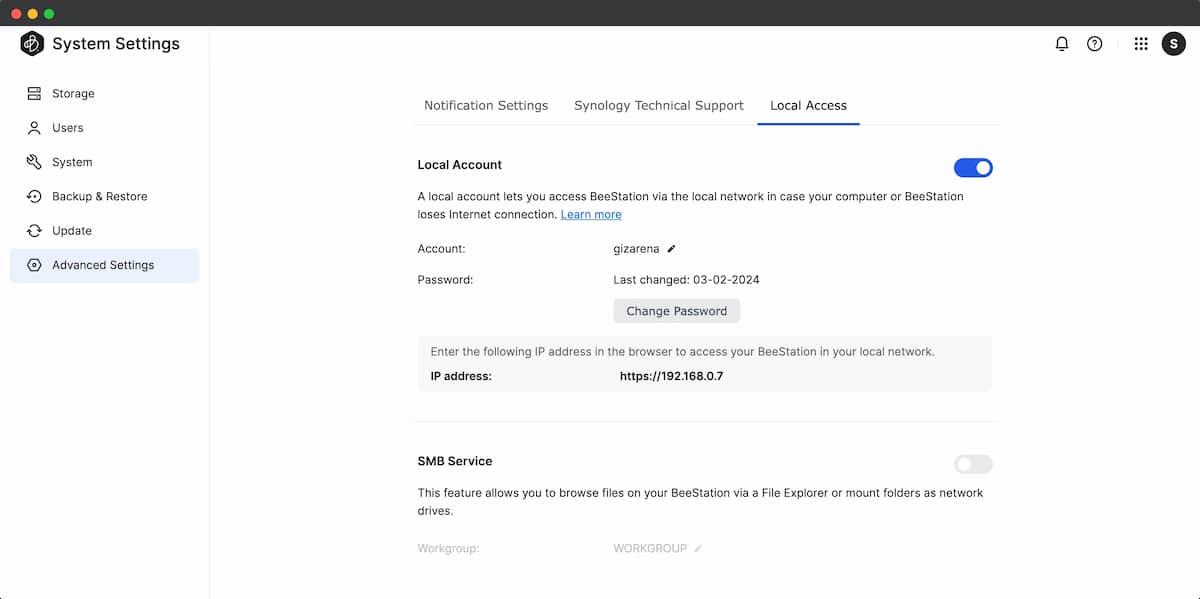
- Local Access: Access your Synology BeeStation on a local network in case your computer or BeeStation loses the internet. You can also turn on the SMB service to browse BeeStation files using File Explorer or connect folders as network drives.
In case you missed it: Synology C2 Backup: Features, Installation, Easy Setup Guide with Step by Step Instructions
Access BeeDrive from Desktop
One of Synology’s notable highlights here is the development of dedicated apps for various platforms, with a particular emphasis on Macs. This initiative significantly facilitates file management across all your devices. For instance, you can upload a file from your phone and promptly access it on your Windows computer or Mac through the specialized BeeStation app.
- Download BeeDrive for Mac or BeeDrive for Windows from the Download Center.
- Open the app and log in with the same account you used when setting up BeeStation for the first time.
When you initially set up BeeStation on your desktop, the application will assign a specific folder path on your computer as the destination for your files on BeeFiles. On a Mac system, you are unable to choose a specific folder, unlike the Windows app, which allows you to select the destination according to your preferences. If you are using a Mac, proceed with the default location.
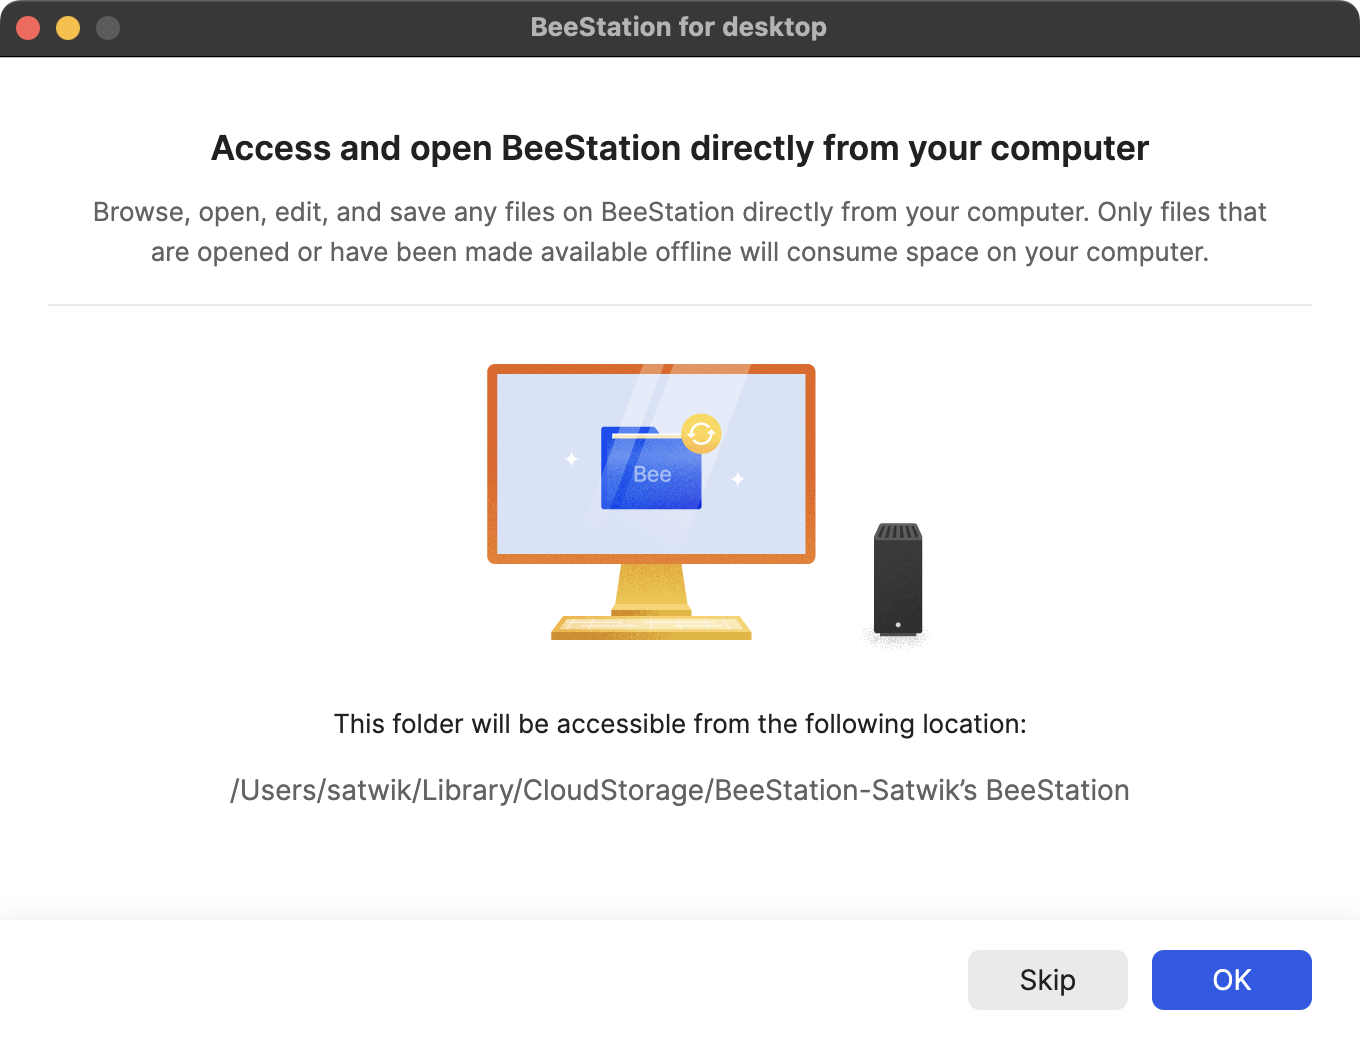
You can subsequently access, browse, and edit the files in this designated folder directly through File Explorer (Windows) or Finder (macOS). Any modifications you make will be automatically synchronized with BeeStation.
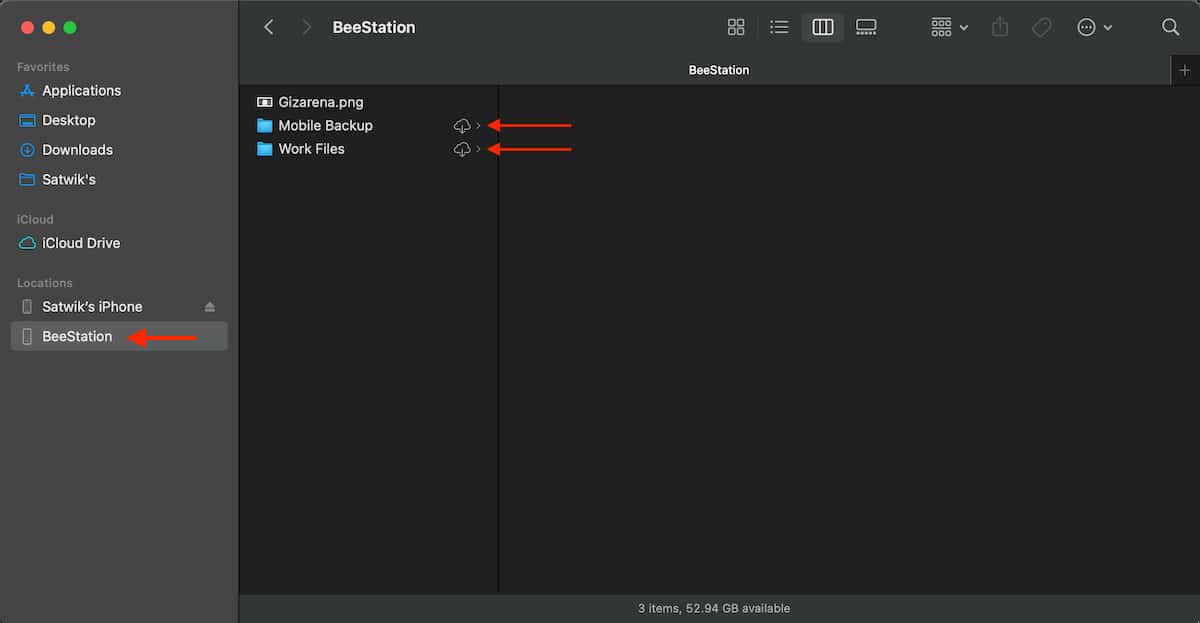
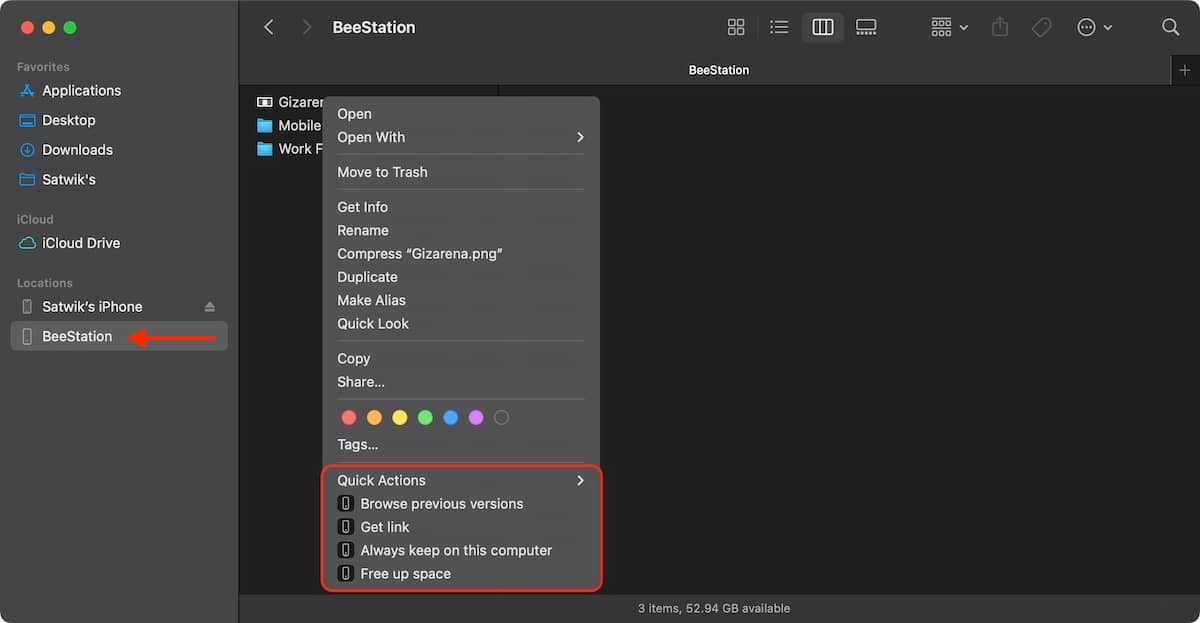
Keep in mind that files stored in this folder will only take up space on your computer when you open them. Changes you make to files or folders here will be saved in BeeStation, making sure you don’t lose any work if your computer unexpectedly stops working. A folder or file with a cloud icon won’t take up space on your laptop until you open it. You’ll get multiple options to store and manage files. When you right-click on individual files, you’ll see several control options that can help save storage space on your system.
- Browse previous versions: Download up to 8 previous versions from here.
- Get link: Share a file directly from your desktop. Create a link to share a specific file or folder with friends and family. You can also set an expiry date and add a password.
- Always keep on this computer: It will maintain a local copy on your computer. If you make edits while offline, once your computer reconnects to the Internet, the changes will synchronize back to BeeStation.
- Free up space: Manually delete the saved file or folder to free up storage space. If your computer is running low on storage, these saved files or folders will be automatically deleted to create more space. However, you can still access the files or folders online with a cloud icon.
Backup and Browse Photos
Uploading Photos Using BeePhotos Desktop Computer
- Navigate to https://portal.bee.synology.com/ in your web browser.
- Select BeePhotos to open the BeePhotos portal in a new window.
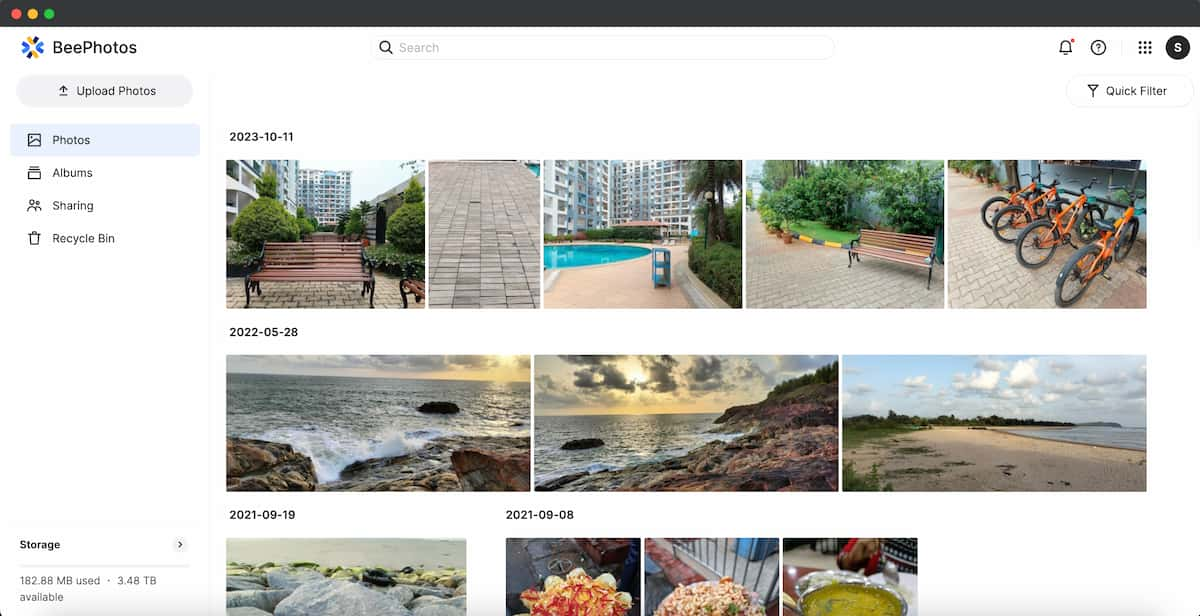
- You can then either drag and drop your photos directly into the browser or utilize the Upload Photos button.
Backup Photos Using BeePhotos Mobile App
Mobile users can benefit from the dedicated BeePhotos app, available on both Android and iOS devices. You can download these from Google Play and the App Store.
- Open BeePhotos on your mobile device.
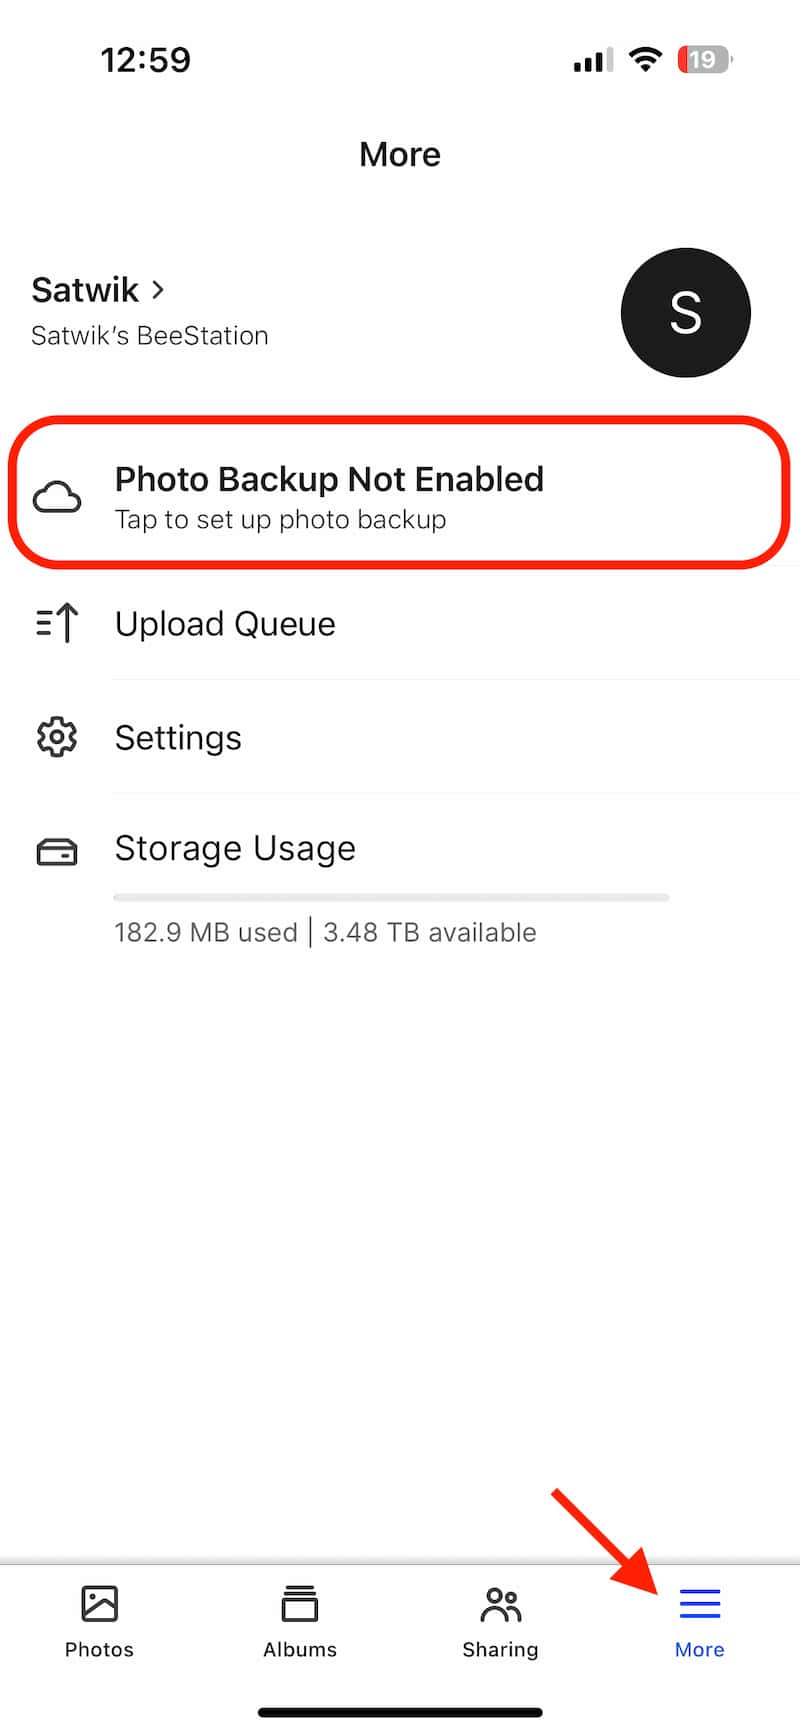
- Navigate to the More tab and select Photo Backup Not Enabled.
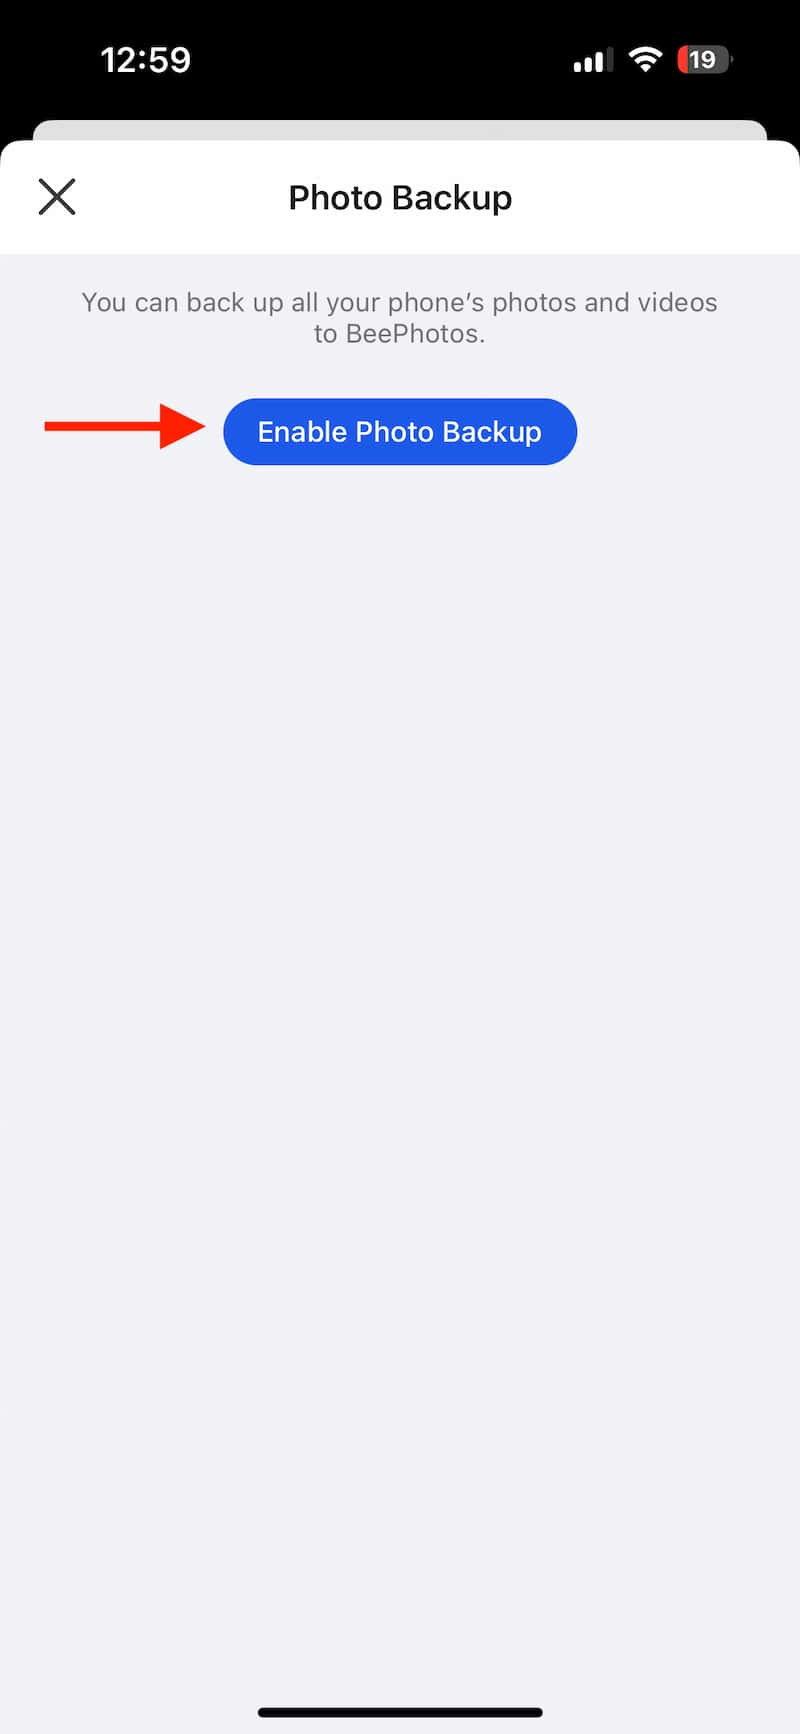
- Select Enable Photo Backup.
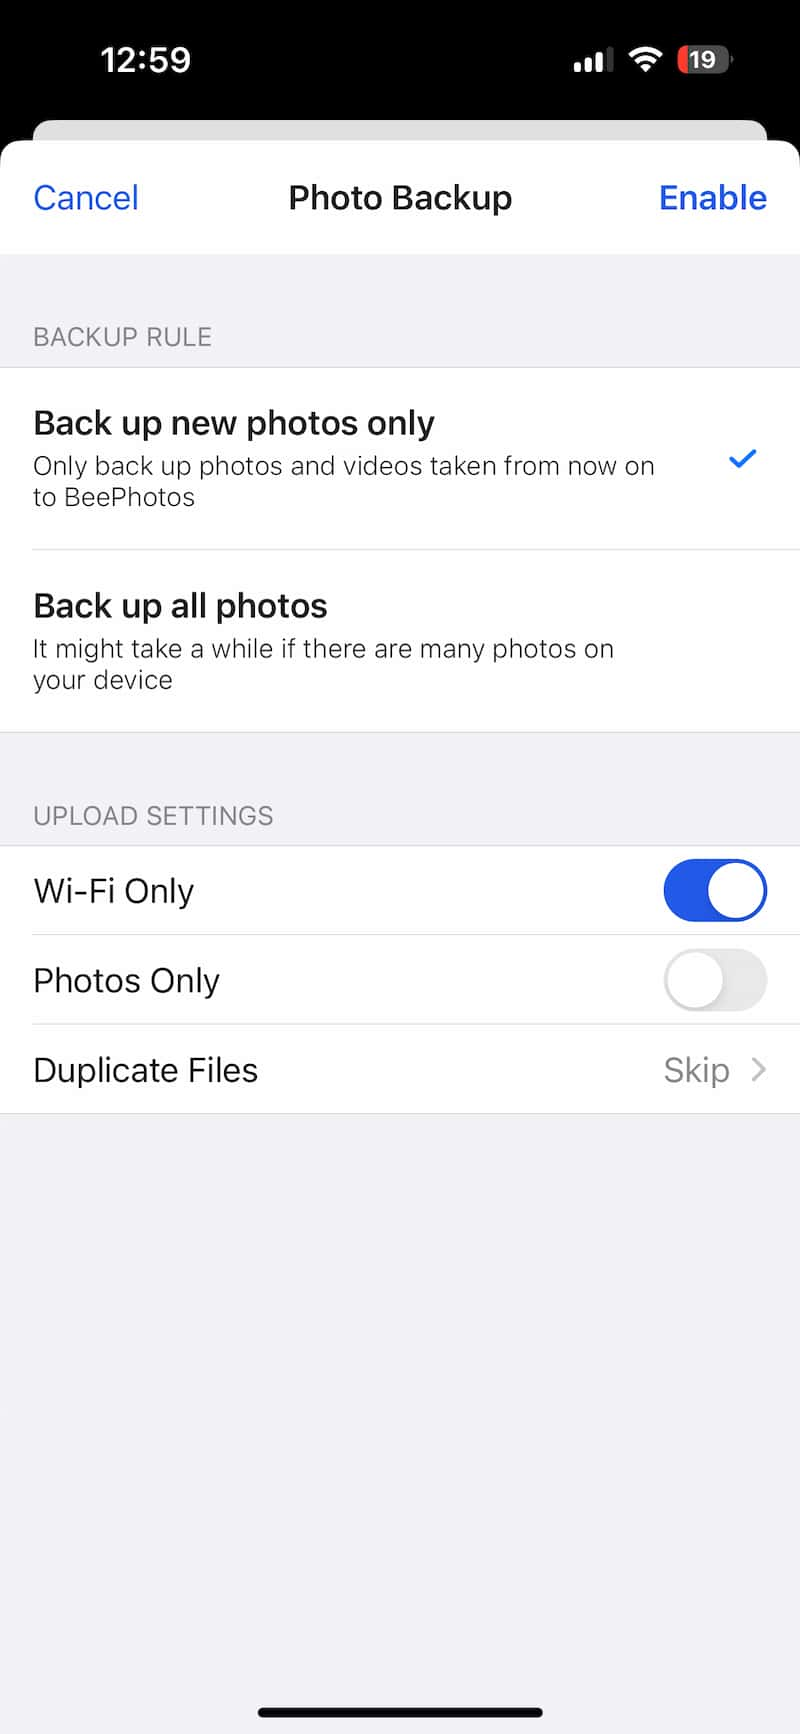
- If you prefer to upload only newly captured photos moving forward, choose Back up new photos only. Alternatively, opt for Back up all photos to back up all the photos on your phone. Tap Enable to initiate the backup process. You can choose this option based on your specific requirements.
- The backed-up photos will be displayed in the timeline based on when they were taken.
Backup Photos from Your Computer
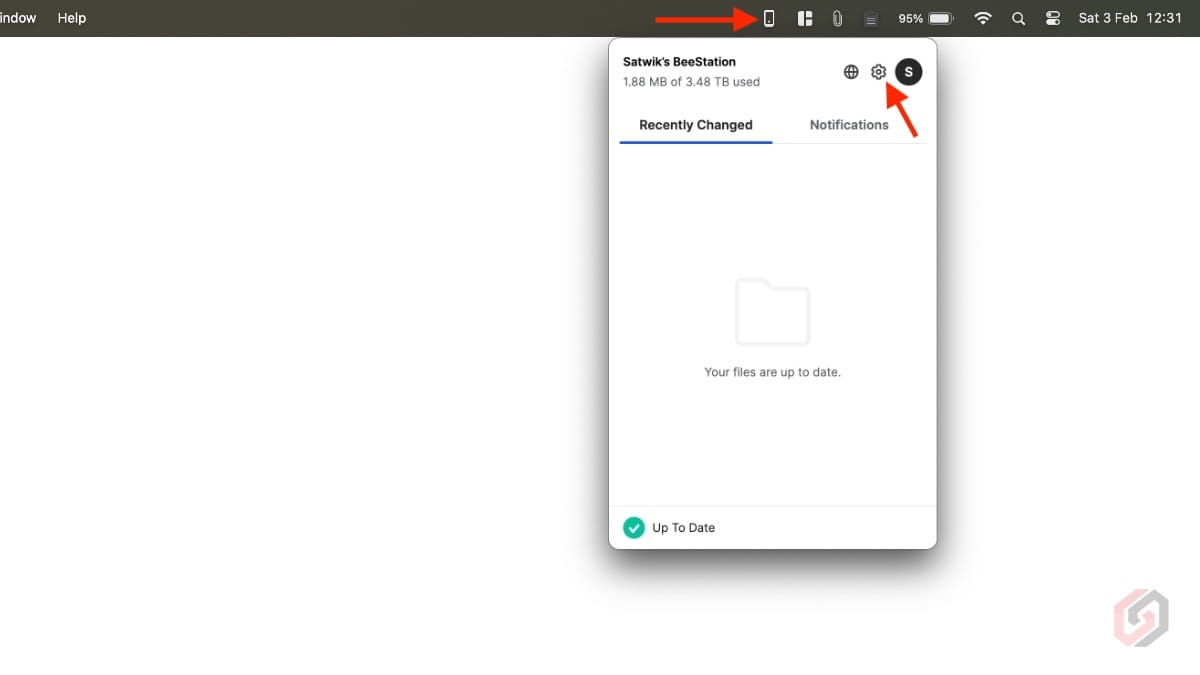
Launch BeeStation on your desktop, and click on the Settings icon on the top right. Subsequently, click on Settings to access the main window.
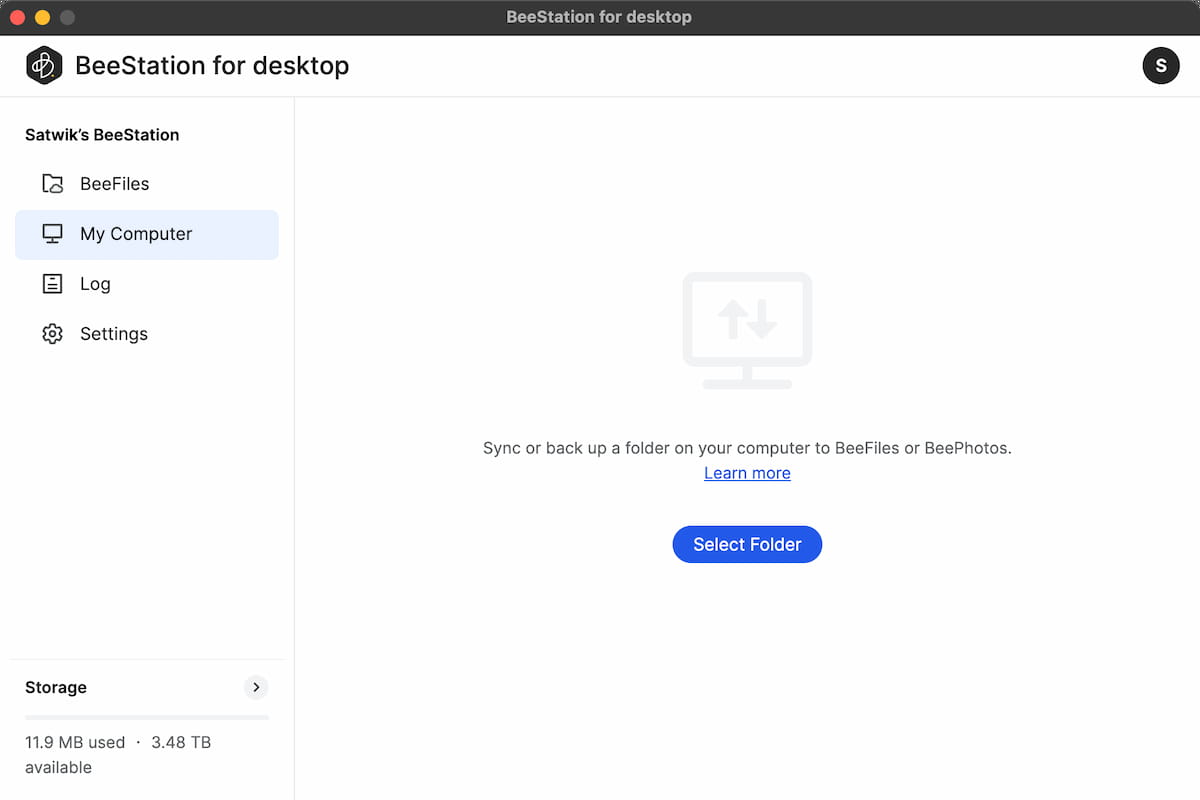
- Click on My Computer on the left sidebar and select Choose Folder.
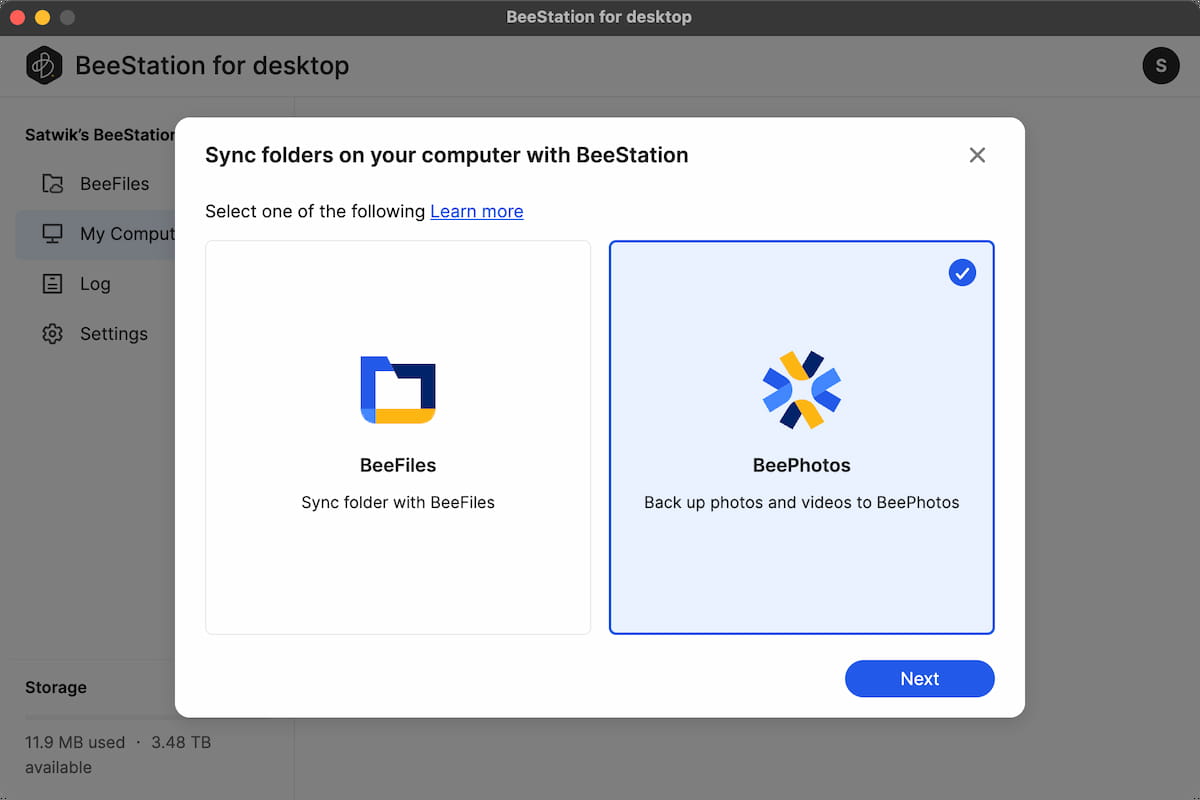
- Pick BeePhotos.
- Choose the specific folder on your computer that you intend to back up.
- Click Apply to initiate the backup process. You can review the results by checking the BeePhotos app or BeePhotos web interface on your computer.
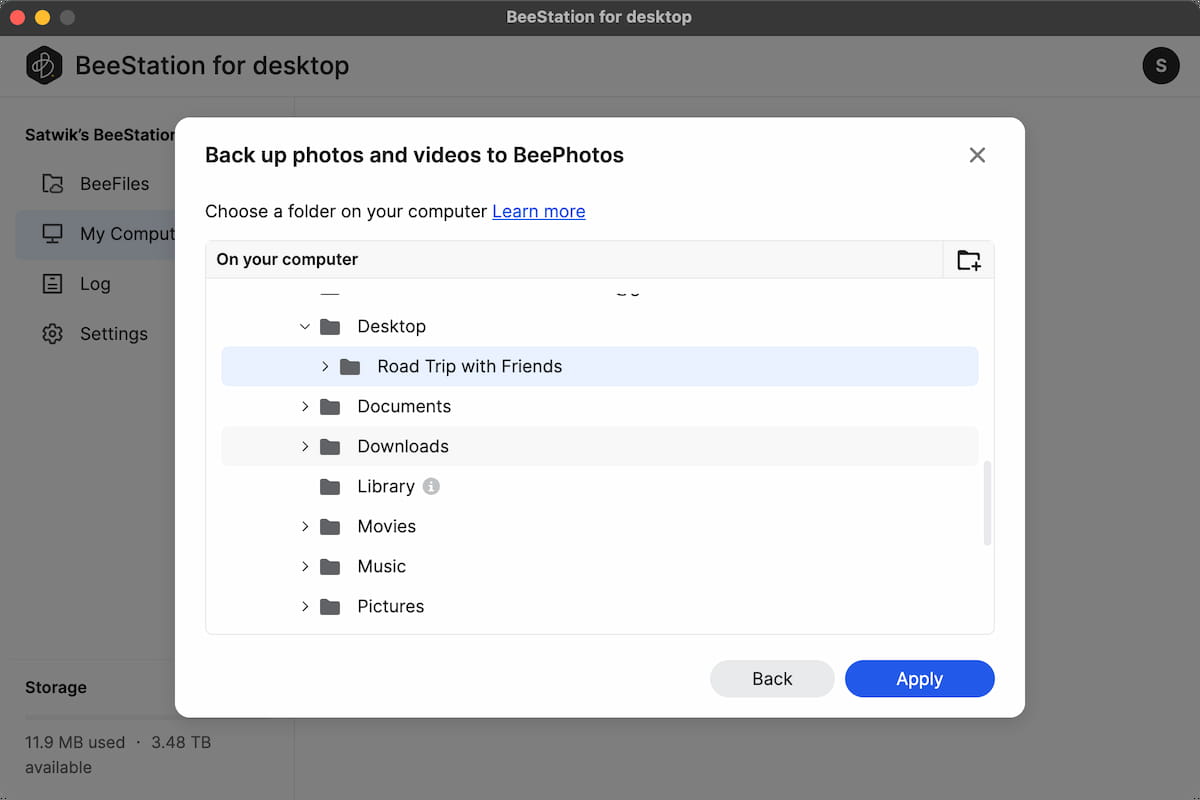
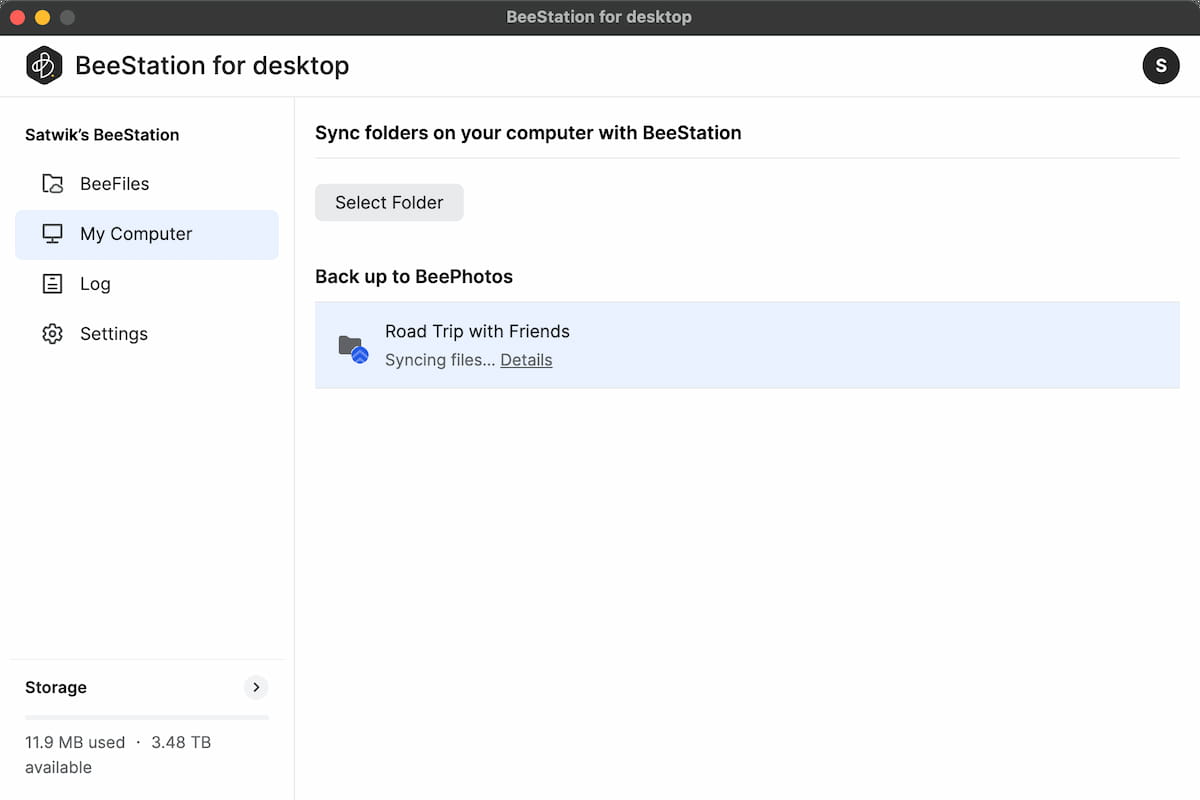
If you have a lot of photos, uploading photos through the desktop app provides the additional benefit of enabling the computer to generate image thumbnails. This helps reduce the workload on BeeStation and is therefore recommended over uploading via a web browser.
Securely Share Photos and Albums with Family and Friends
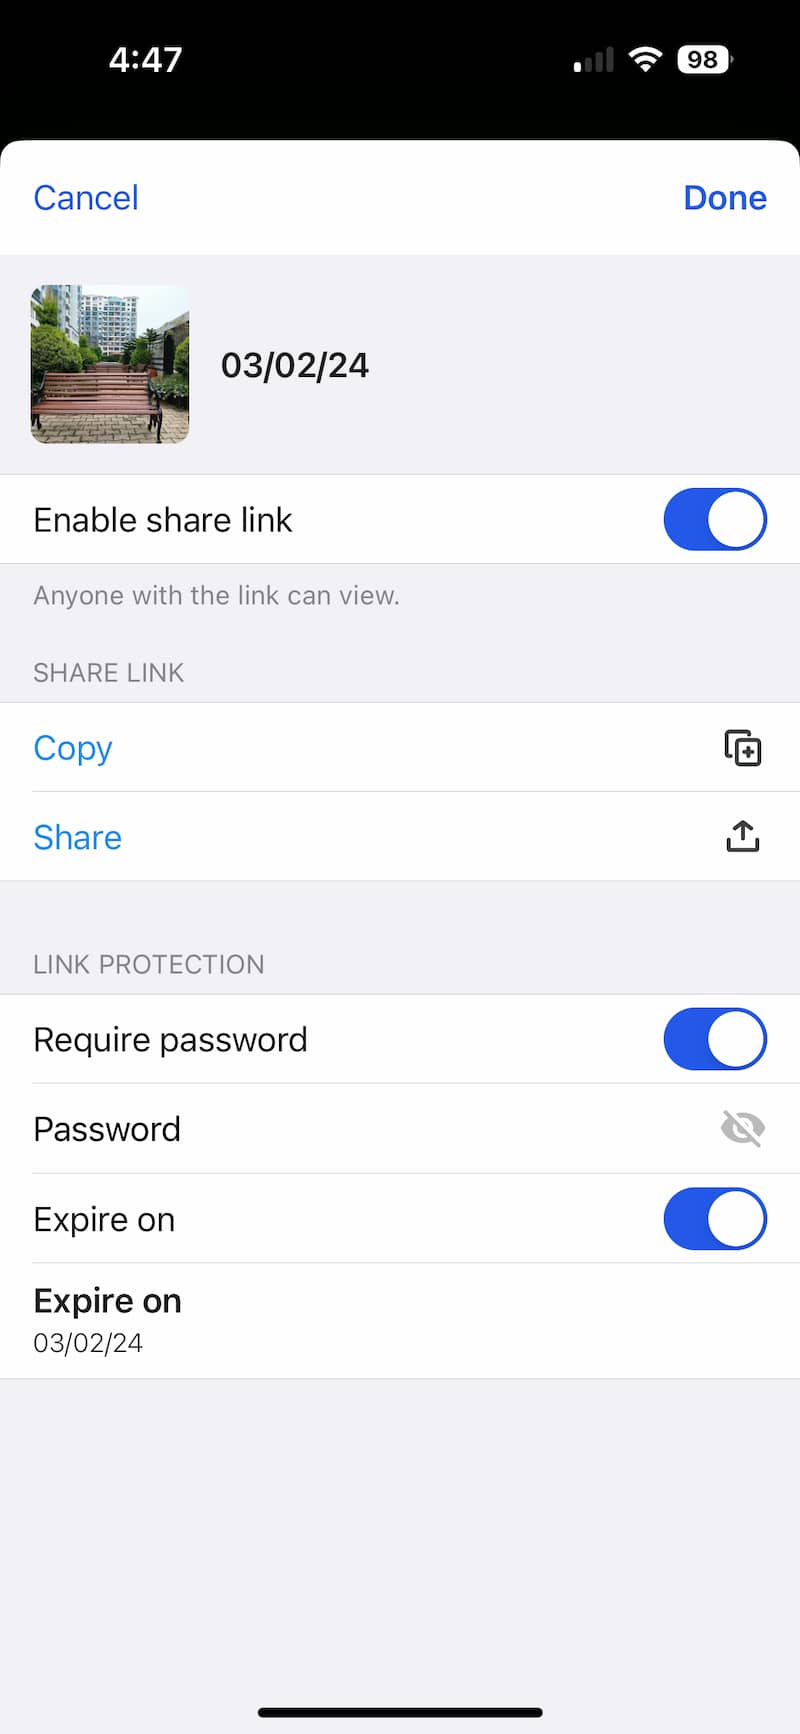
With BeePhotos, you can make groups of photos called albums to organize them as you like and share them with your friends and family. You can share just one photo or make an album with multiple photos to share. Synology also lets you put a password on shared photos, so people need a password to see them. There’s an option to set a date for when the shared link won’t work anymore, so it stops working after that date.
Share Individual Photos from Your Mobile
- Open BeePhotos on your mobile device.
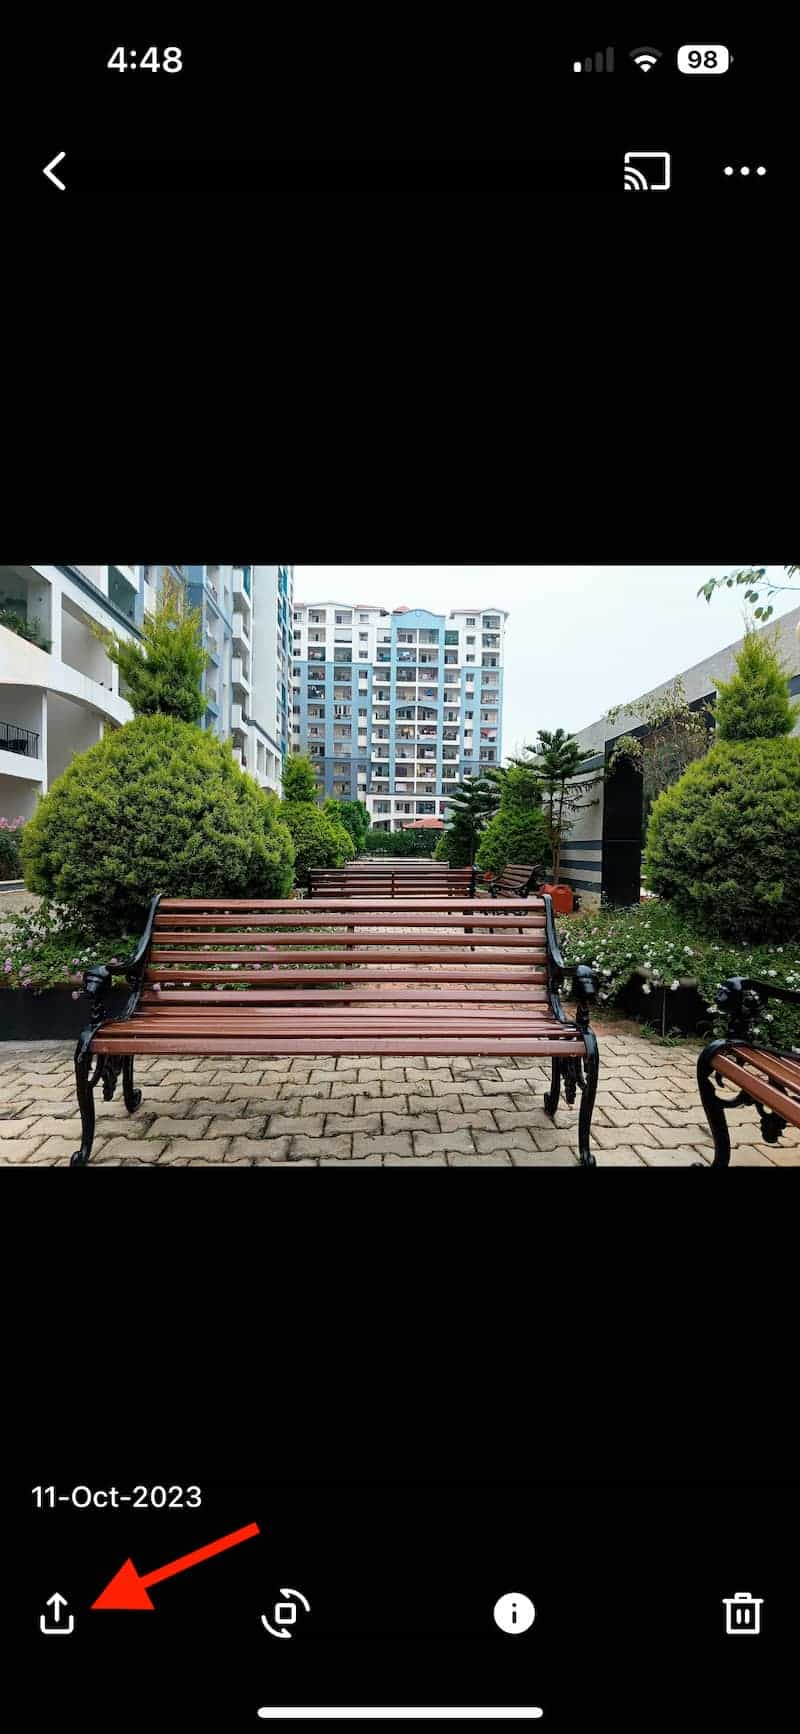
- Open the specific photo you wish to share.
- Click on the Share icon located at the bottom left of the screen.
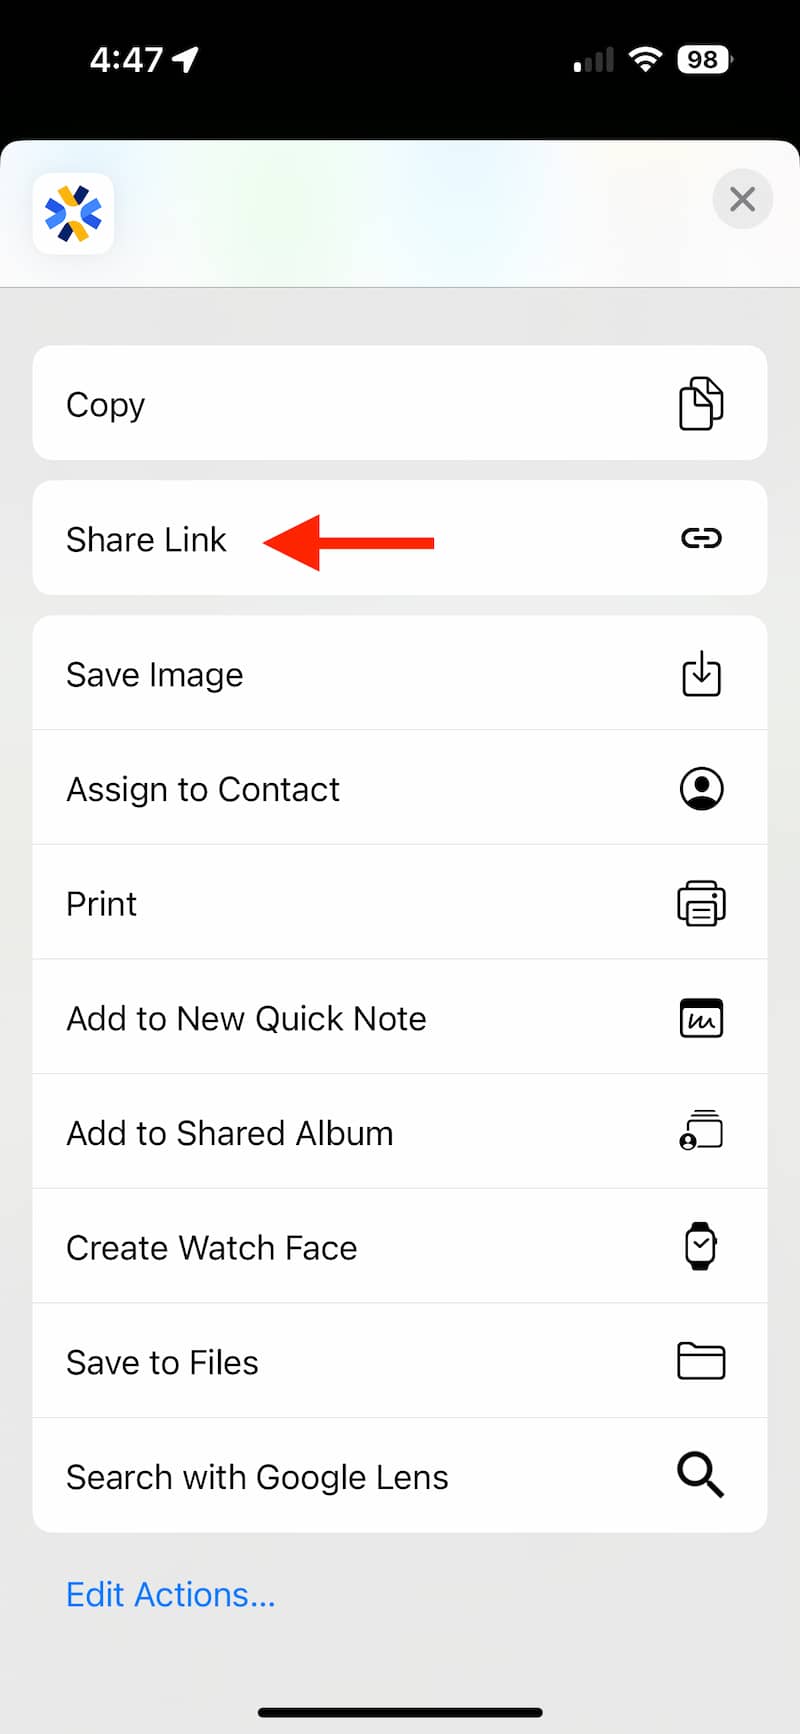
- Choose the Share Link option.
- To share the link, either tap Copy to copy the link or select the Share option to open the menu and pick the app through which you want to share the link.
- Additionally, you can safeguard the link with a password and set an expiry date.
Share Photo Album from Your Mobile
- Open BeePhotos on your smartphone.
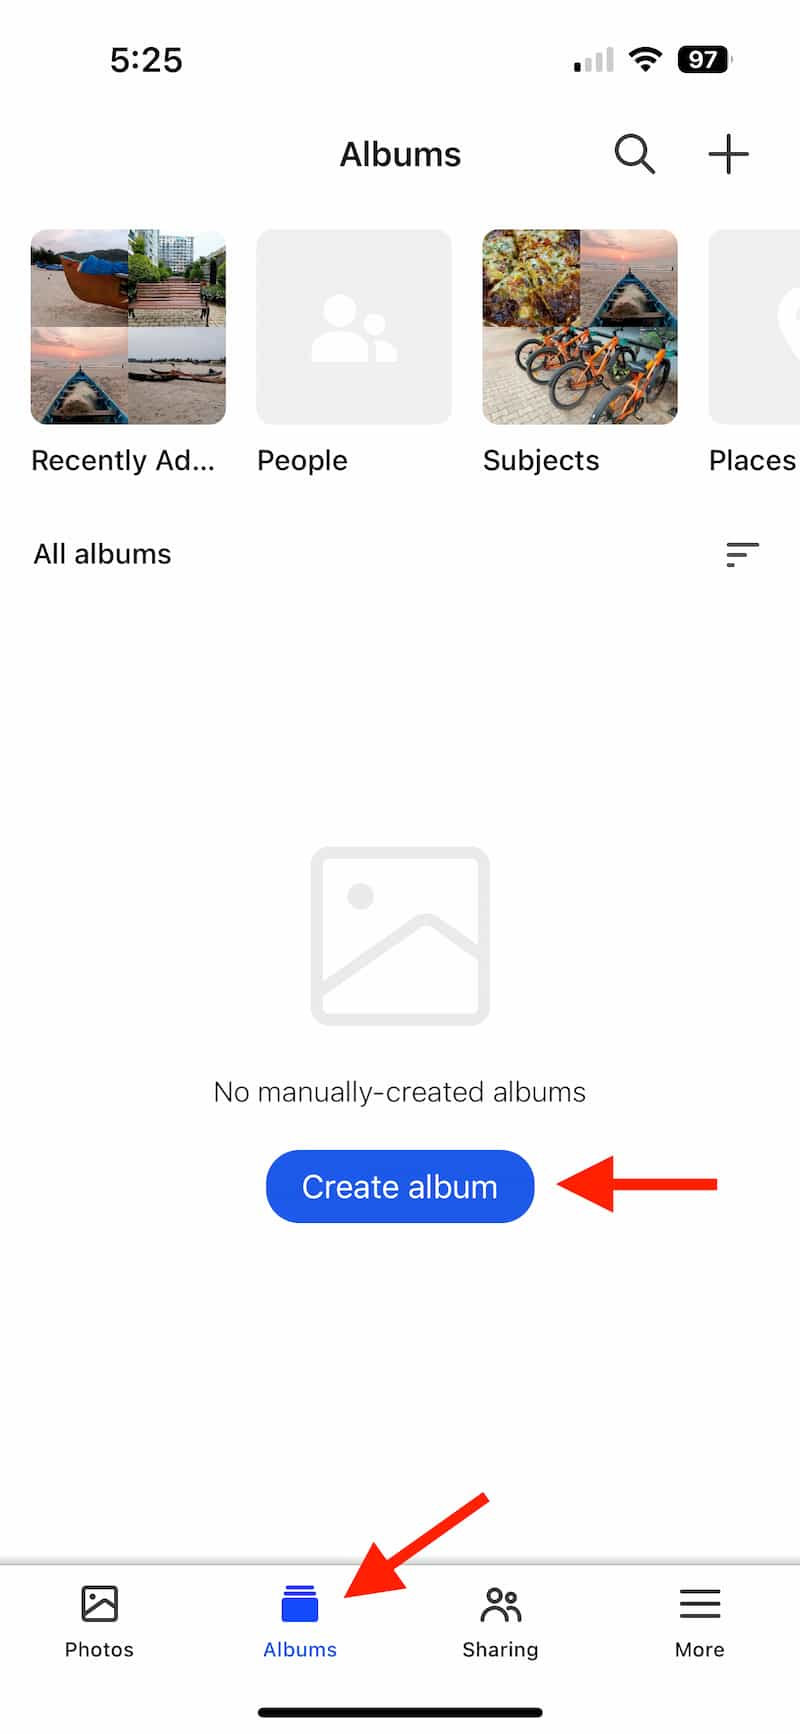
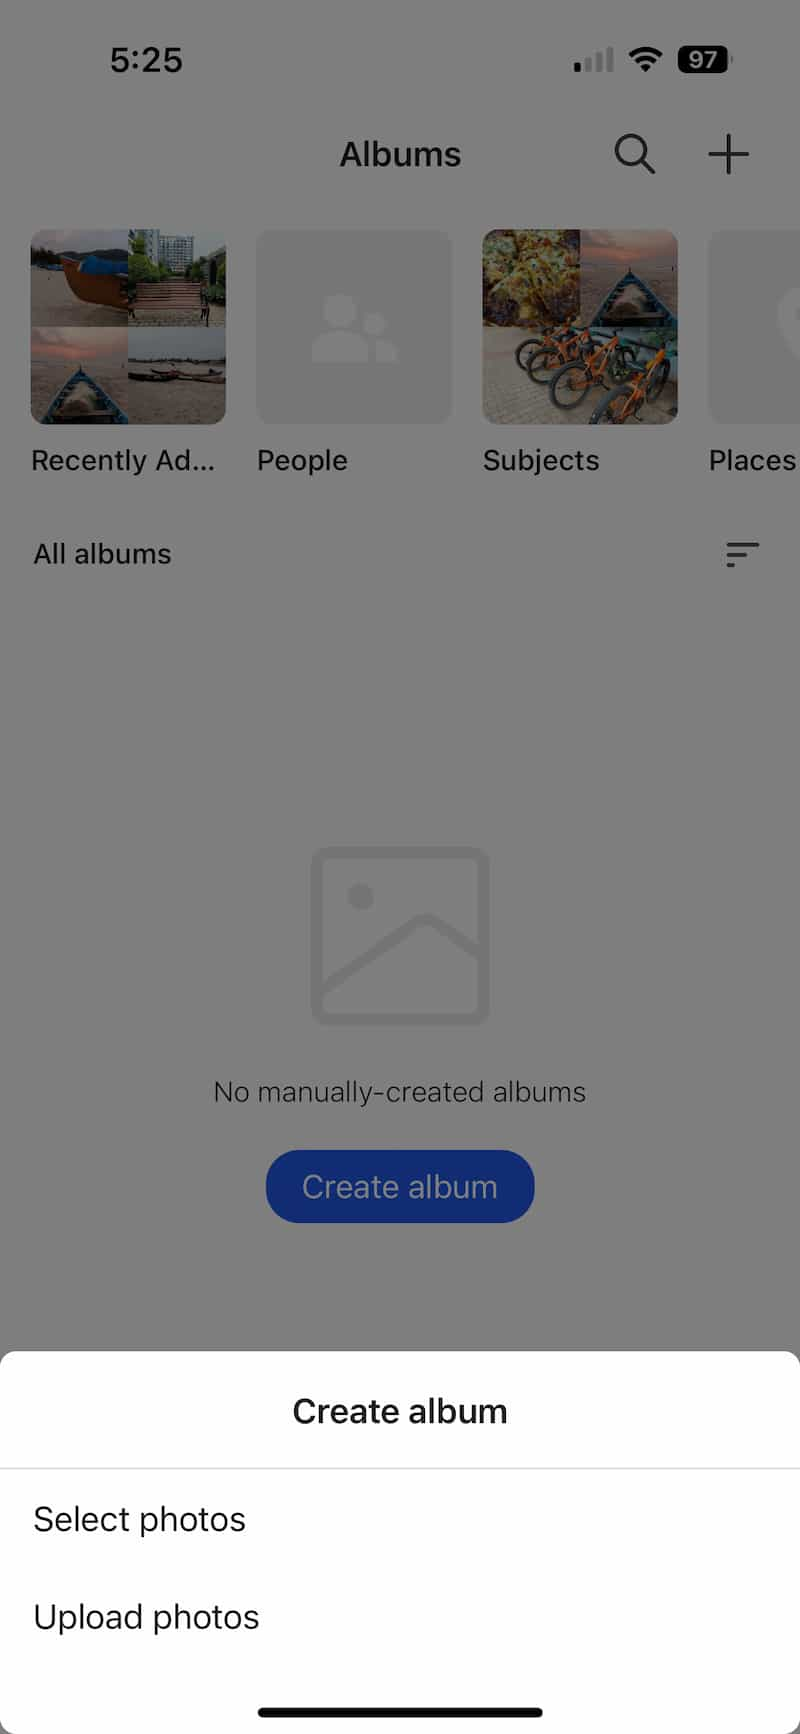
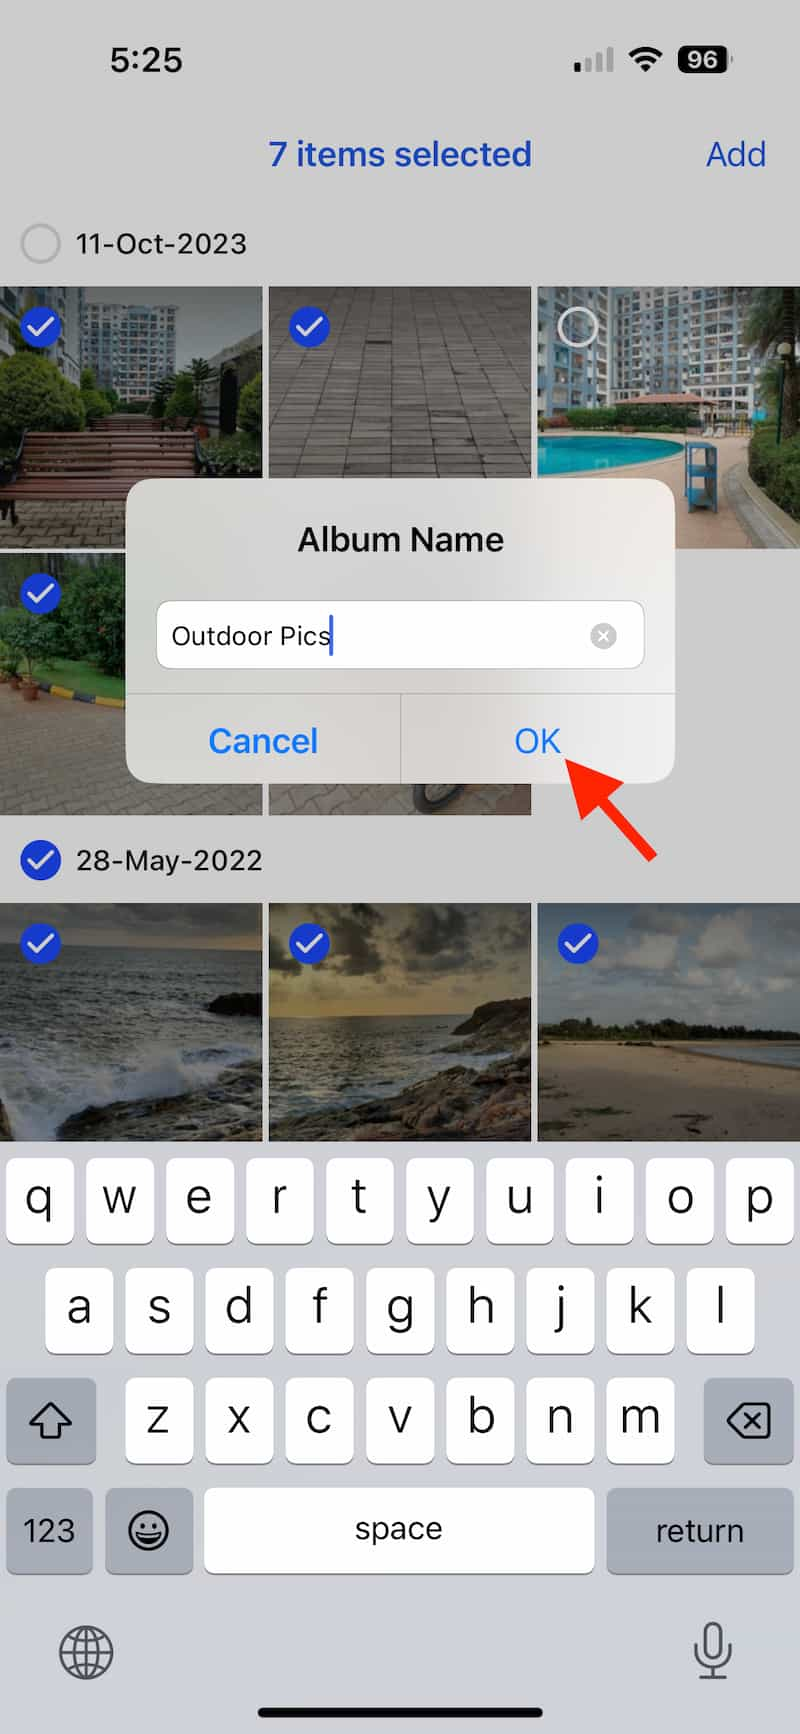
- Navigate to Albums and tap on Create album.
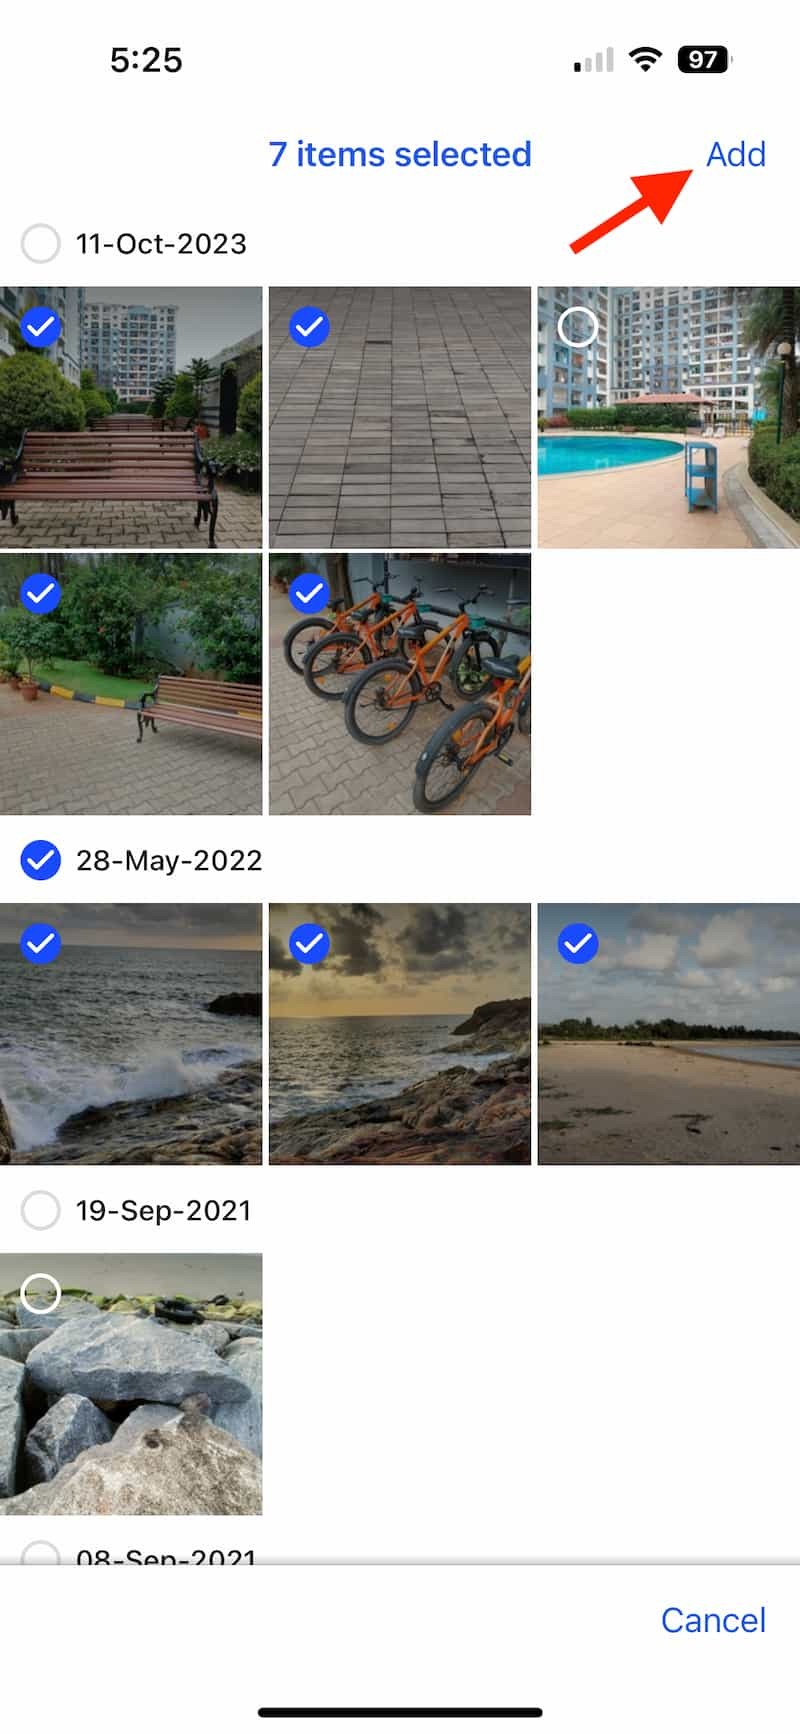
- You will have two options: Select Photos and Upload Photos. The Select Photos option allows you to pick images already uploaded to BeeStation, while Upload Photos enables you to upload pictures directly from your smartphone. Now, choose the photos you wish to include in the album and click Add at the top right.
- Assign a name to the album and tap OK.
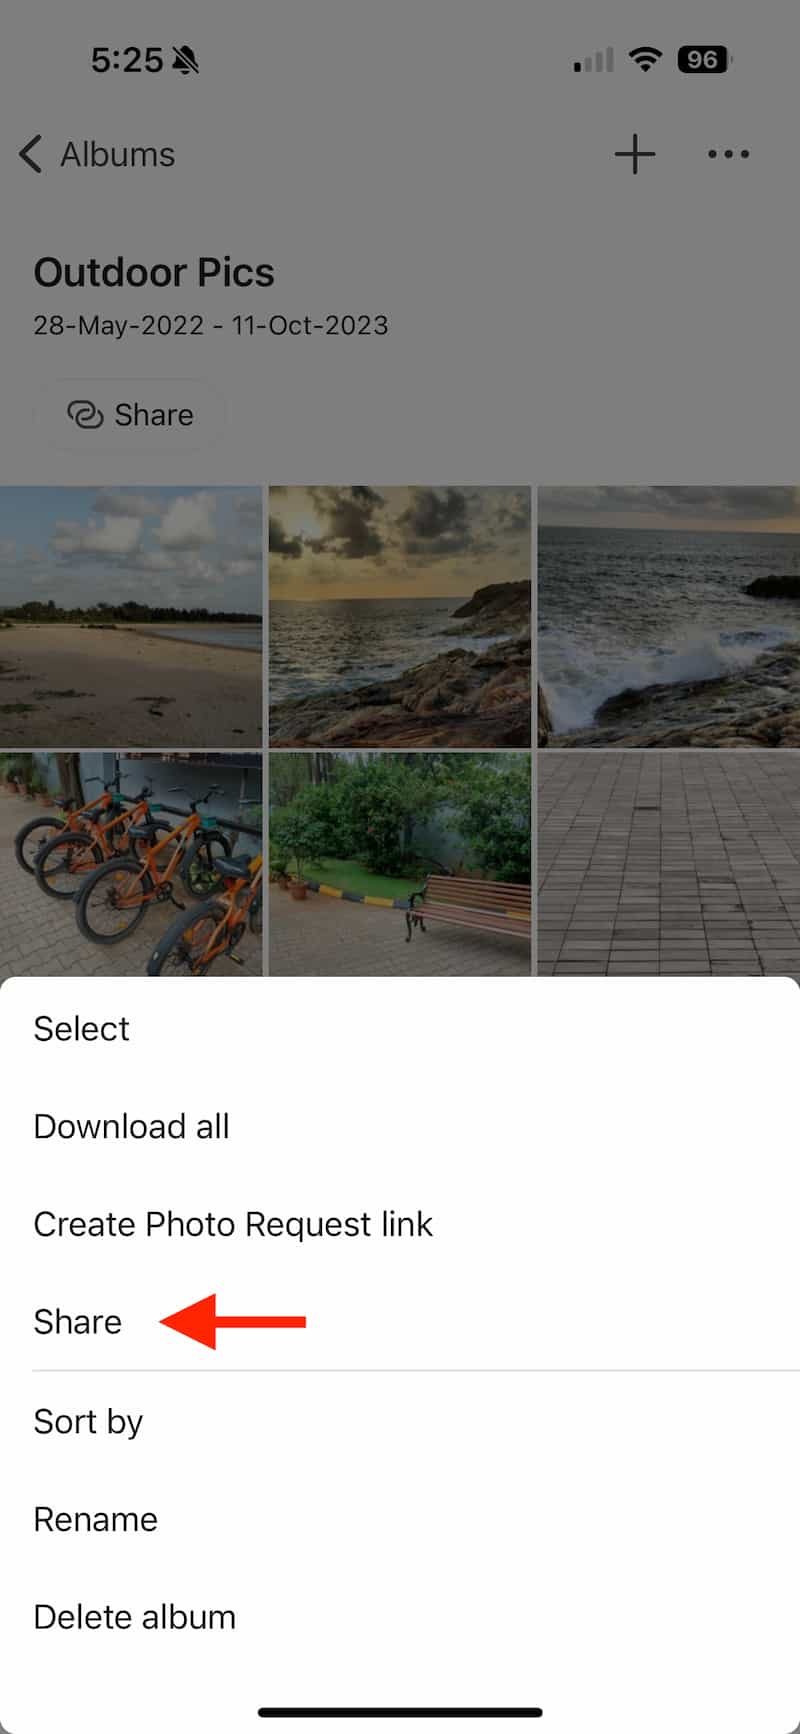
- Click on the Share option.
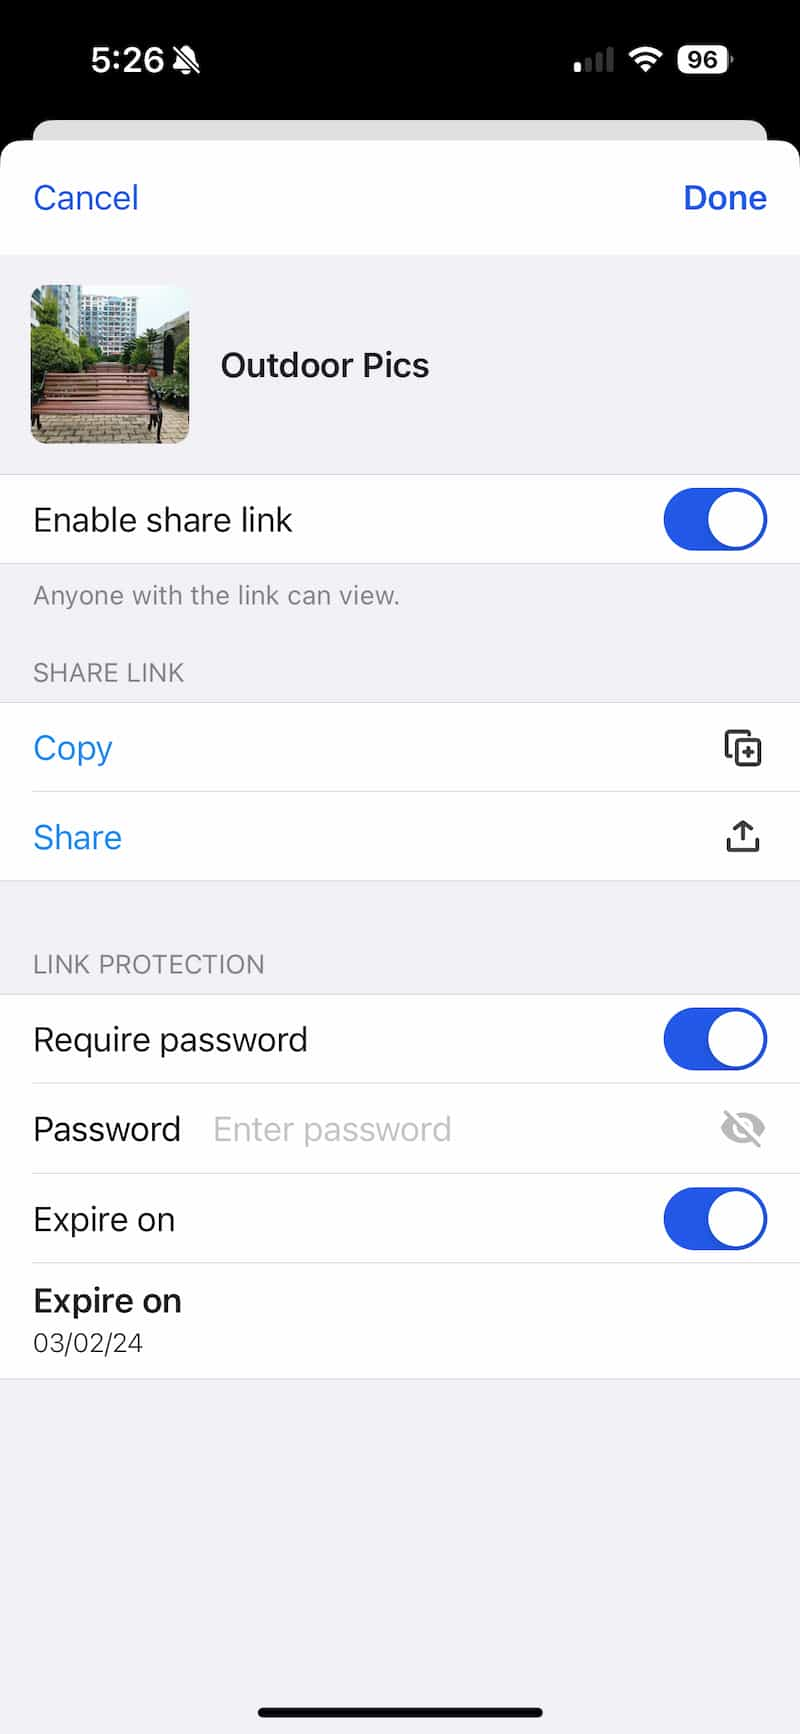
- Turn on the Enable Share Link option. To share the link, either tap Copy to copy the link or select the Share option, opening a menu to choose the app through which you want to share the link. Additionally, you can secure the link with a password and set an expiry date.
How to Turn Off Photo Sharing?
- Open BeePhotos on your smartphone.
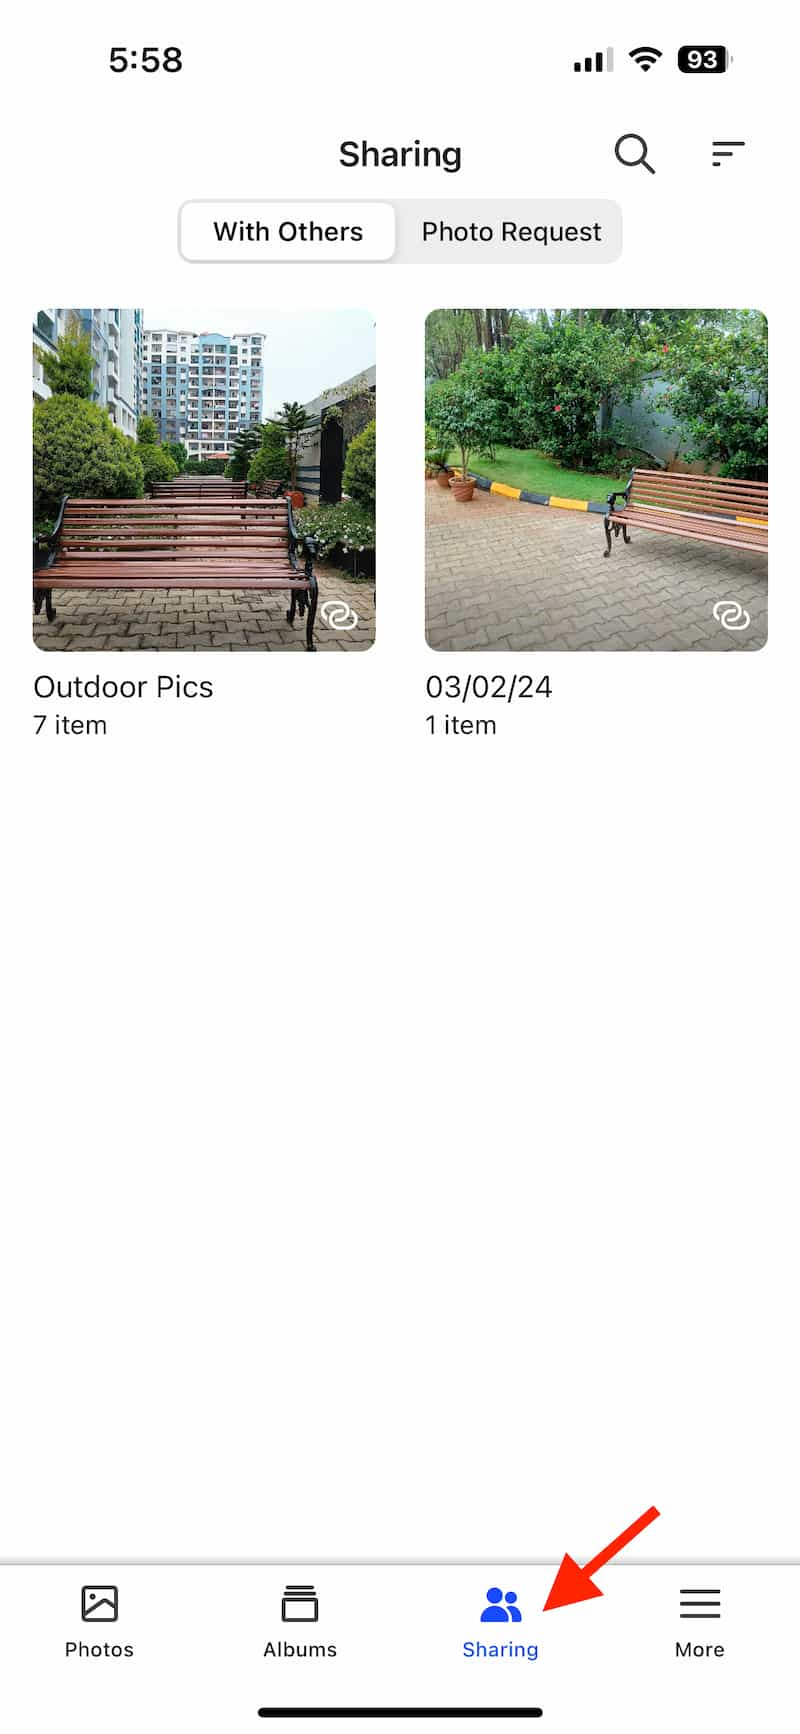
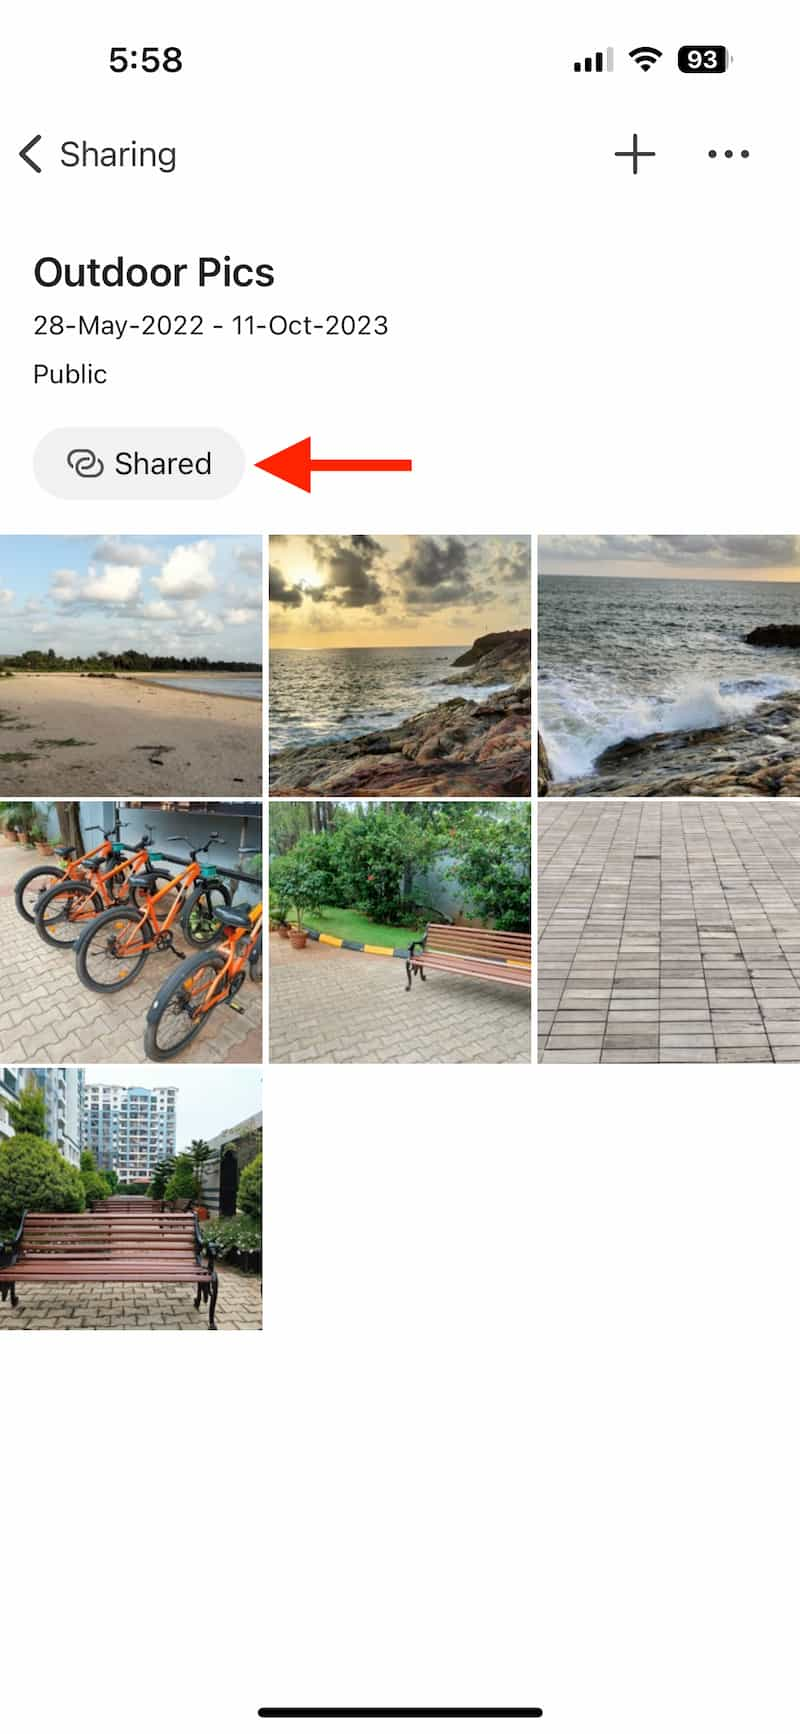
- Go to the Sharing tab, where you can find all the photos and albums you have shared.
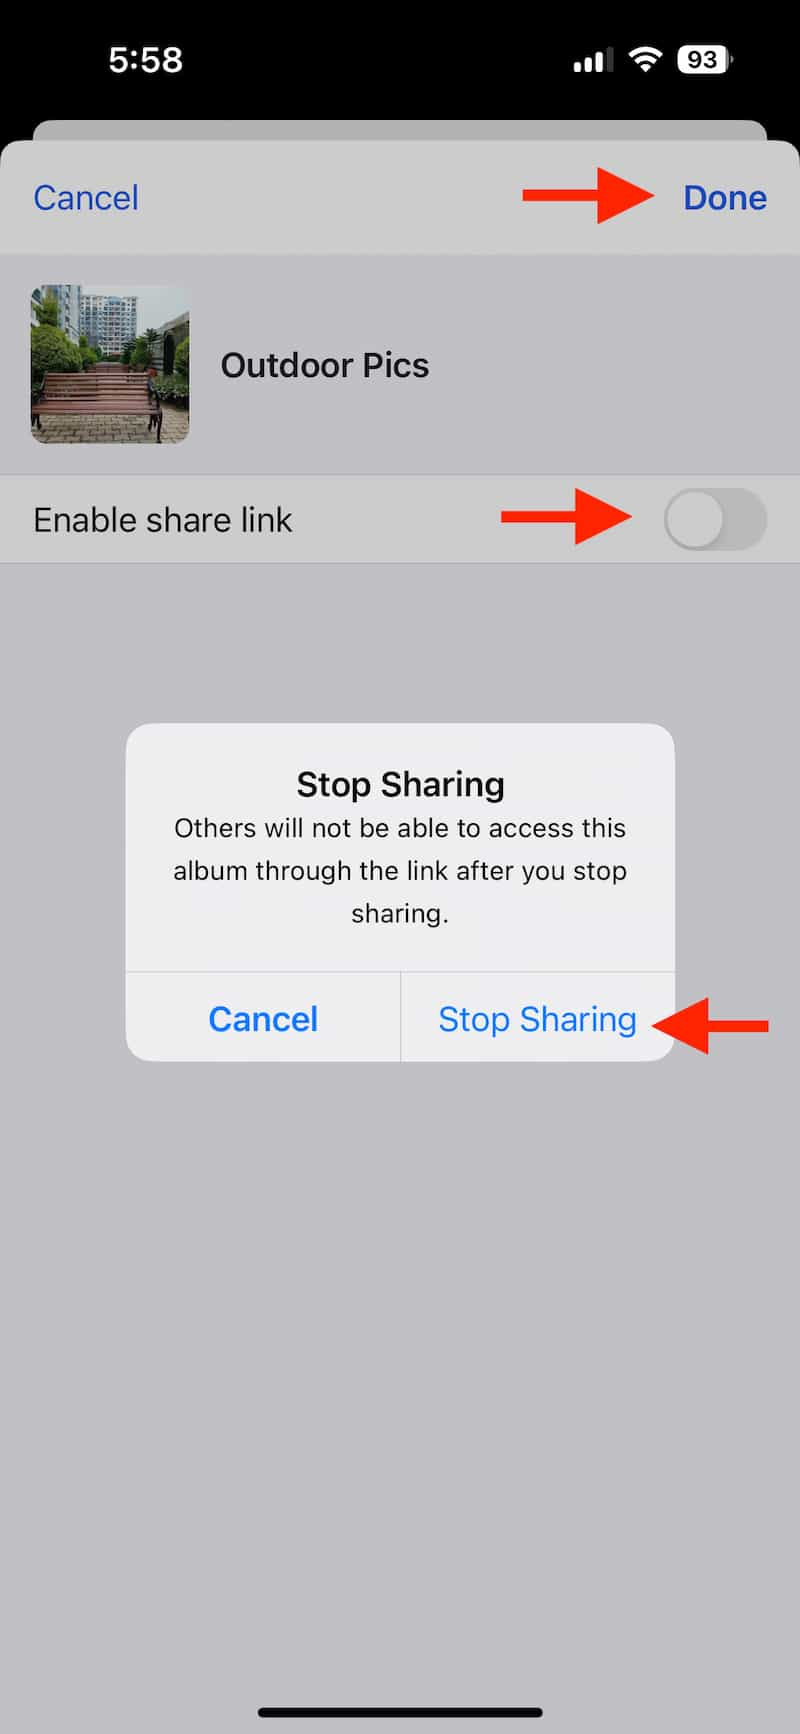
- Open the desired photo or album, and tap on Shared.
- Toggle off the Enable Sharing option and select Done on the top right. Then, from the pop-up, select Stop sharing.
Cast Photos on TV
The BeePhotos Mobile app facilitates the casting of photos via AirPlay or Chromecast, allowing you to effortlessly display photos and videos stored on BeeStation on your Smart TV.
- For AirPlay: Make sure your AirPlay device is linked to the same Wi-Fi network as your mobile device. Open Control Center, tap on Screen Mirroring and then select your AirPlay device.
- For Chromecast: Confirm that your Chromecast device is configured and connected to the same Wi-Fi network as your mobile device. Open a photo, tap the cast icon, and choose your Chromecast device.
Sync or Back Up Files from Your Computer to BeeStation using BeeFiles
A really good way to use Synology BeeStation is for file syncing. This allows you to back up a folder from your PC to the Synology BeeStation using the official desktop app, which works on both Windows and Mac computers.
- Open the BeeStation desktop app on your computer.
- Access the main window by clicking the Settings icon and then selecting Settings.

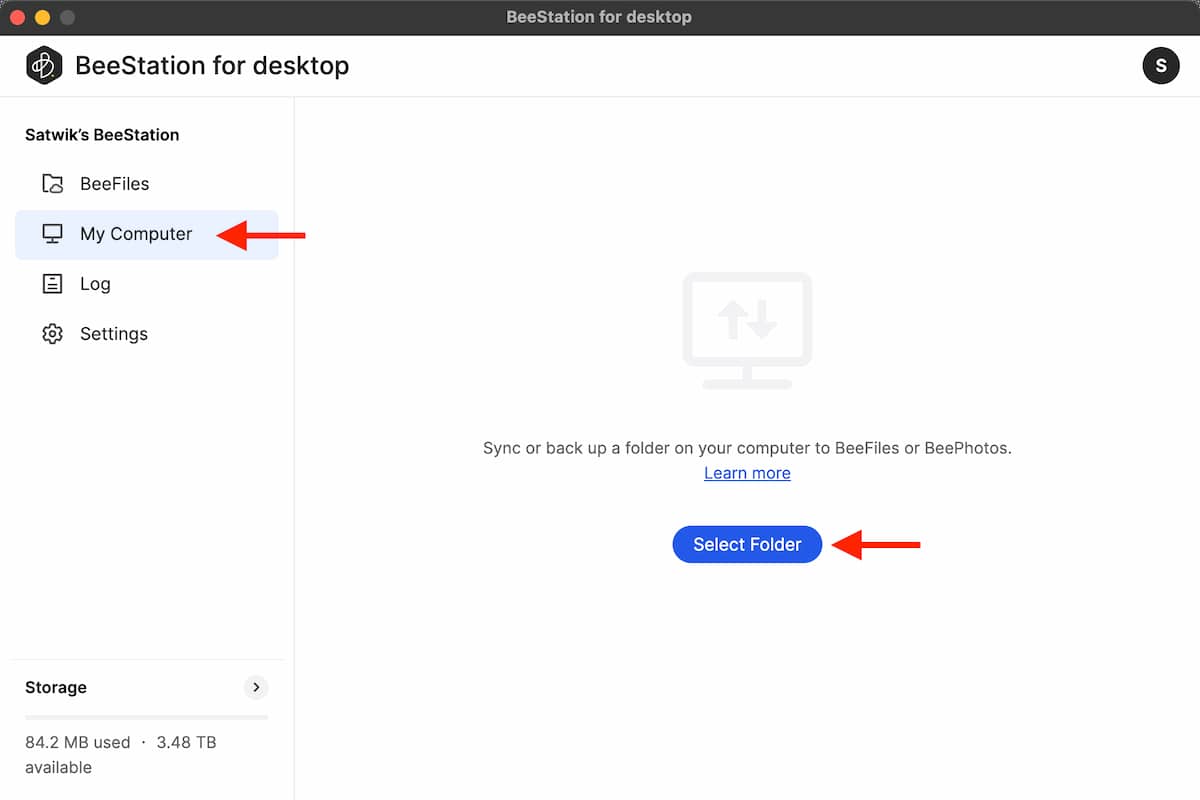
- Navigate to the My Computer tab in the left sidebar and click on Select Folder.
- Choose BeeFiles. If you primarily work with images and videos, you can also opt for BeePhotos. For other file formats like DOCX, PDF, etc., choose BeeFiles.
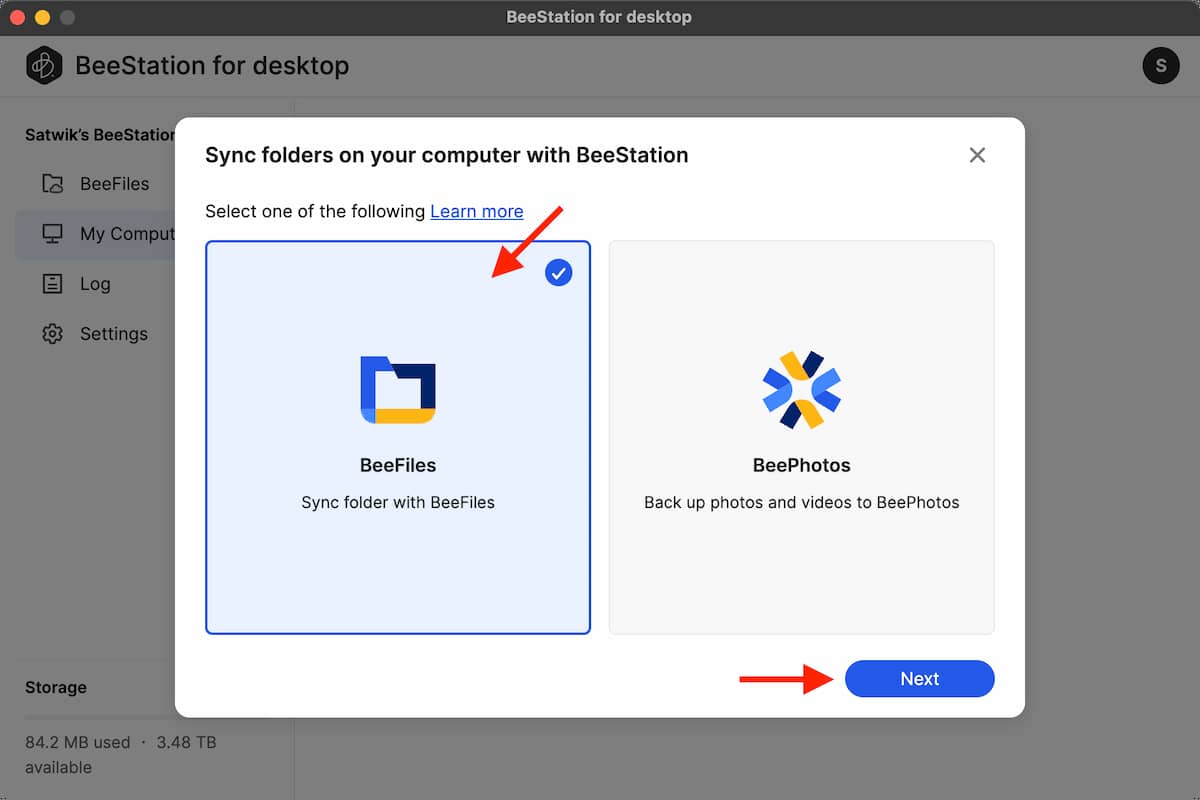
- Afterward, you’ll need to choose the Backup type, which includes Sync with BeeFiles and Back up to BeeFiles. In Sync with BeeFiles, also known as two-way sync, file changes are mirrored between your computer and BeeFiles. If you delete a file on BeeStation, it will also be removed from your computer. In Back up to BeeFiles, also termed as one-way sync, files from the selected folder on your computer are backed up to BeeFiles. You can restore content from BeeStation at any time if necessary. Choose the option that best fits your needs.
- Then, select the folder on your computer that you want to sync or back up and click Apply to initiate the syncing or backing-up process.
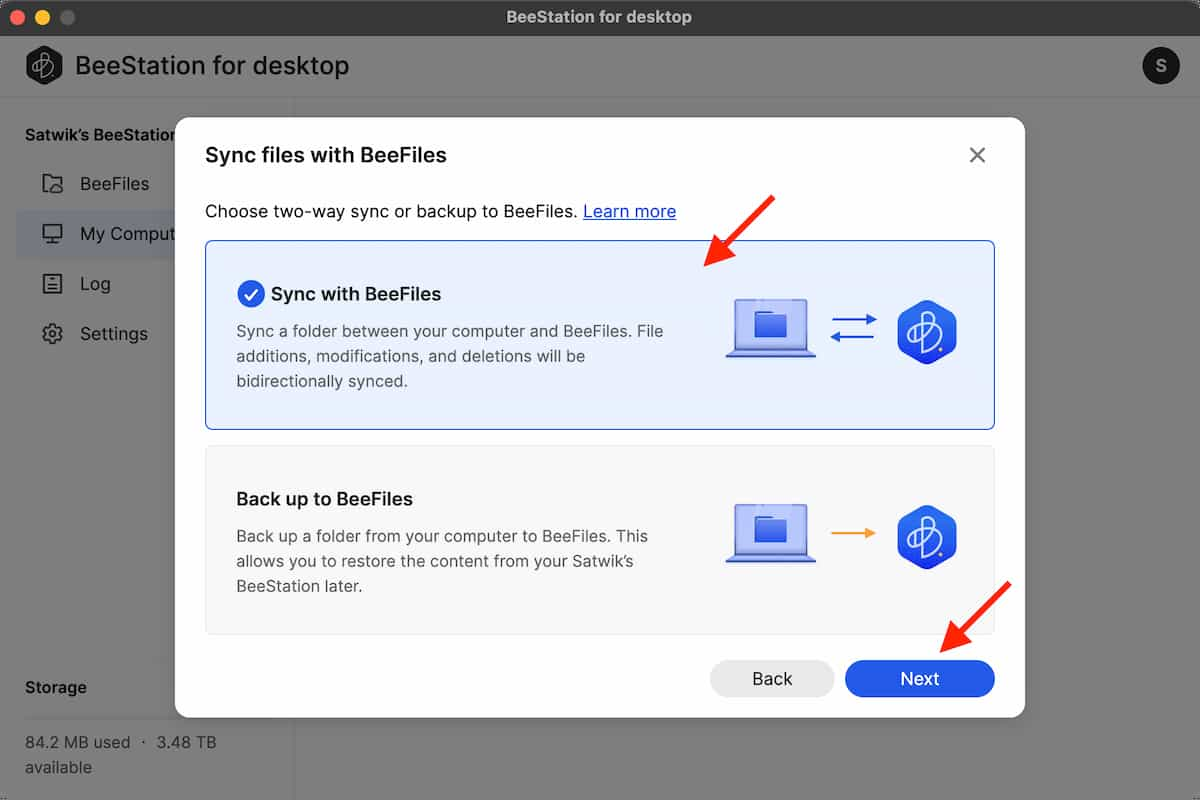
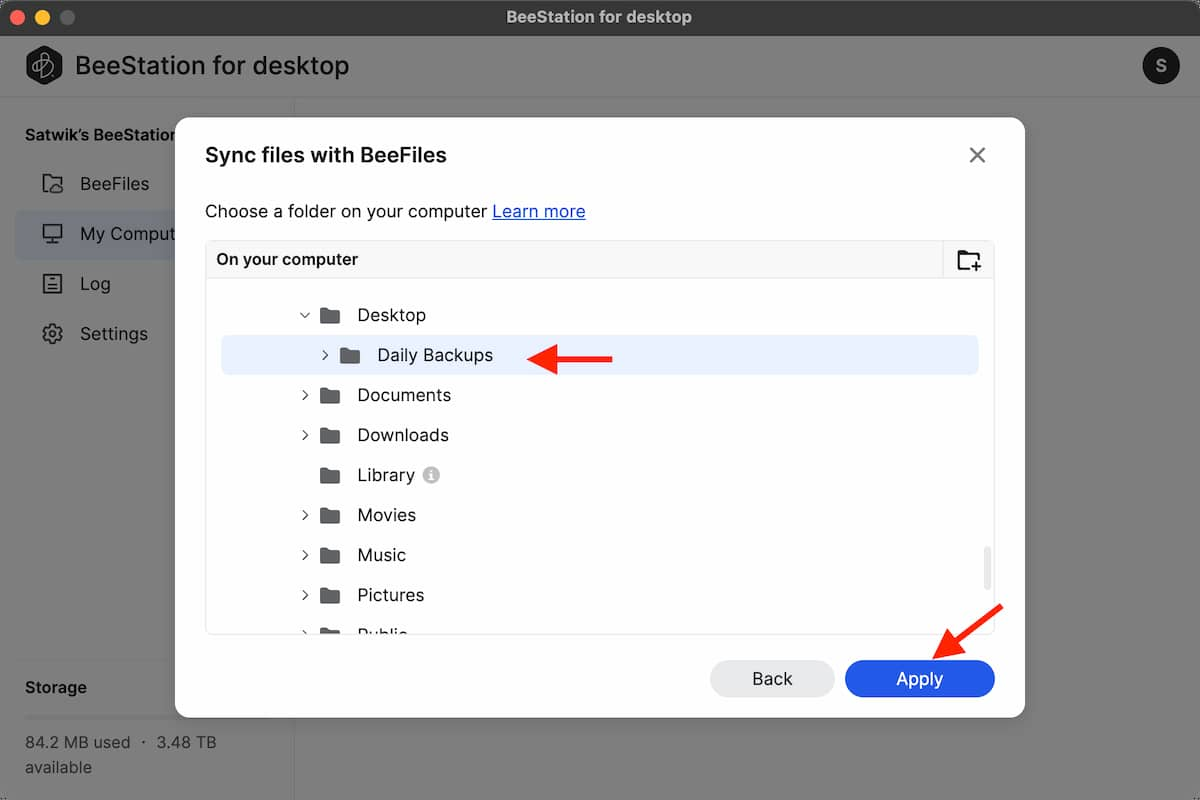
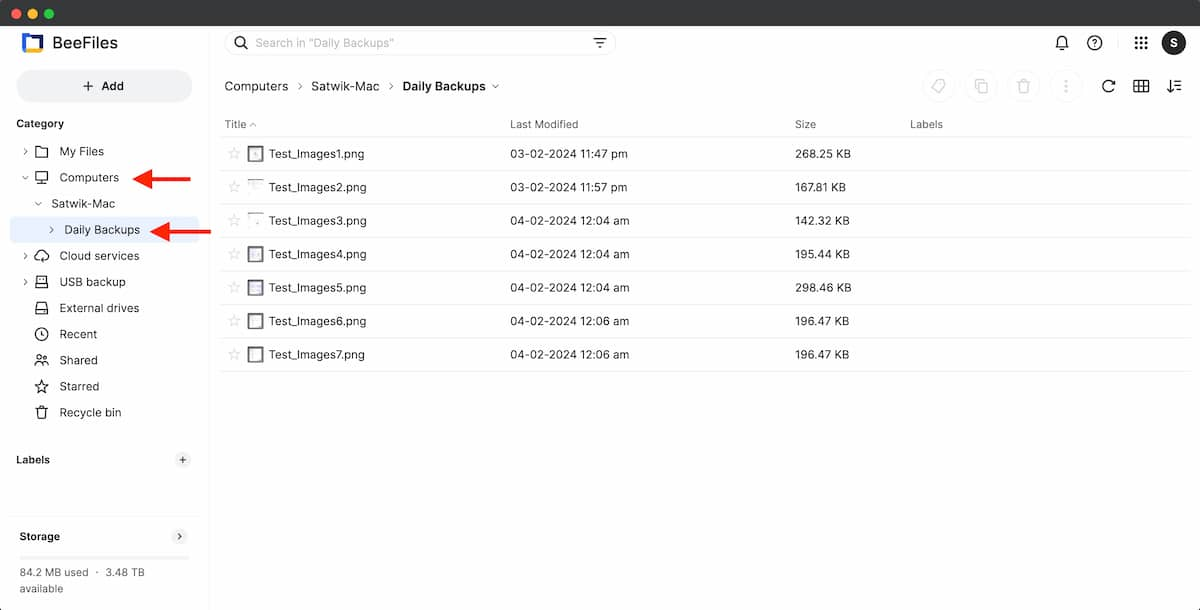
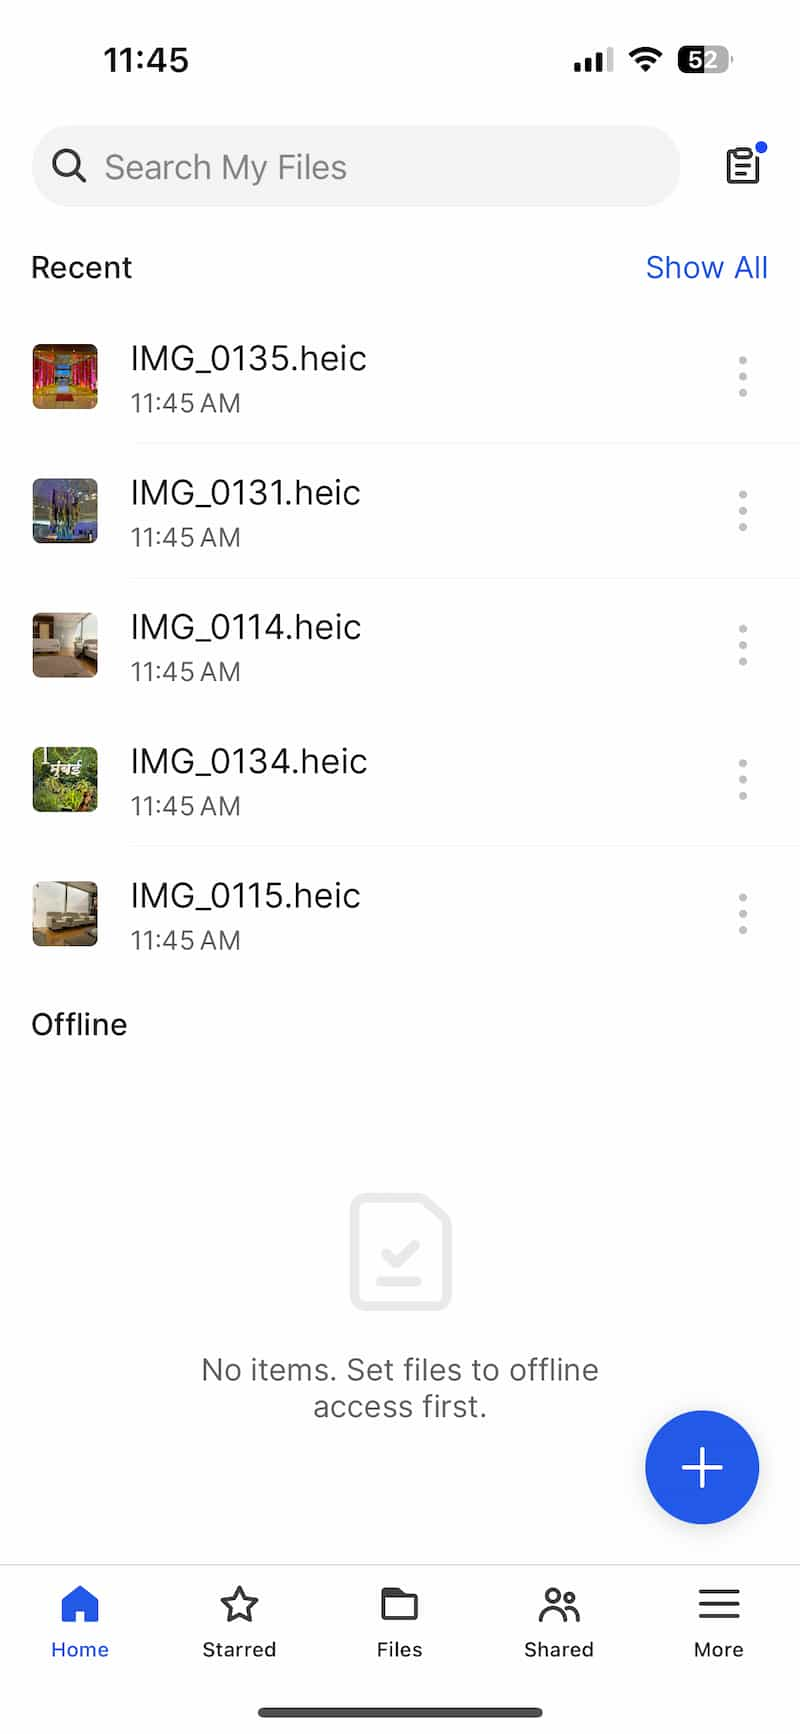
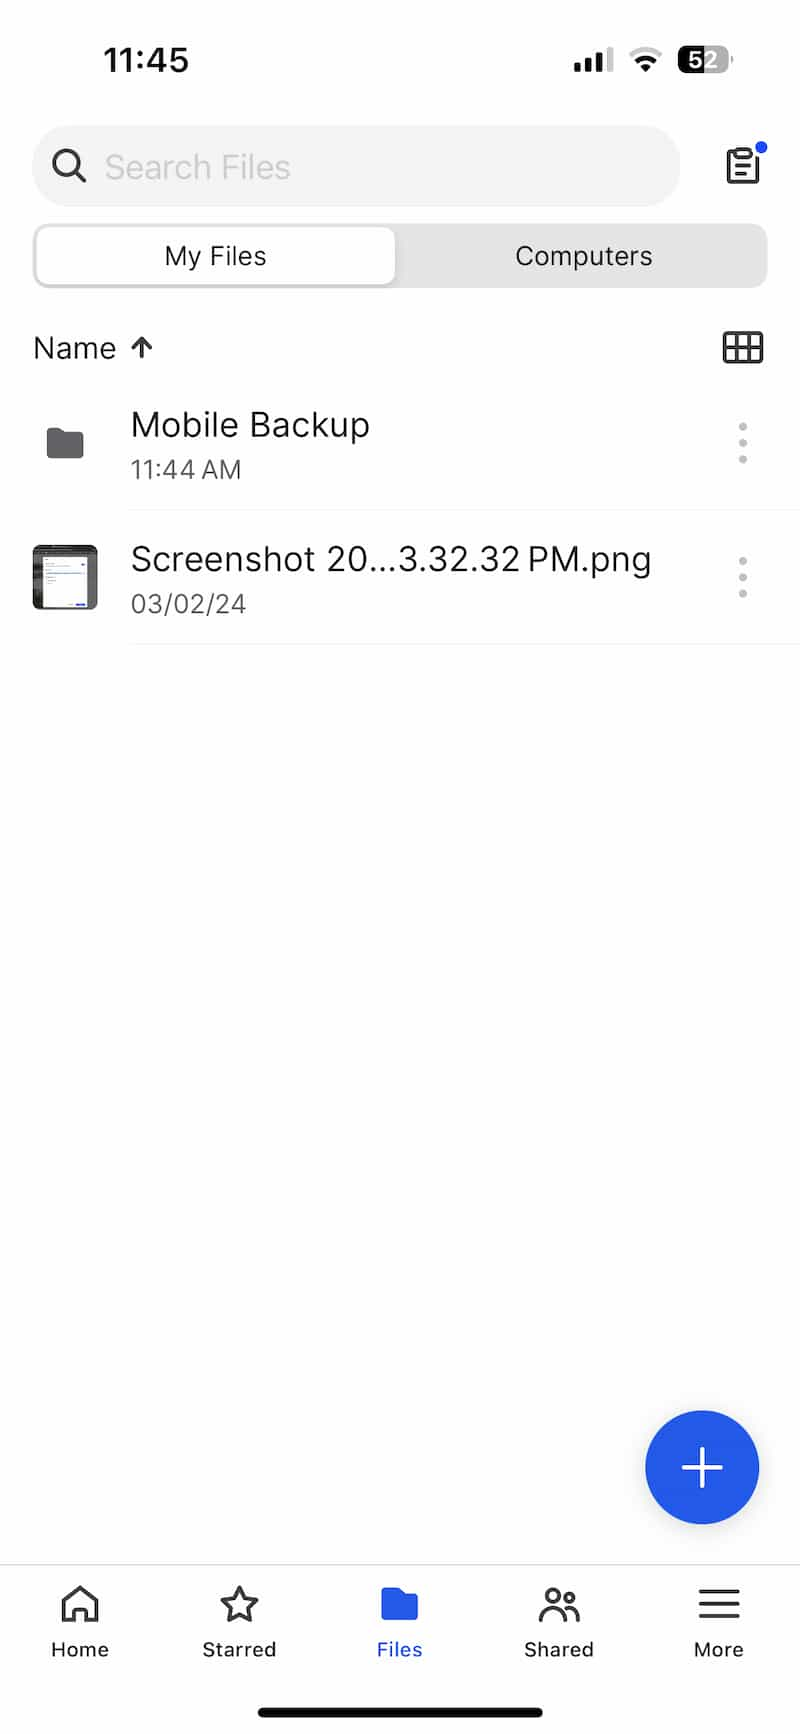
To verify the results, visit the BeeFiles web portal. Once you’ve opened the BeeFiles web portal, navigate to the Computers section in the sidebar. Choose the folder named after your computer. Alternatively, you can access this folder on your phone through the Files tab in the BeeFiles app.
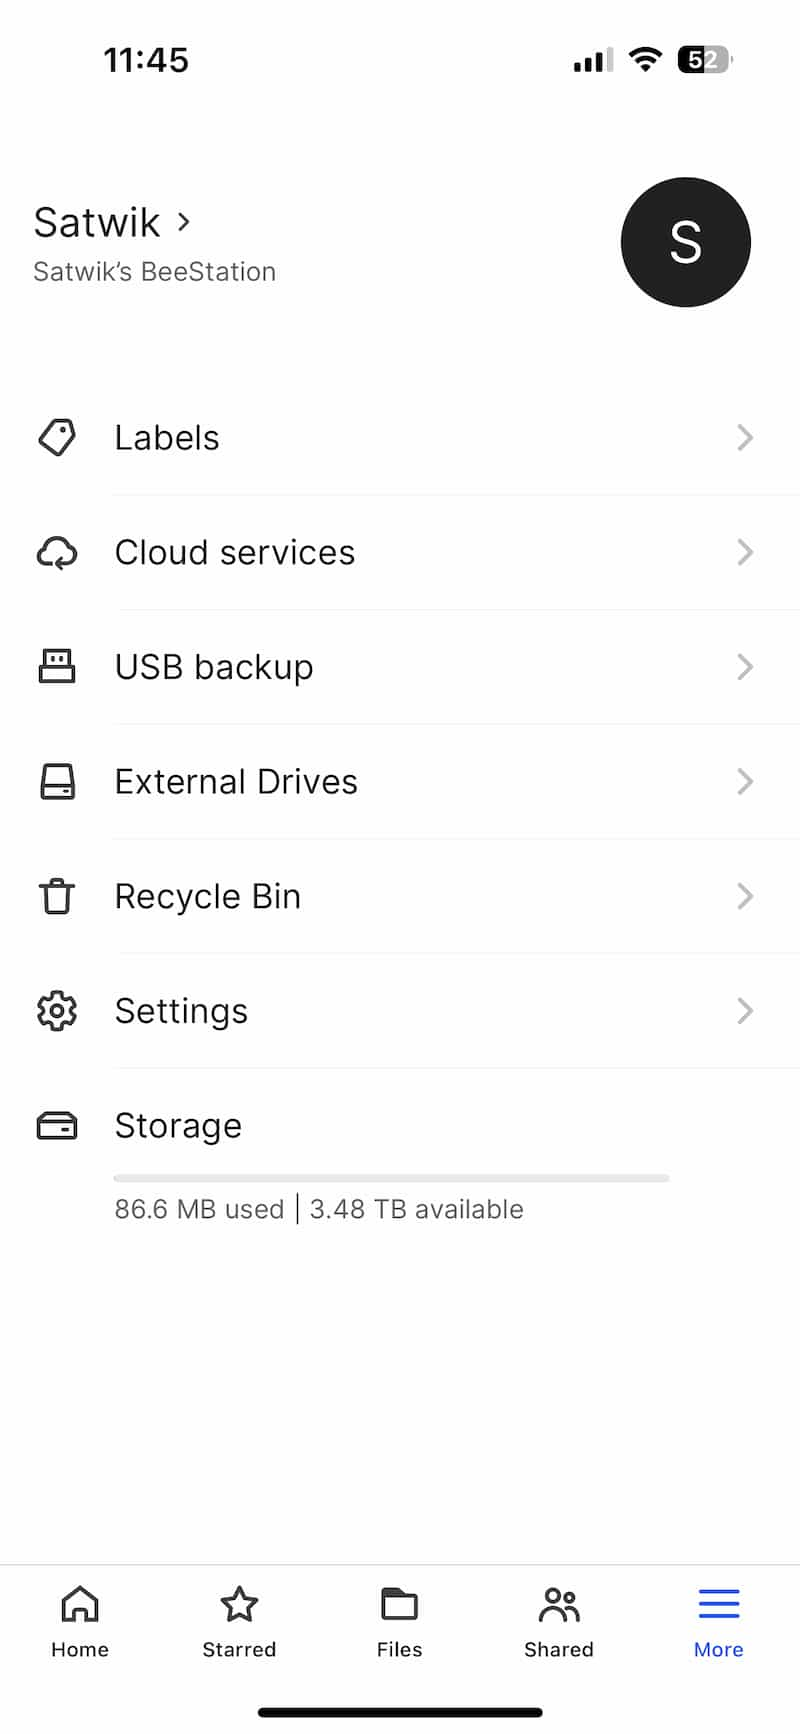
You can also use the BeeFiles app on your smartphone to upload files to BeeStation. Both apps support most of the features supported by Desktop except a few.
In case you missed it: Import Passwords to Synology C2 Password Account: Step by Step Guide
Sync Files from Cloud Service to BeeStation
Synology BeeStation also allows you to backup files and photos from Dropbox, Google Drive, Google Photos, and Microsoft OneDrive.
- Launch BeeFiles on your computer.
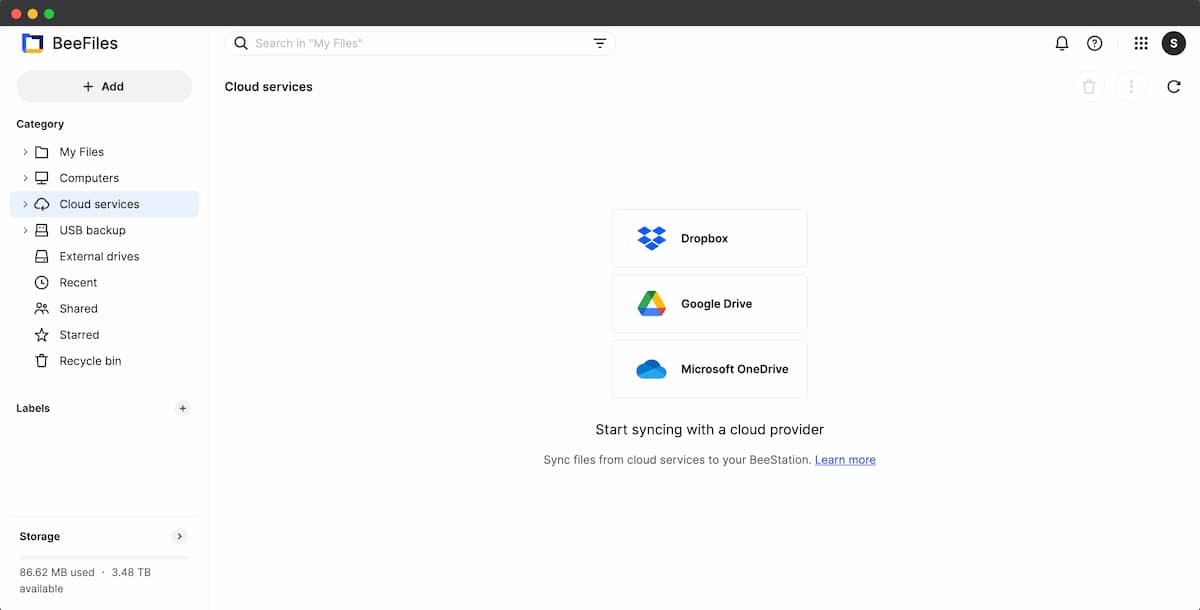
- Navigate to the Cloud Services section and choose the desired cloud service for synchronization. Dropbox, Google Drive, Google Photos, and Microsoft OneDrive are currently supported.
- Log in to your cloud service (Google Drive, Dropbox, etc.) account.
- Specify the sync direction: Two-way or One-way.
- Choose the folders you wish to sync; all folders are selected by default.
- Click Done to create the sync folder and initiate the synchronization process.
Access External Drives on BeeStation – Browse, Copy, Move, Delete and Backup
One useful feature of BeeStation is its compatibility with external drives such as External HDDs, External SSDs, or USB Flash drives. Users can effortlessly connect these drives to BeeStation, allowing easy access to files and the convenience of automatically backing up all external drive files to the SSD without the need for manual interventions. You have the flexibility to connect your USB-C drive directly to the USB-C port of BeeStation, or alternatively, you can connect a USB flash drive to the USB-A port of BeeStation.
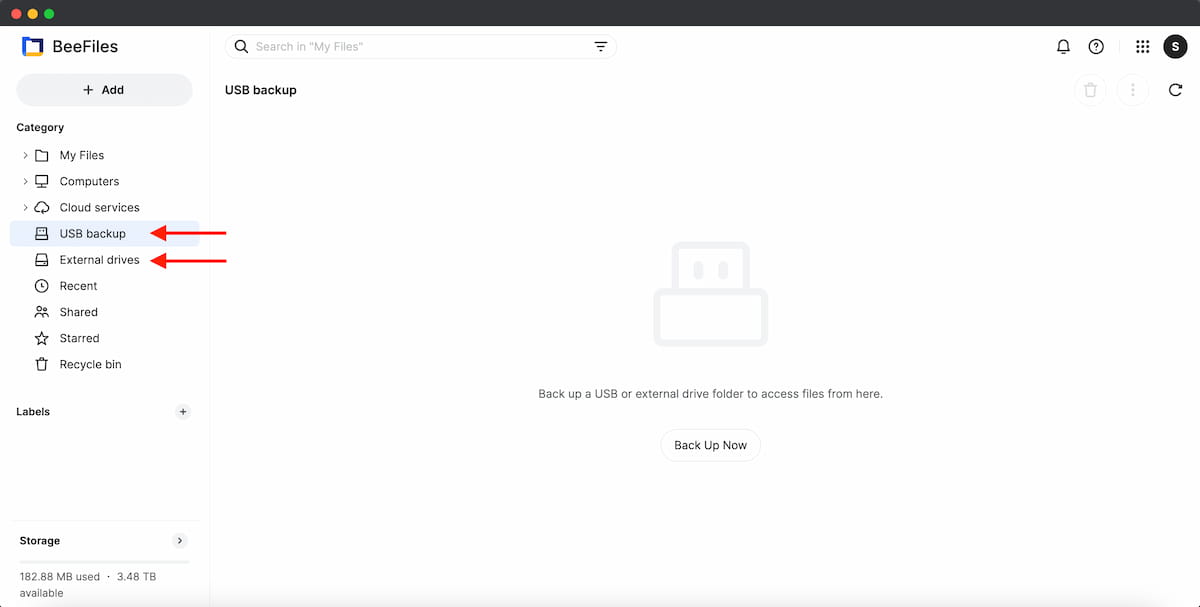
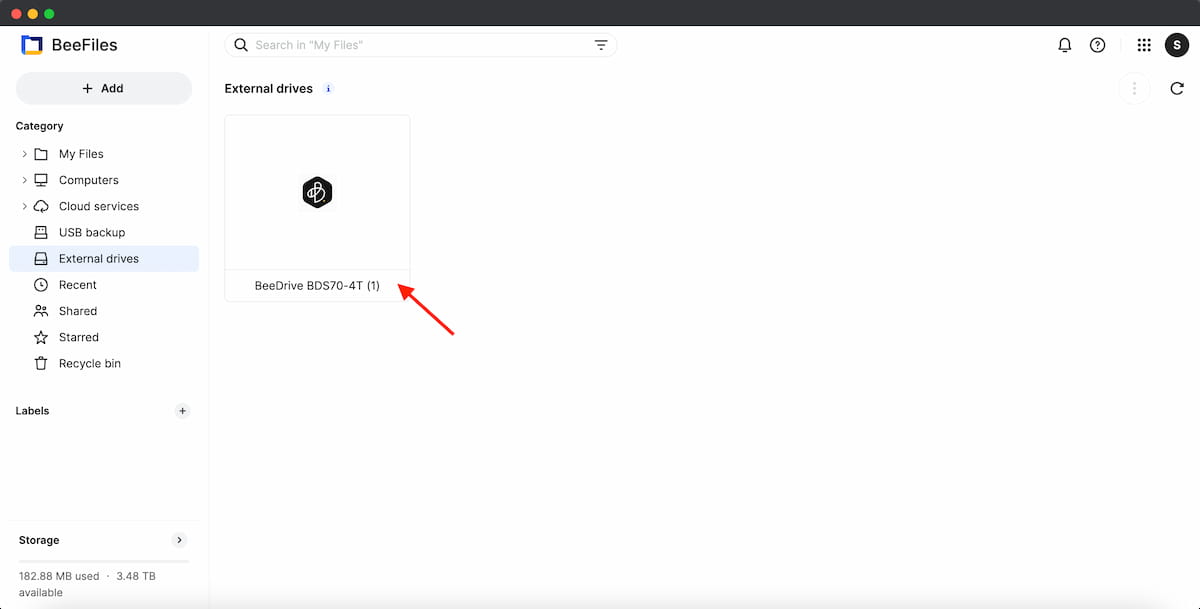
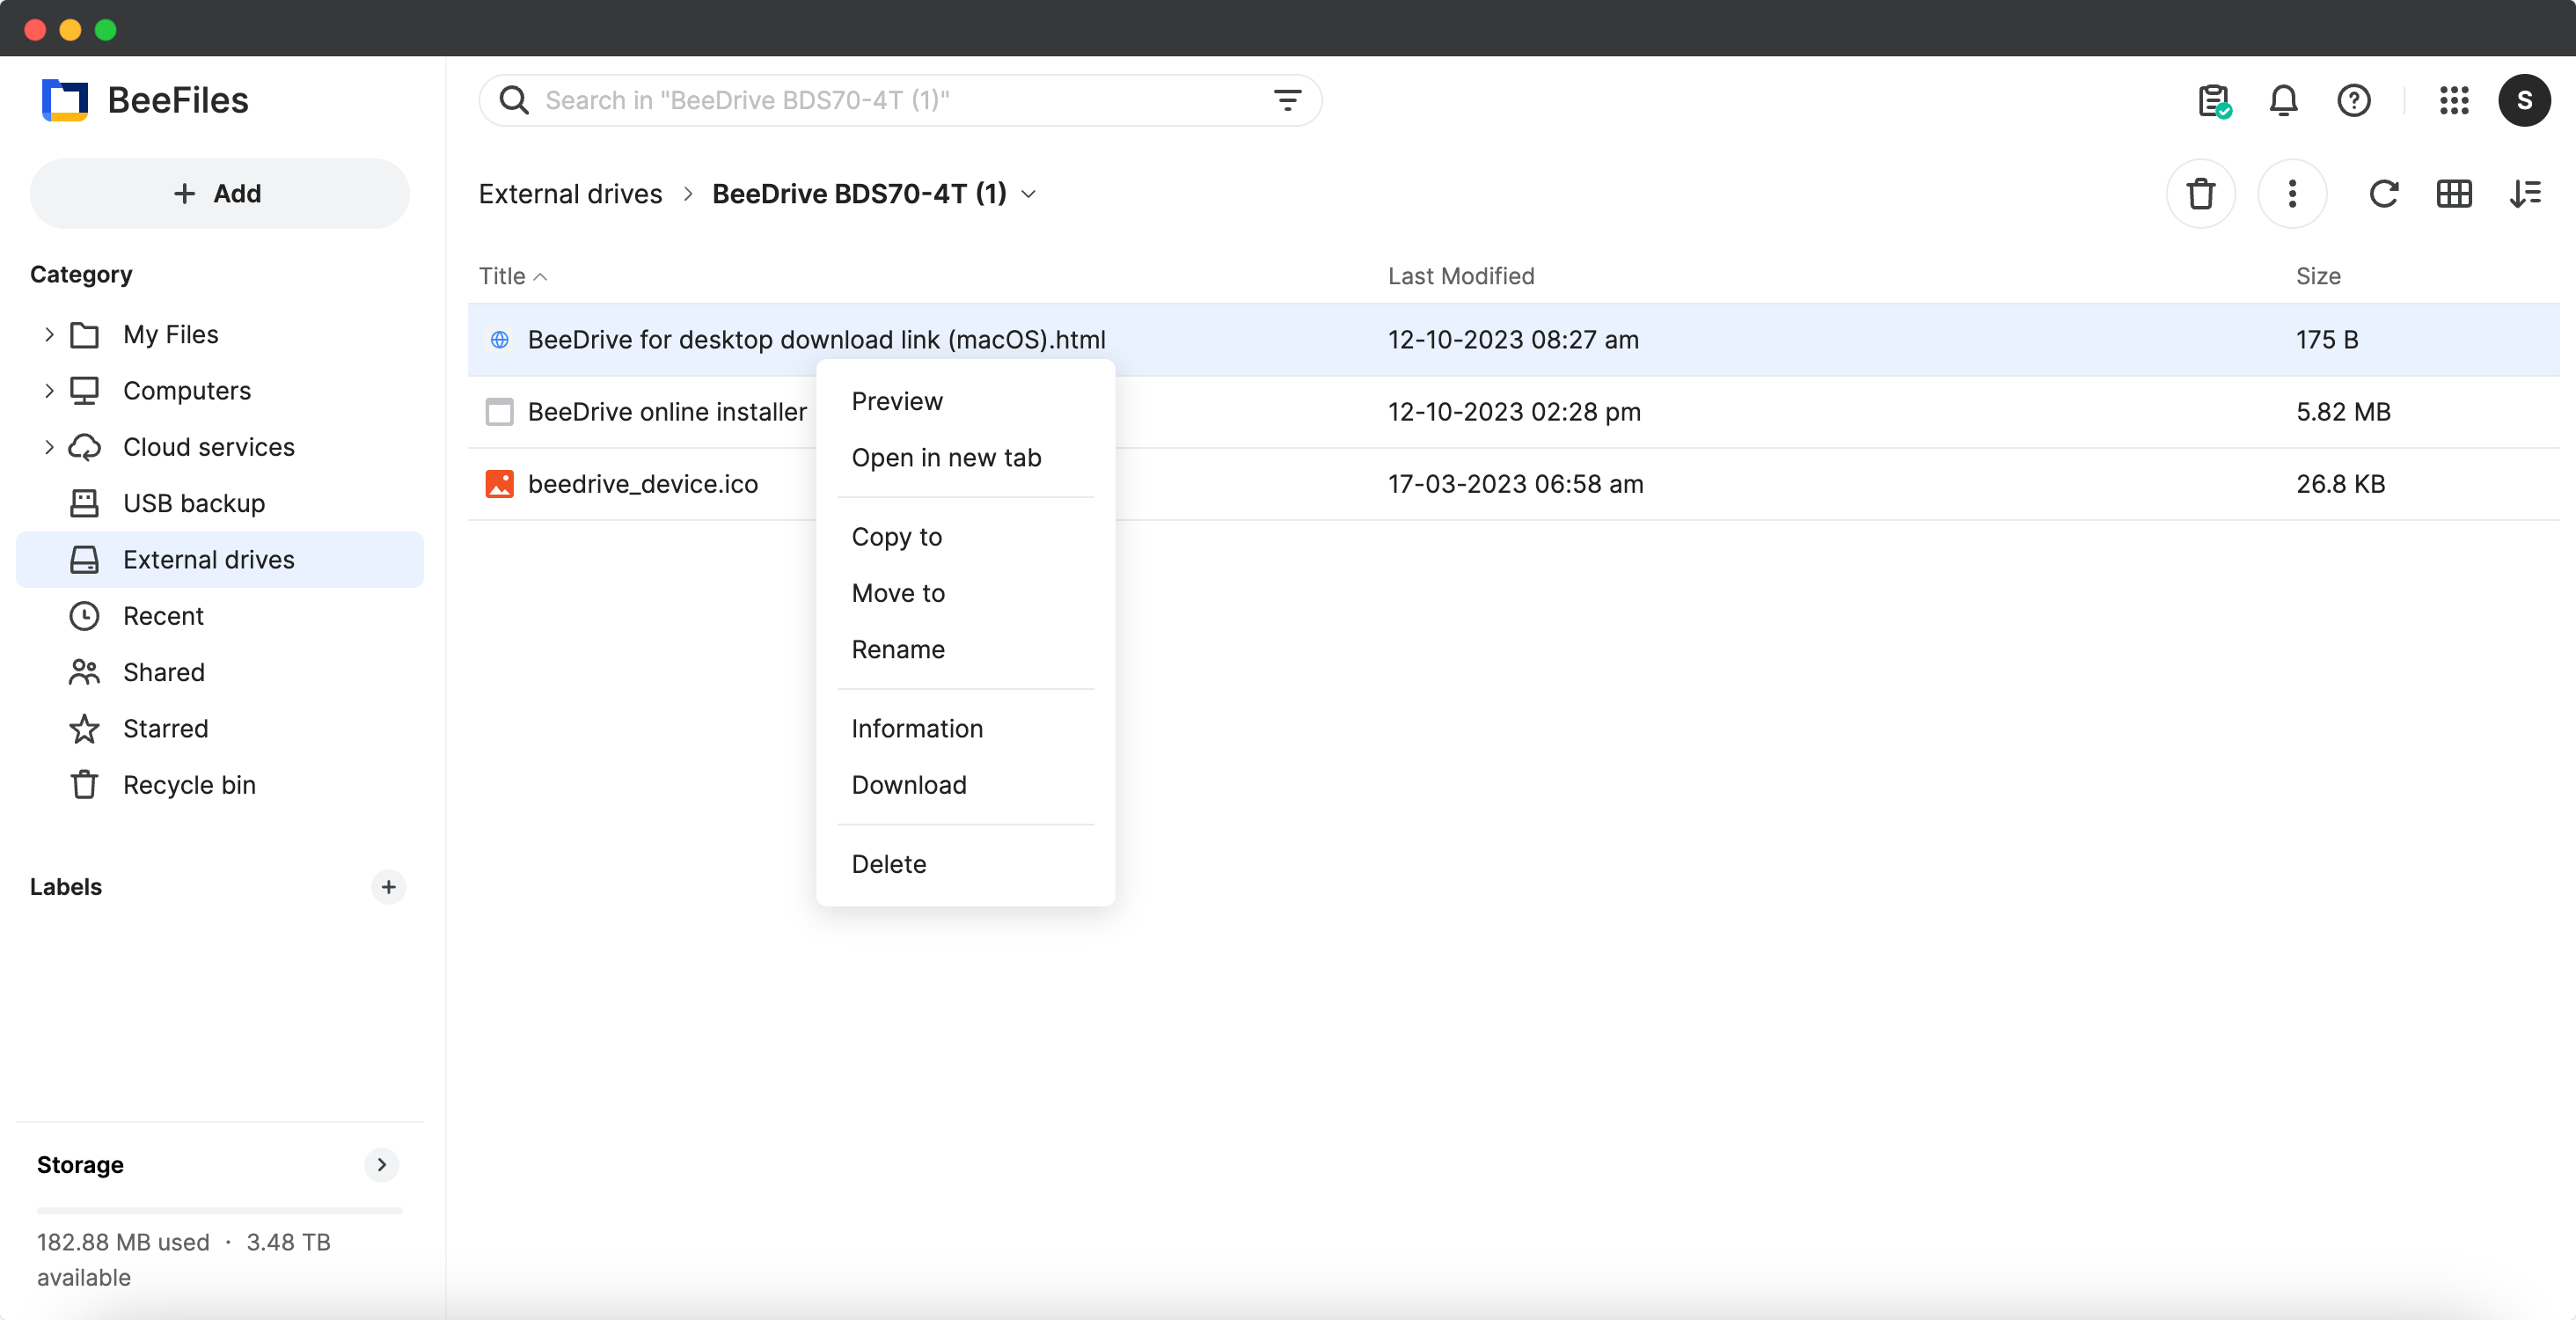
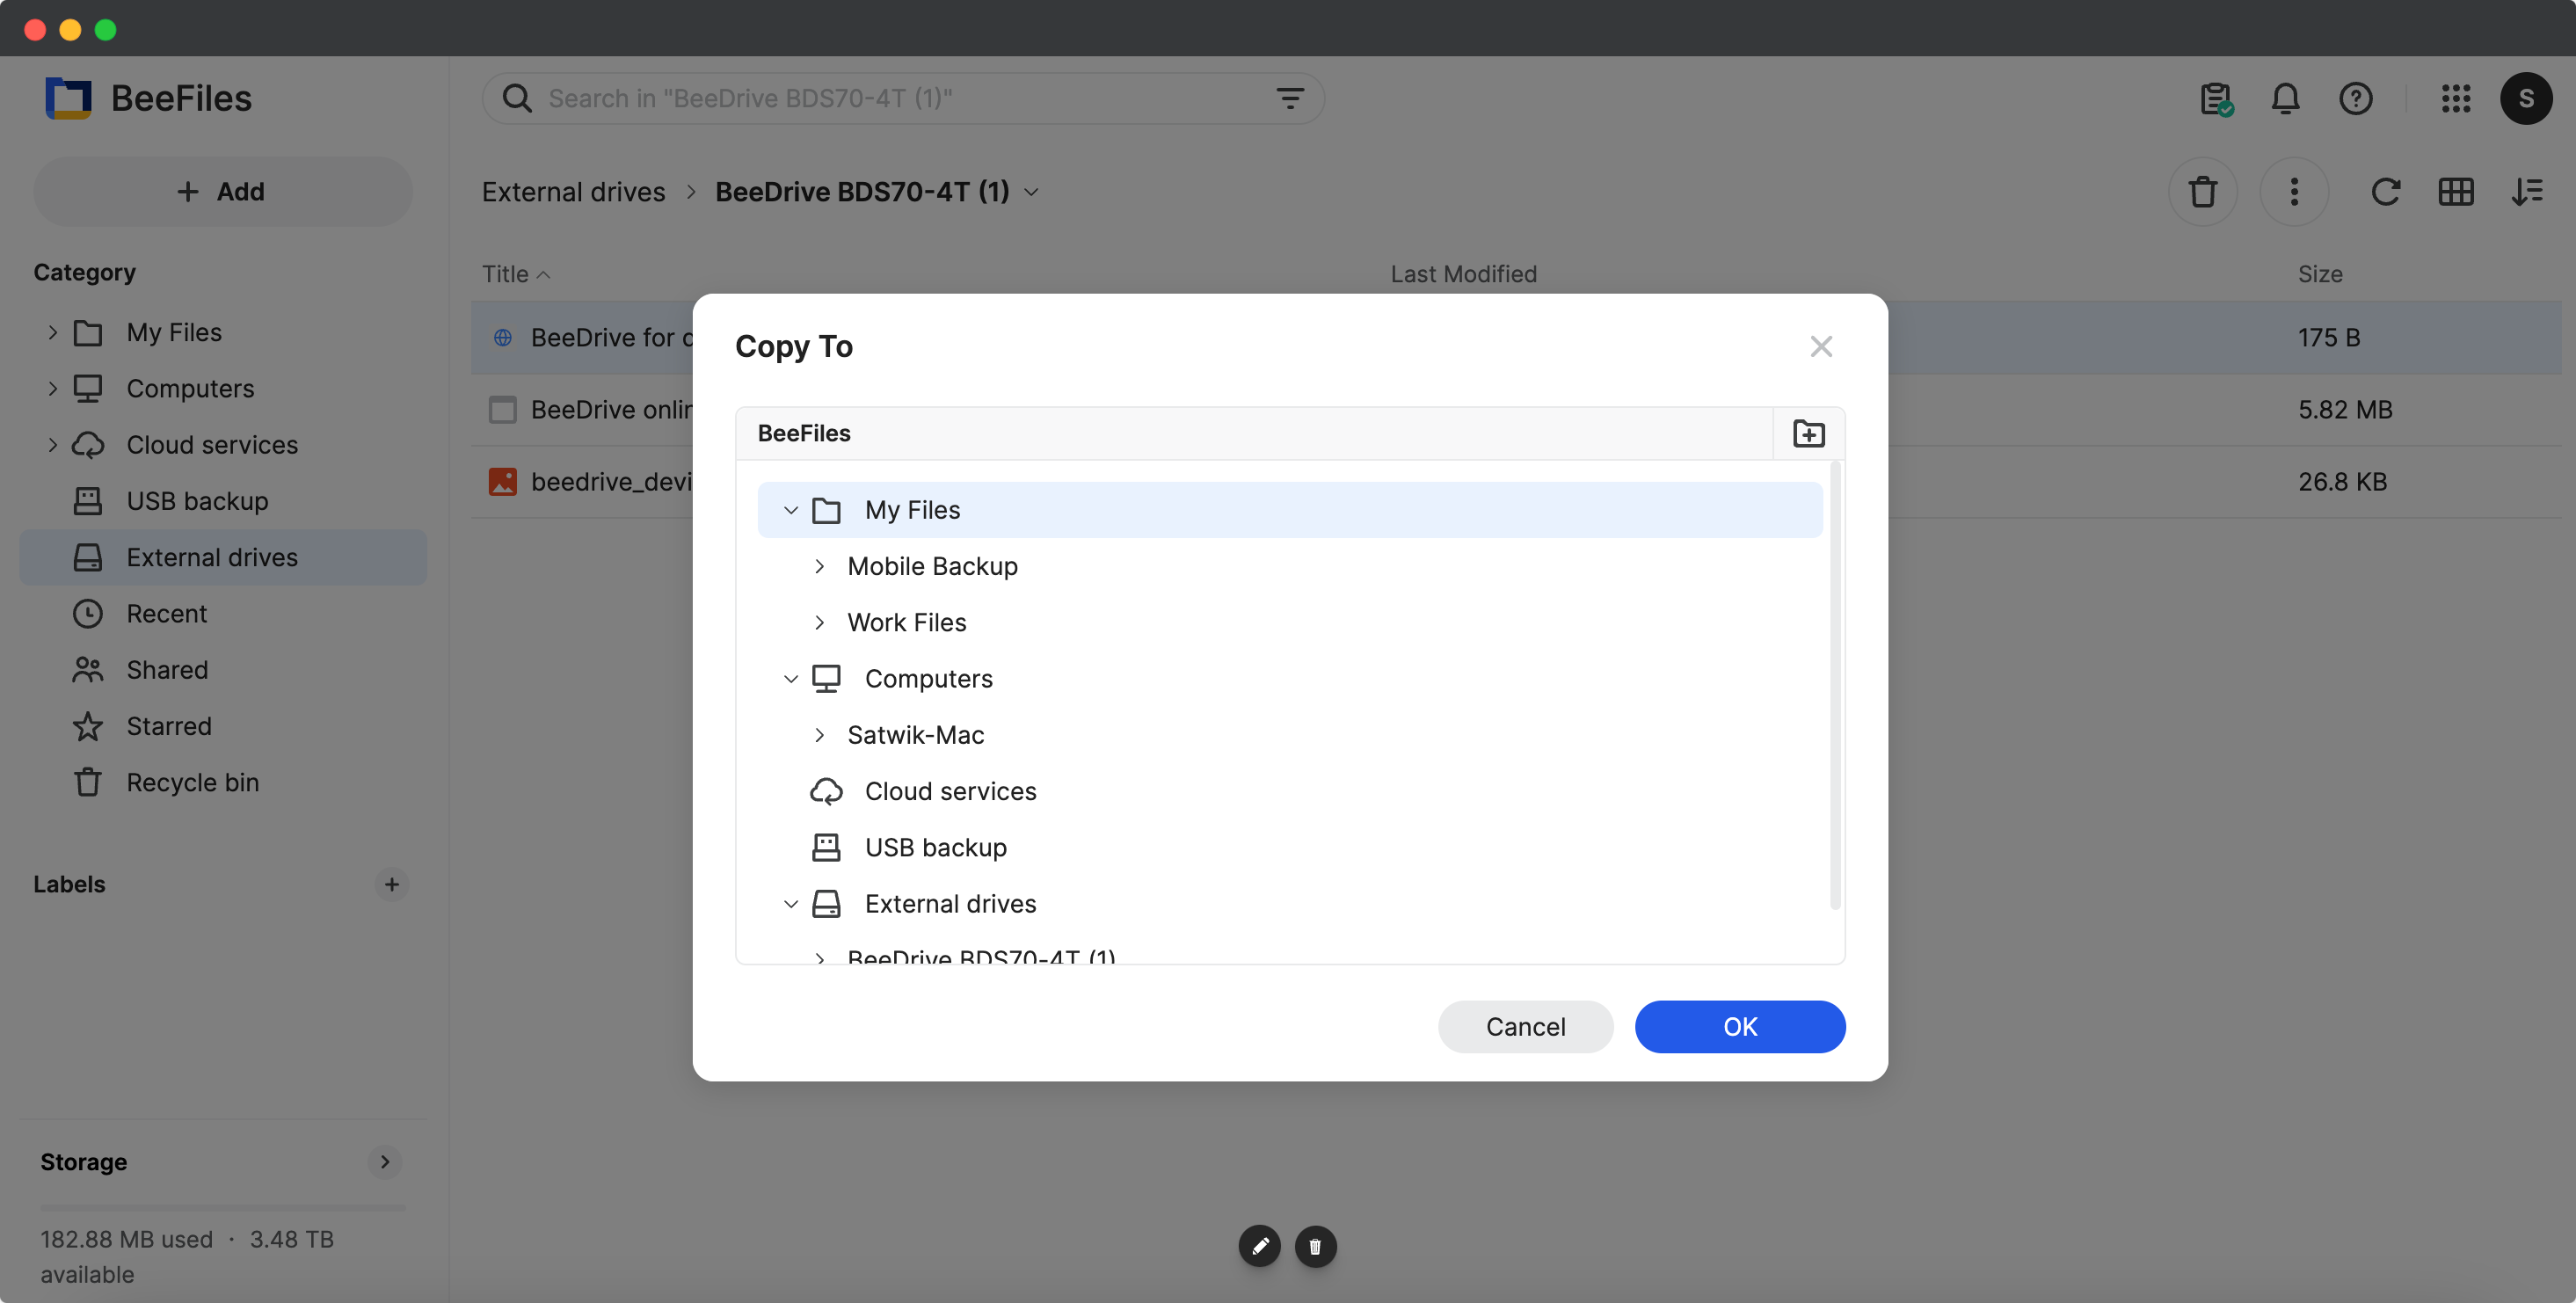
Upon connecting, the BeeStation will automatically detect the external drive. In the BeeFile App, you’ll get access to two options: USB Backup and External Drive. Choosing the External Drive option will display a list of connected external drives. By selecting the specific external drive, users gain access to all stored files. Furthermore, various actions such as deleting files from the drive, downloading files to the computer, and copying/moving files from the external drive to BeeStation are possible within the app.
Backup External Drives – USB Flash Drive, SSD, External HDD
BeeStation offers the convenience of backing up external drives, including USB Flash Drives, External HDDs, or SSDs. A notable feature is BeeStation’s support for automatic external drive backups. Once configured initially, there’s no requirement for manual intervention in the backup process. Every time you connect an external drive, BeeStation will seamlessly and automatically initiate the backup to ensure your data is consistently secured on the BeeStation.
Please take note that configuring external drive backup is exclusively available on the desktop interface and cannot be performed through the mobile application. To initiate the backup process on BeeFiles from the desktop, follow these steps:
- Open BeeFiles on the desktop.
- Choose USB Backup and click on Backup Now.
- From the drop-down menu, select the External drive you wish to back up.
- Customize your backup preferences by either backing up the entire drive or selecting specific folders based on your requirements. By default, all the folders will be selected.
- Select File Conflict Policy: Choosing between Replace or Overwrite to resolve conflicts arising from copying files with identical names to the destination. The option Replace the file in the destination replaces the existing file with the new one, while the Keep both files option retains the original file and renames the new one by adding a suffix. Select the option that suits your needs.
- Activate the Auto Backup option. This ensures that data from the connected drive is automatically copied whenever it is connected.
- Click on Backup Now, and the backup folder will be created.
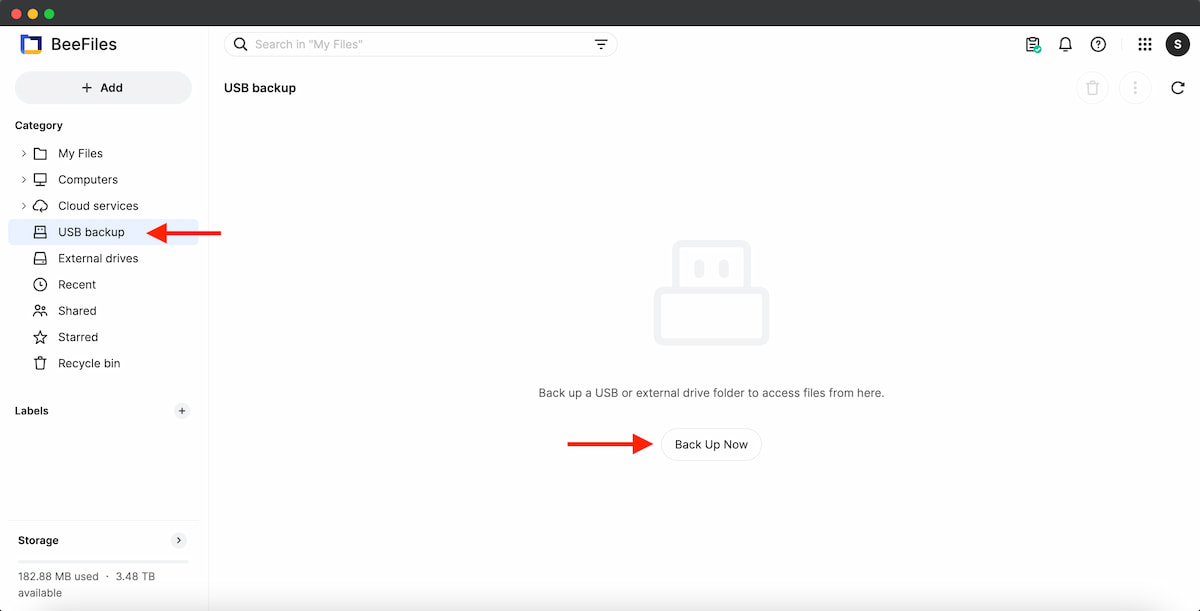
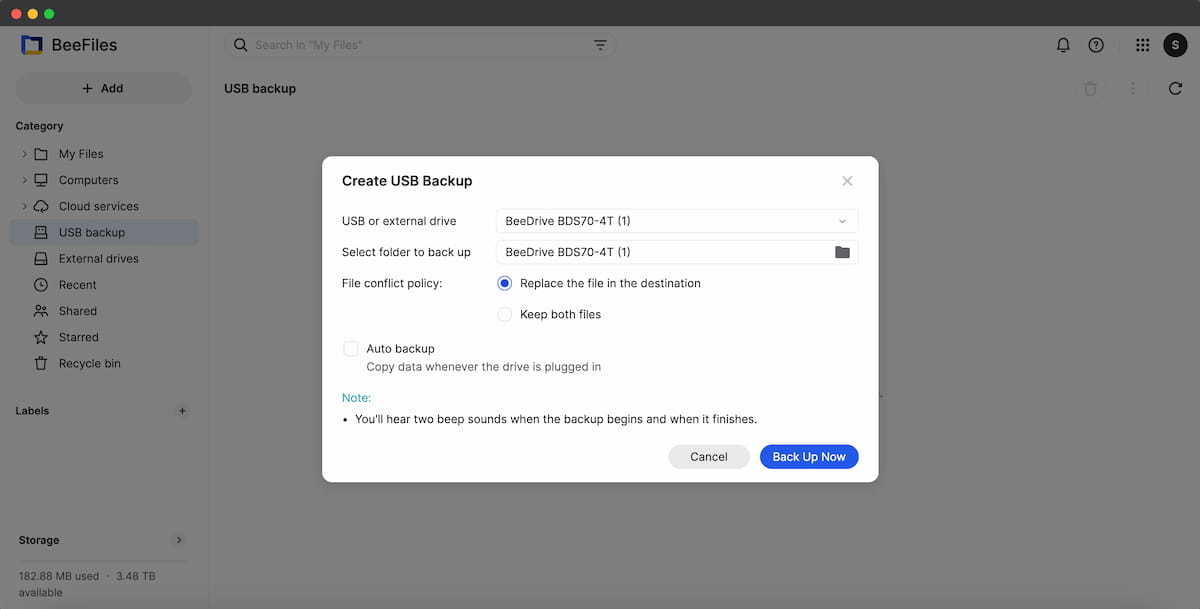
When you turn on automatic backup on BeeStation and connect an external hard drive, it will automatically save any new files without you having to manually start the backup on a computer. This saves time and space because only the newly added or changed files are backed up. If auto backup is on, you’ll hear two beeps when the backup starts and two more when it’s done.
Backup BeeStation to External Drive
It is crucial to create backups for any devices storing important data, such as your phone, computer, external drive, cloud storage, and BeeStation. This precaution is strongly advised to protect your data from physical disasters or unforeseen hardware issues. In BeeStation, you have the option to back up the entire system, encompassing all files, photos, and app configurations, either to Synology C2 (a cloud storage service) or an external drive like an External HDD/SSD or even a USB flash drive.
Synology provides two backup options for BeeStation: Synology C2, a paid cloud backup service, and External Drive. Synology C2 facilitates the backup of the entire BeeStation to the cloud. Likewise, with the External Drive option, you can connect a drive with a minimum capacity of 4TB to BeeStation and back up its data. Follow the below steps.
- Go to https://portal.bee.synology.com/
- Tap on the Menu and select System Settings.
- Click on Backup & Restore.
- Select External Drive and tap on Next.
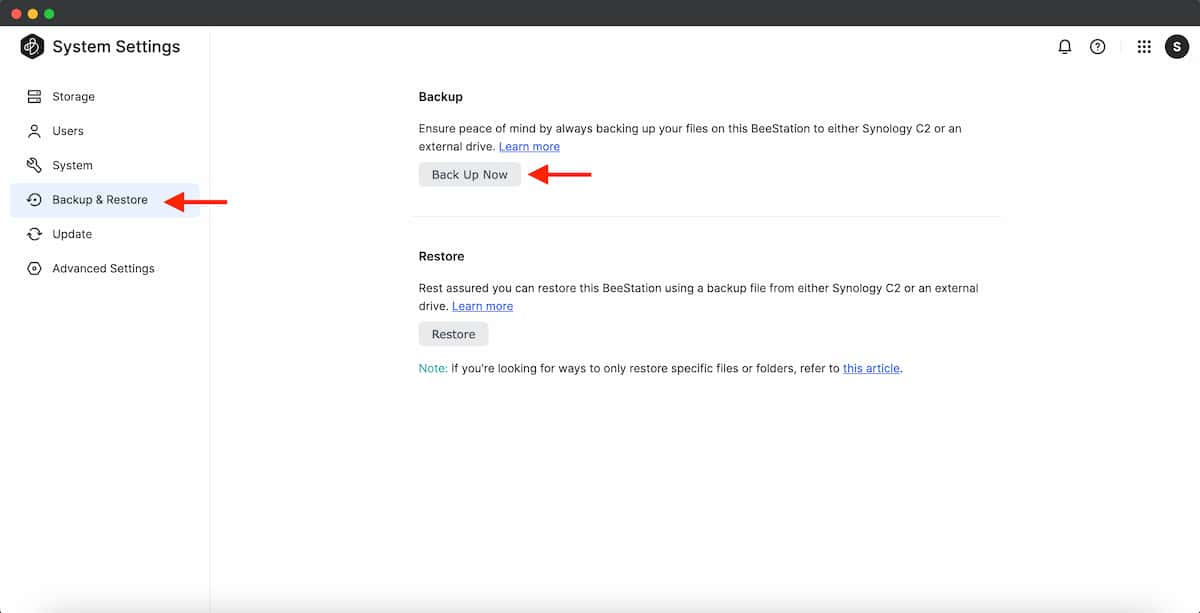
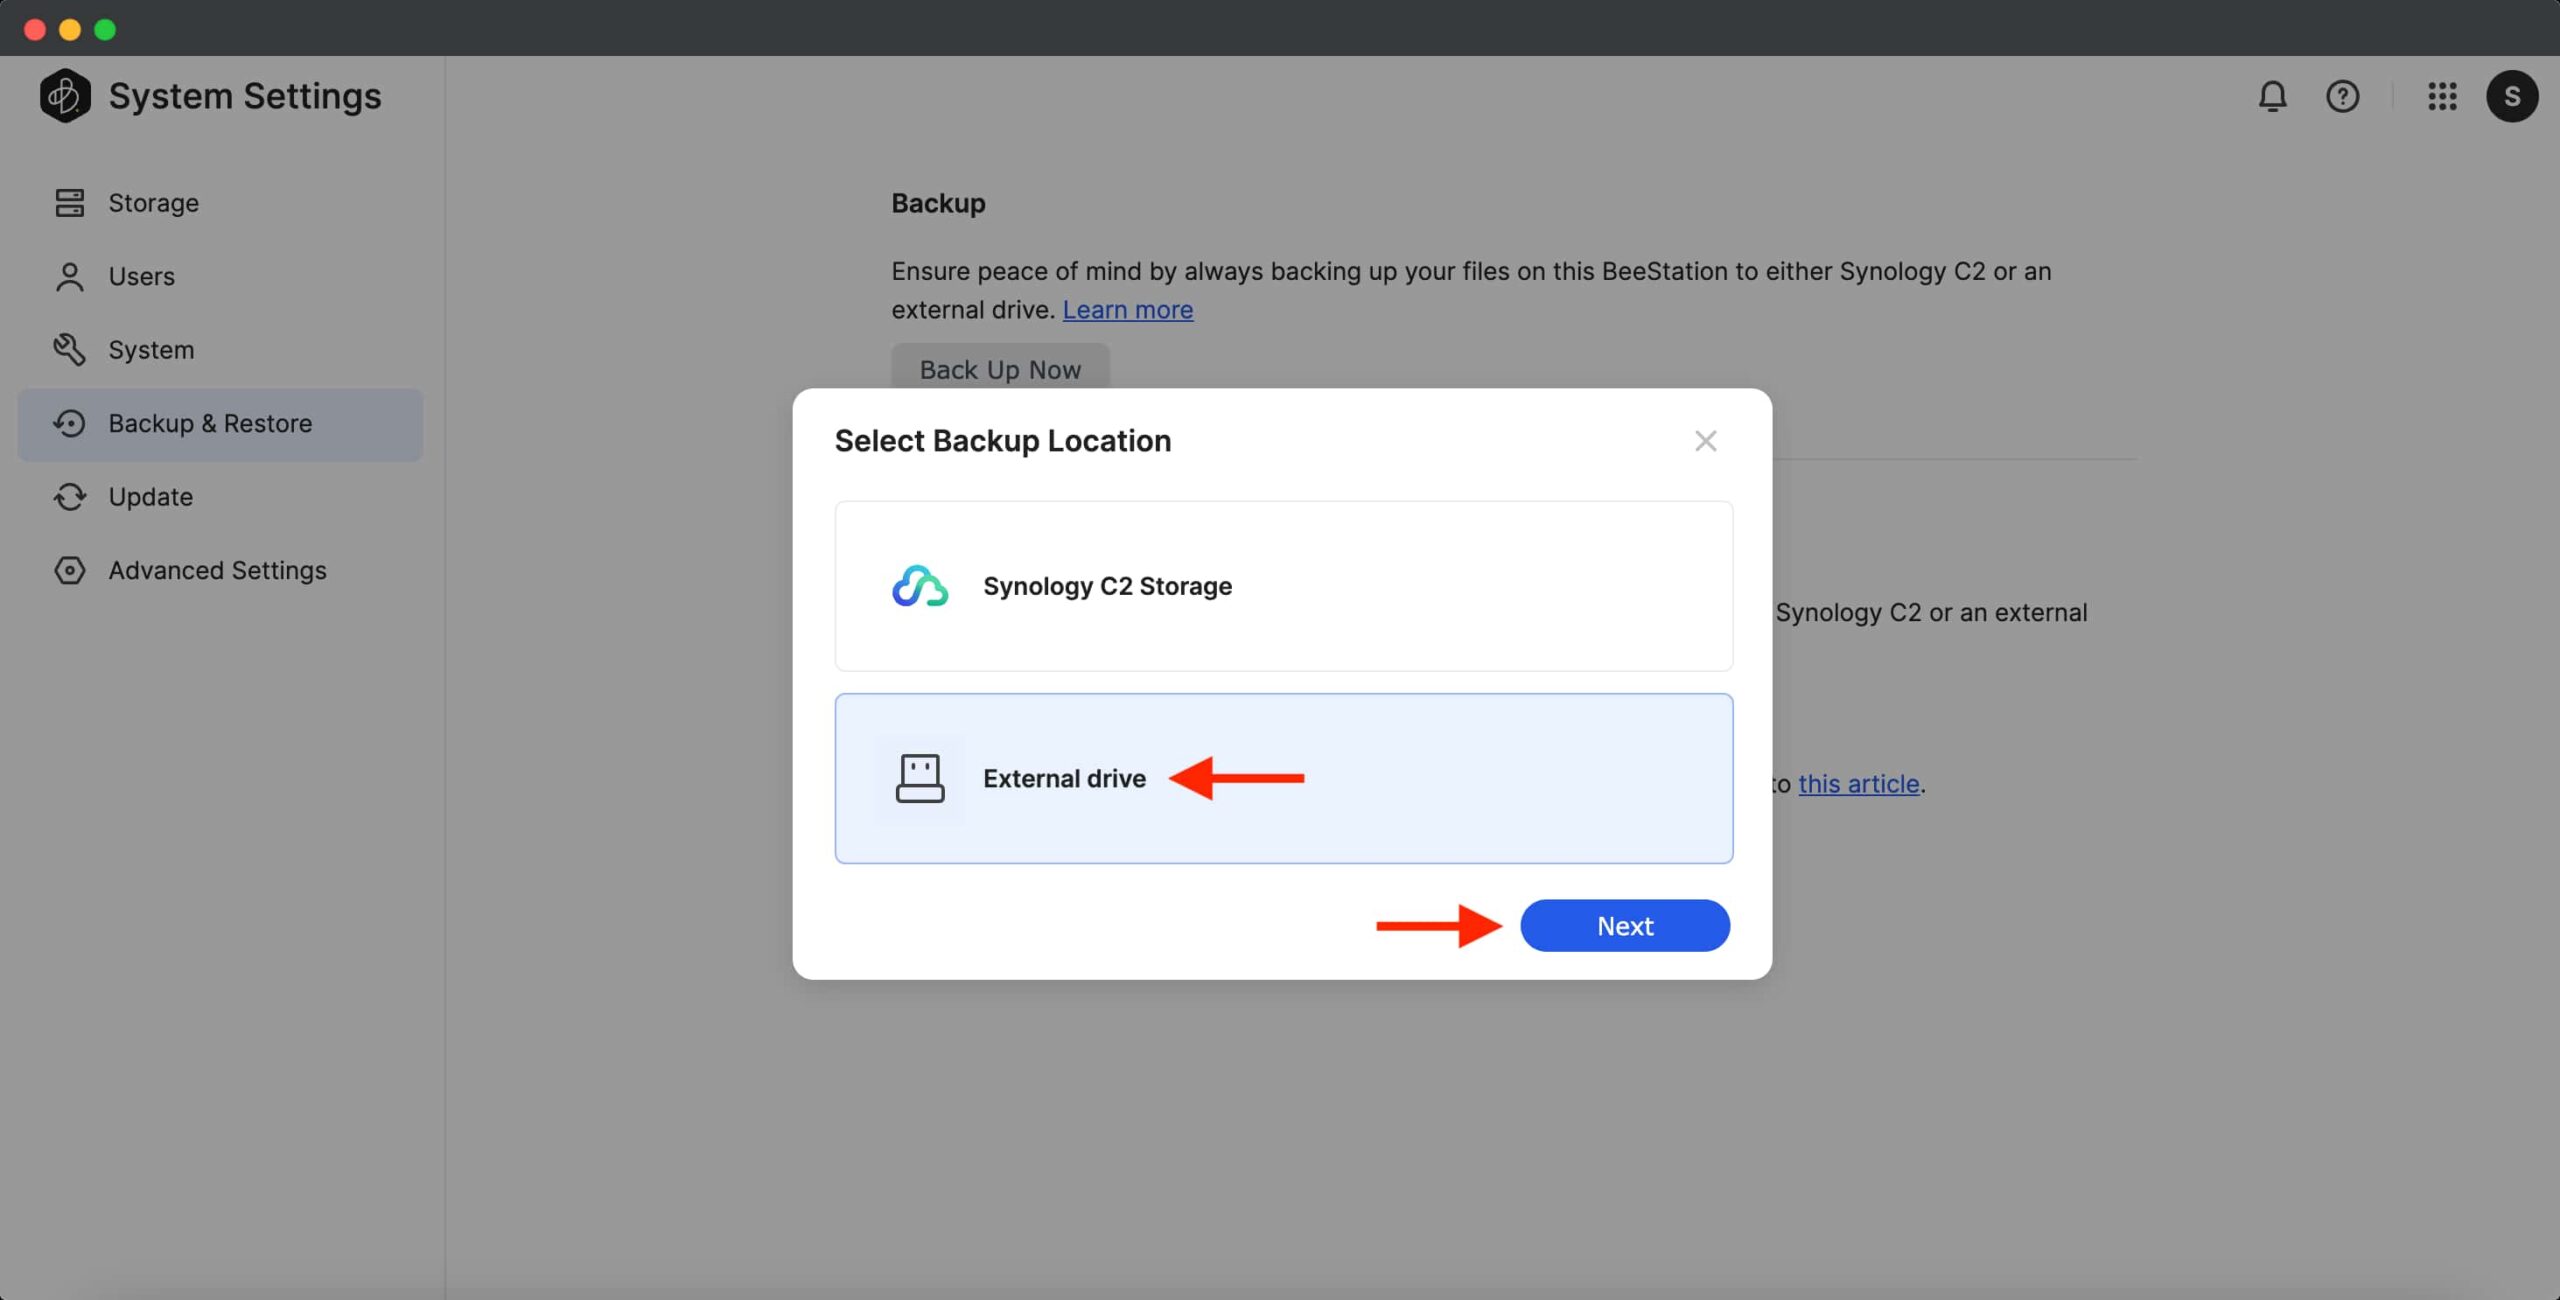
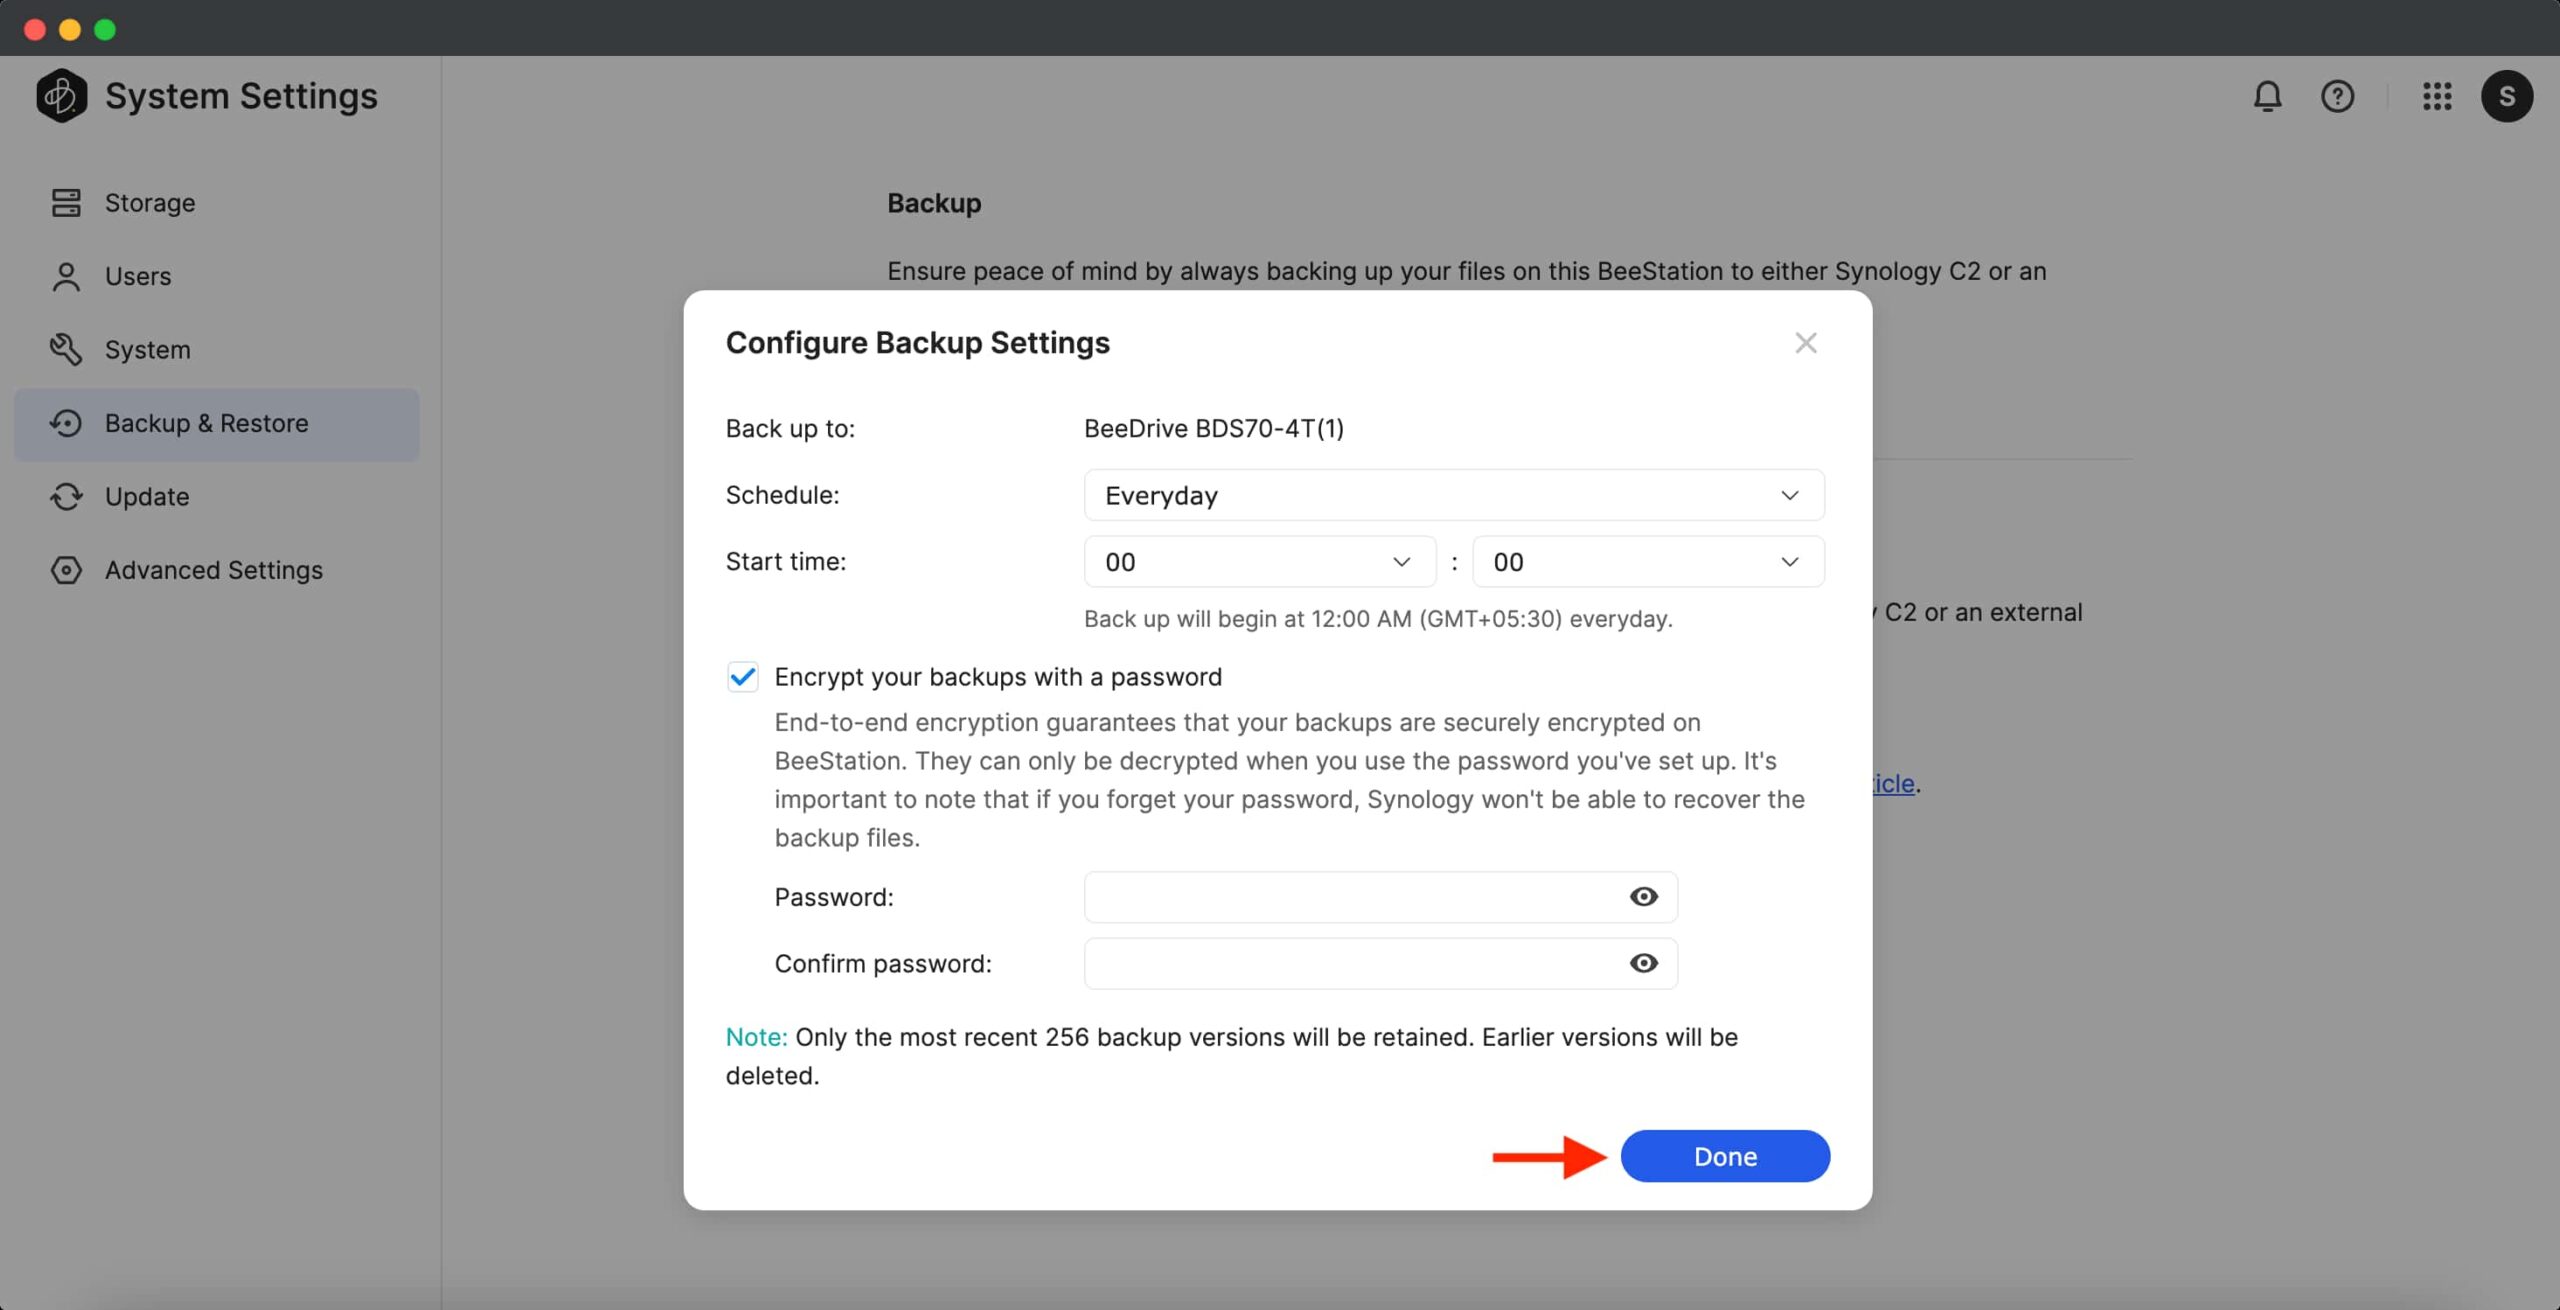
- Back up to: Choose the connected drive from the dropdown menu. If a single drive is attached, it will be automatically selected.
- Schedule: Determine the backup schedule by opting for Everyday or manually selecting specific days from the dropdown based on your preferences.
- Start Time: Specify the backup initiation time. The default is 12 AM in your time zone (00:00). You can modify this timing as needed.
- Encrypt your backup with a password: Enable this option to encrypt the backup before it leaves your BeeStation. Without the password, No one, be it Synology or someone who gets hold of your external drive, would be able to access the data within it.
- Tap Done to complete the backup configurations. You’ll be prompted with two options – Backup Now and Later. If you choose Later, the backup will occur at the scheduled time. Additionally, you can manually trigger the backup whenever necessary from the Backup & Restore section in the System Settings.
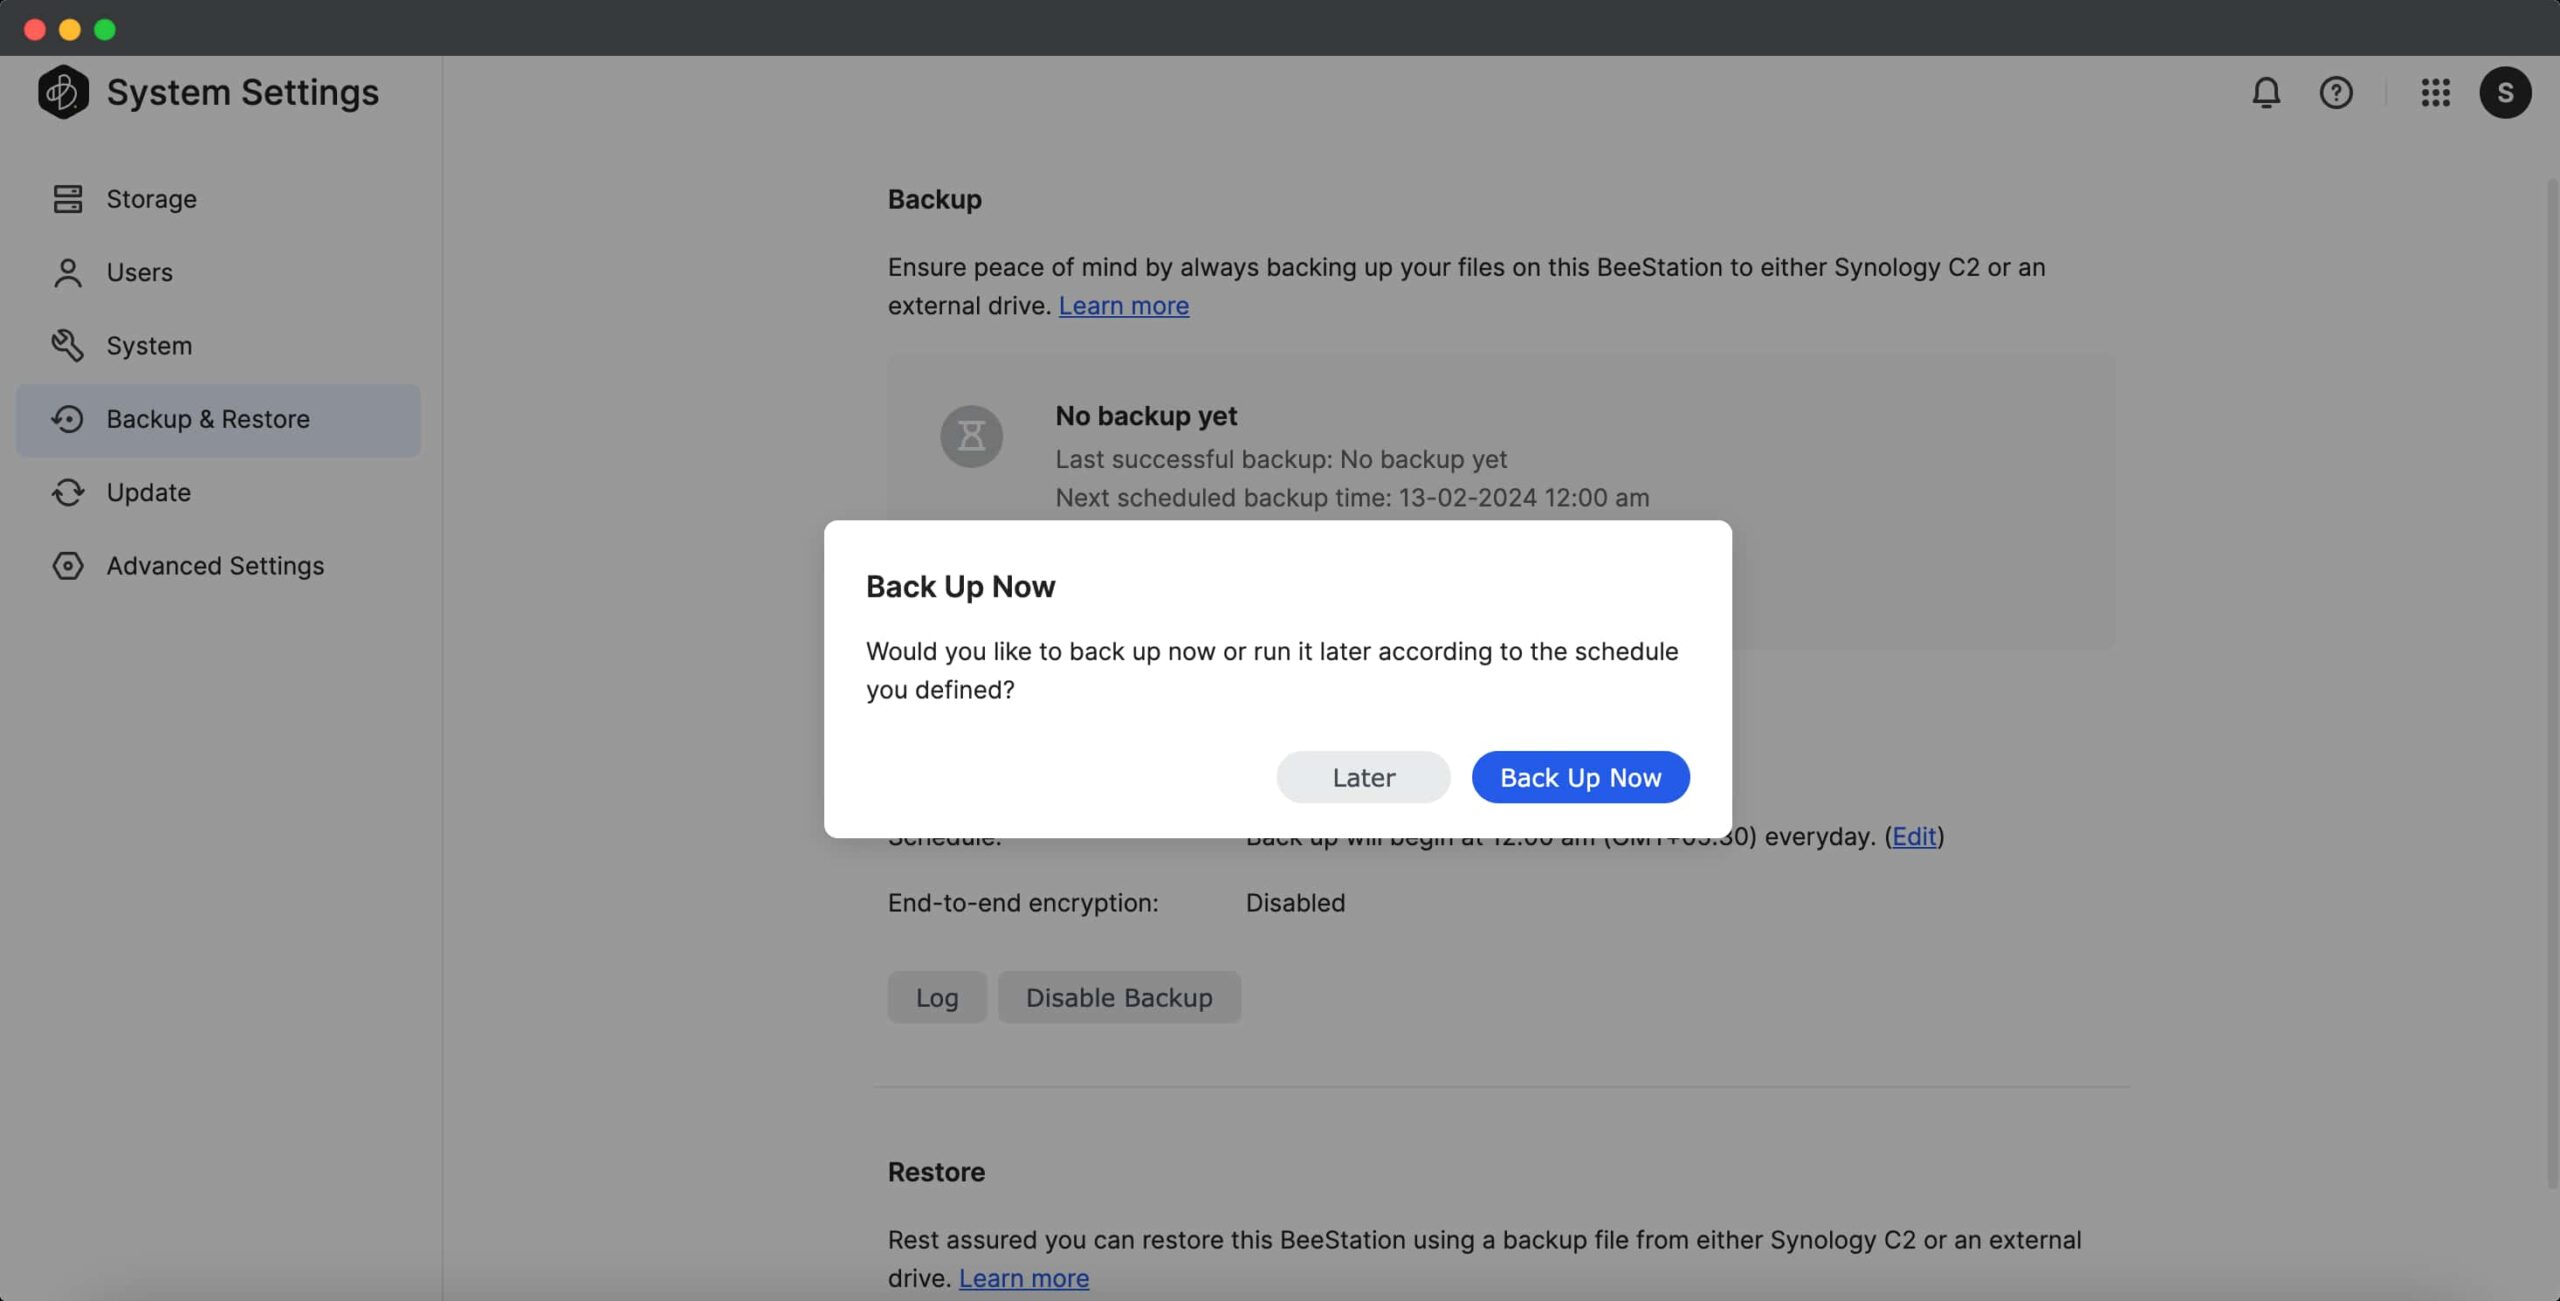
How long it takes to back up depends on how much stuff you have. It could be a few minutes or hours. The speed also relies on whether you’re using a fast SSD or a regular HDD for backup. The backup process happens on its own at the set time, so you don’t have to do anything. Synology gives you a log to check if the backup worked okay. When you go to the Backup & Restore section, you can see when the last backup was done and when the next one is scheduled.
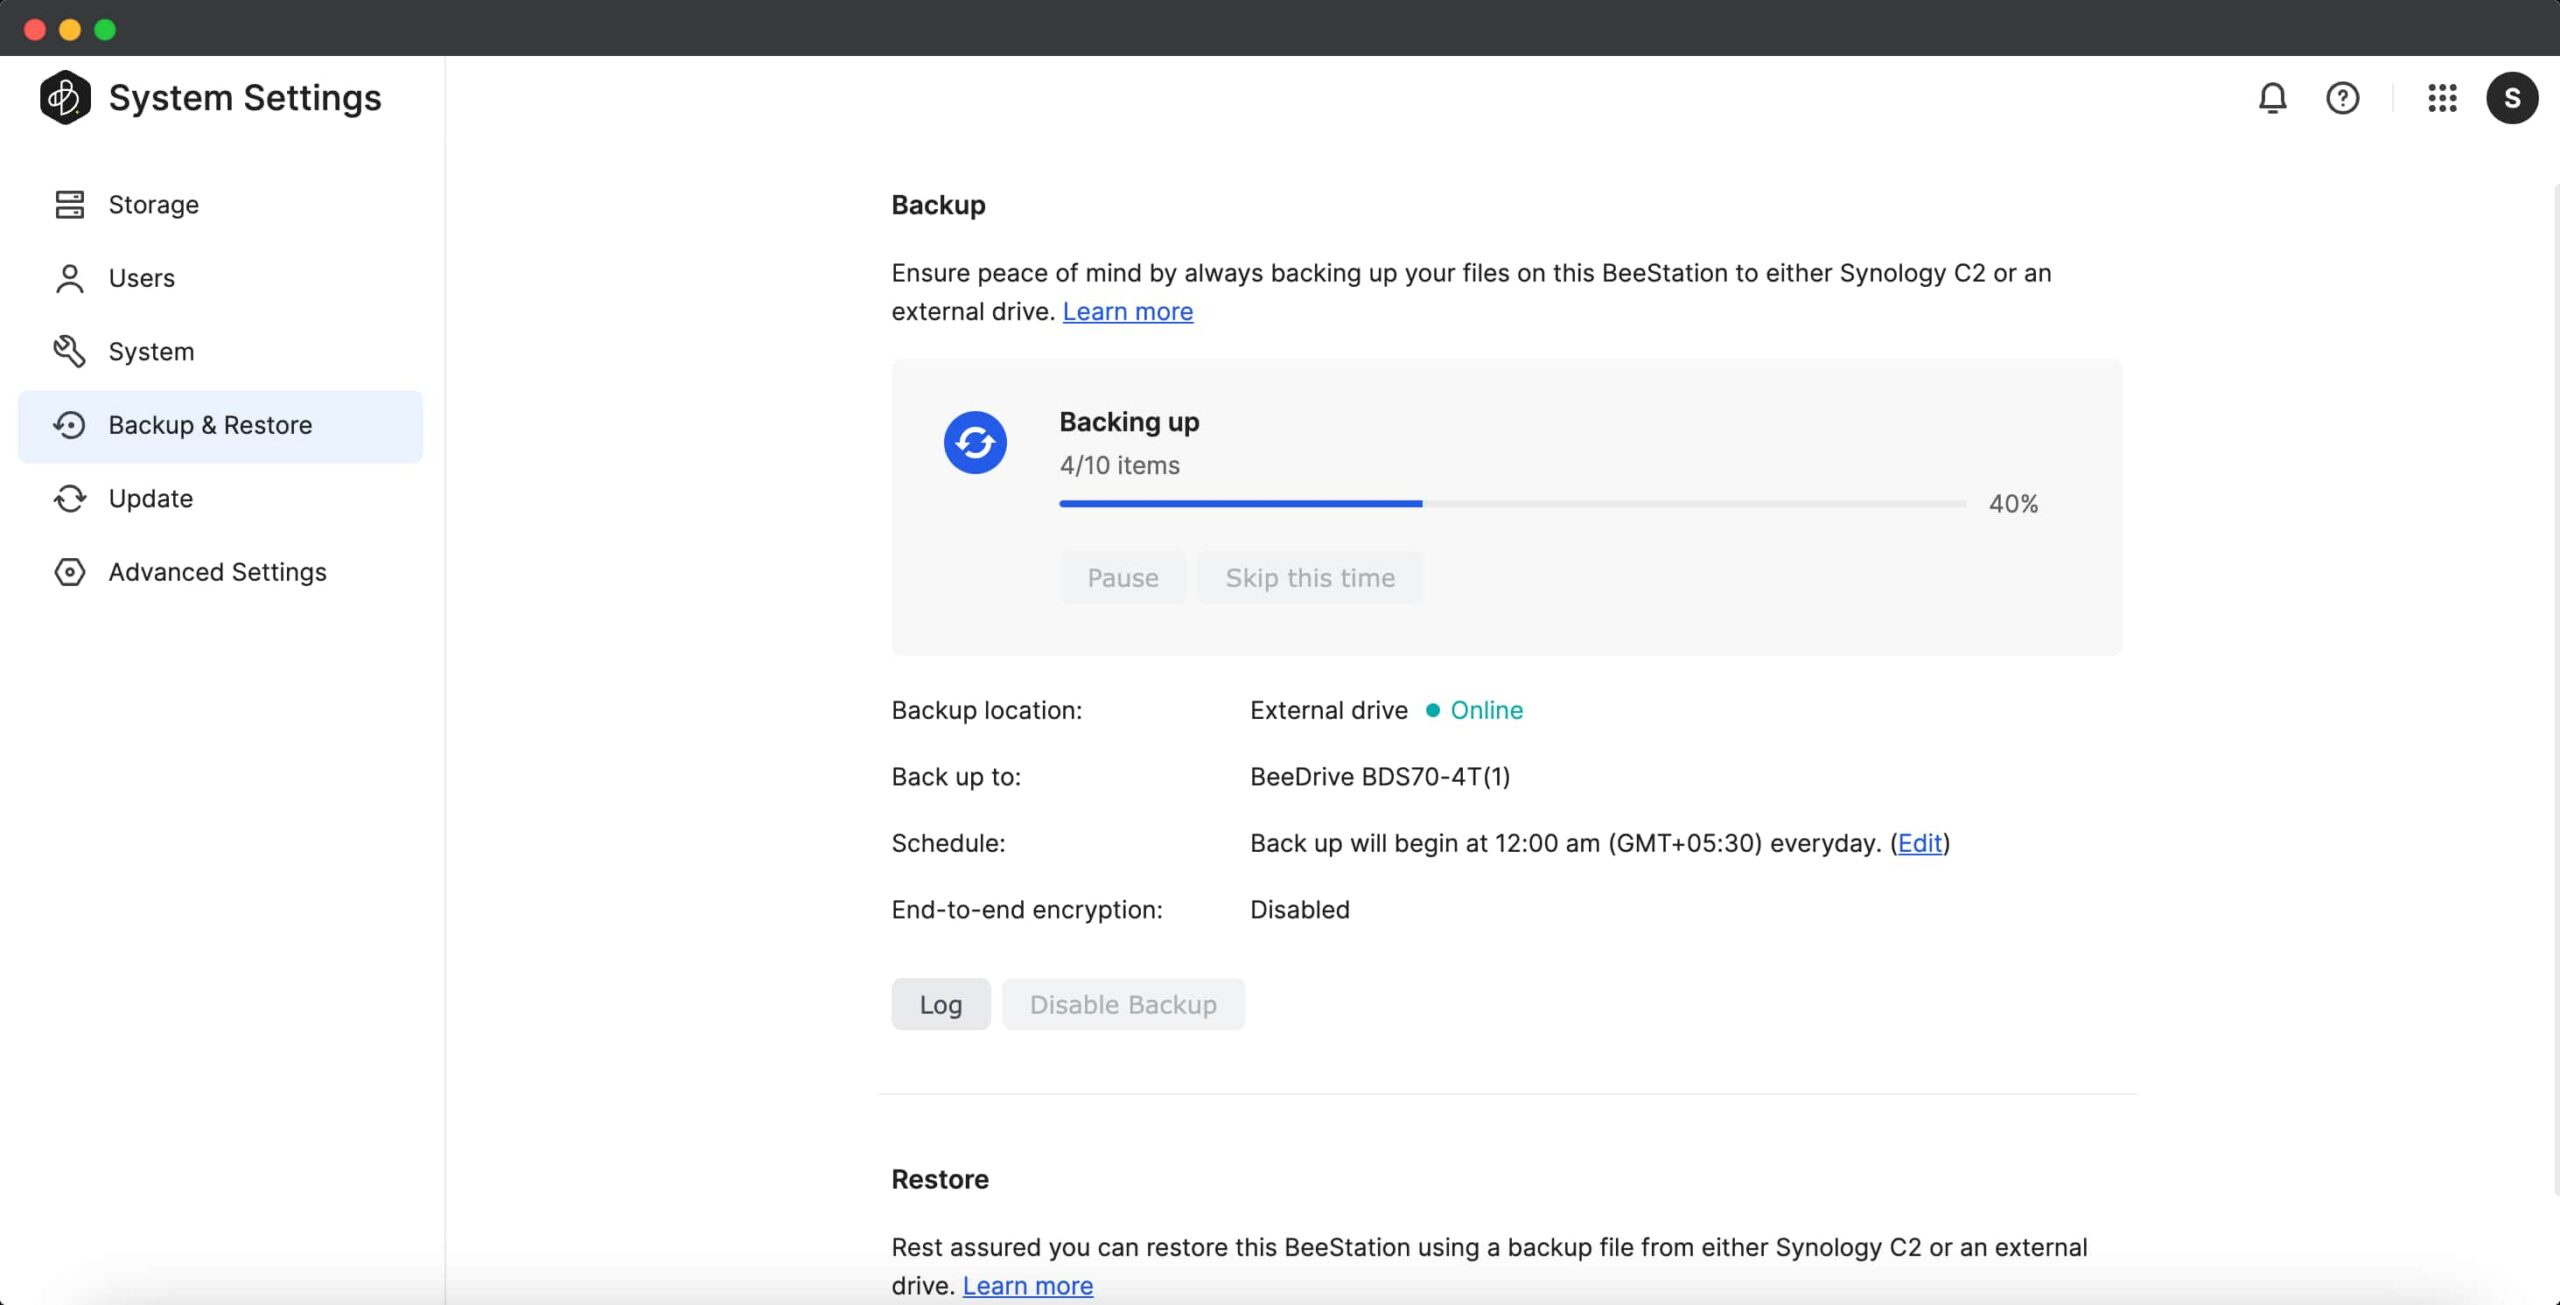
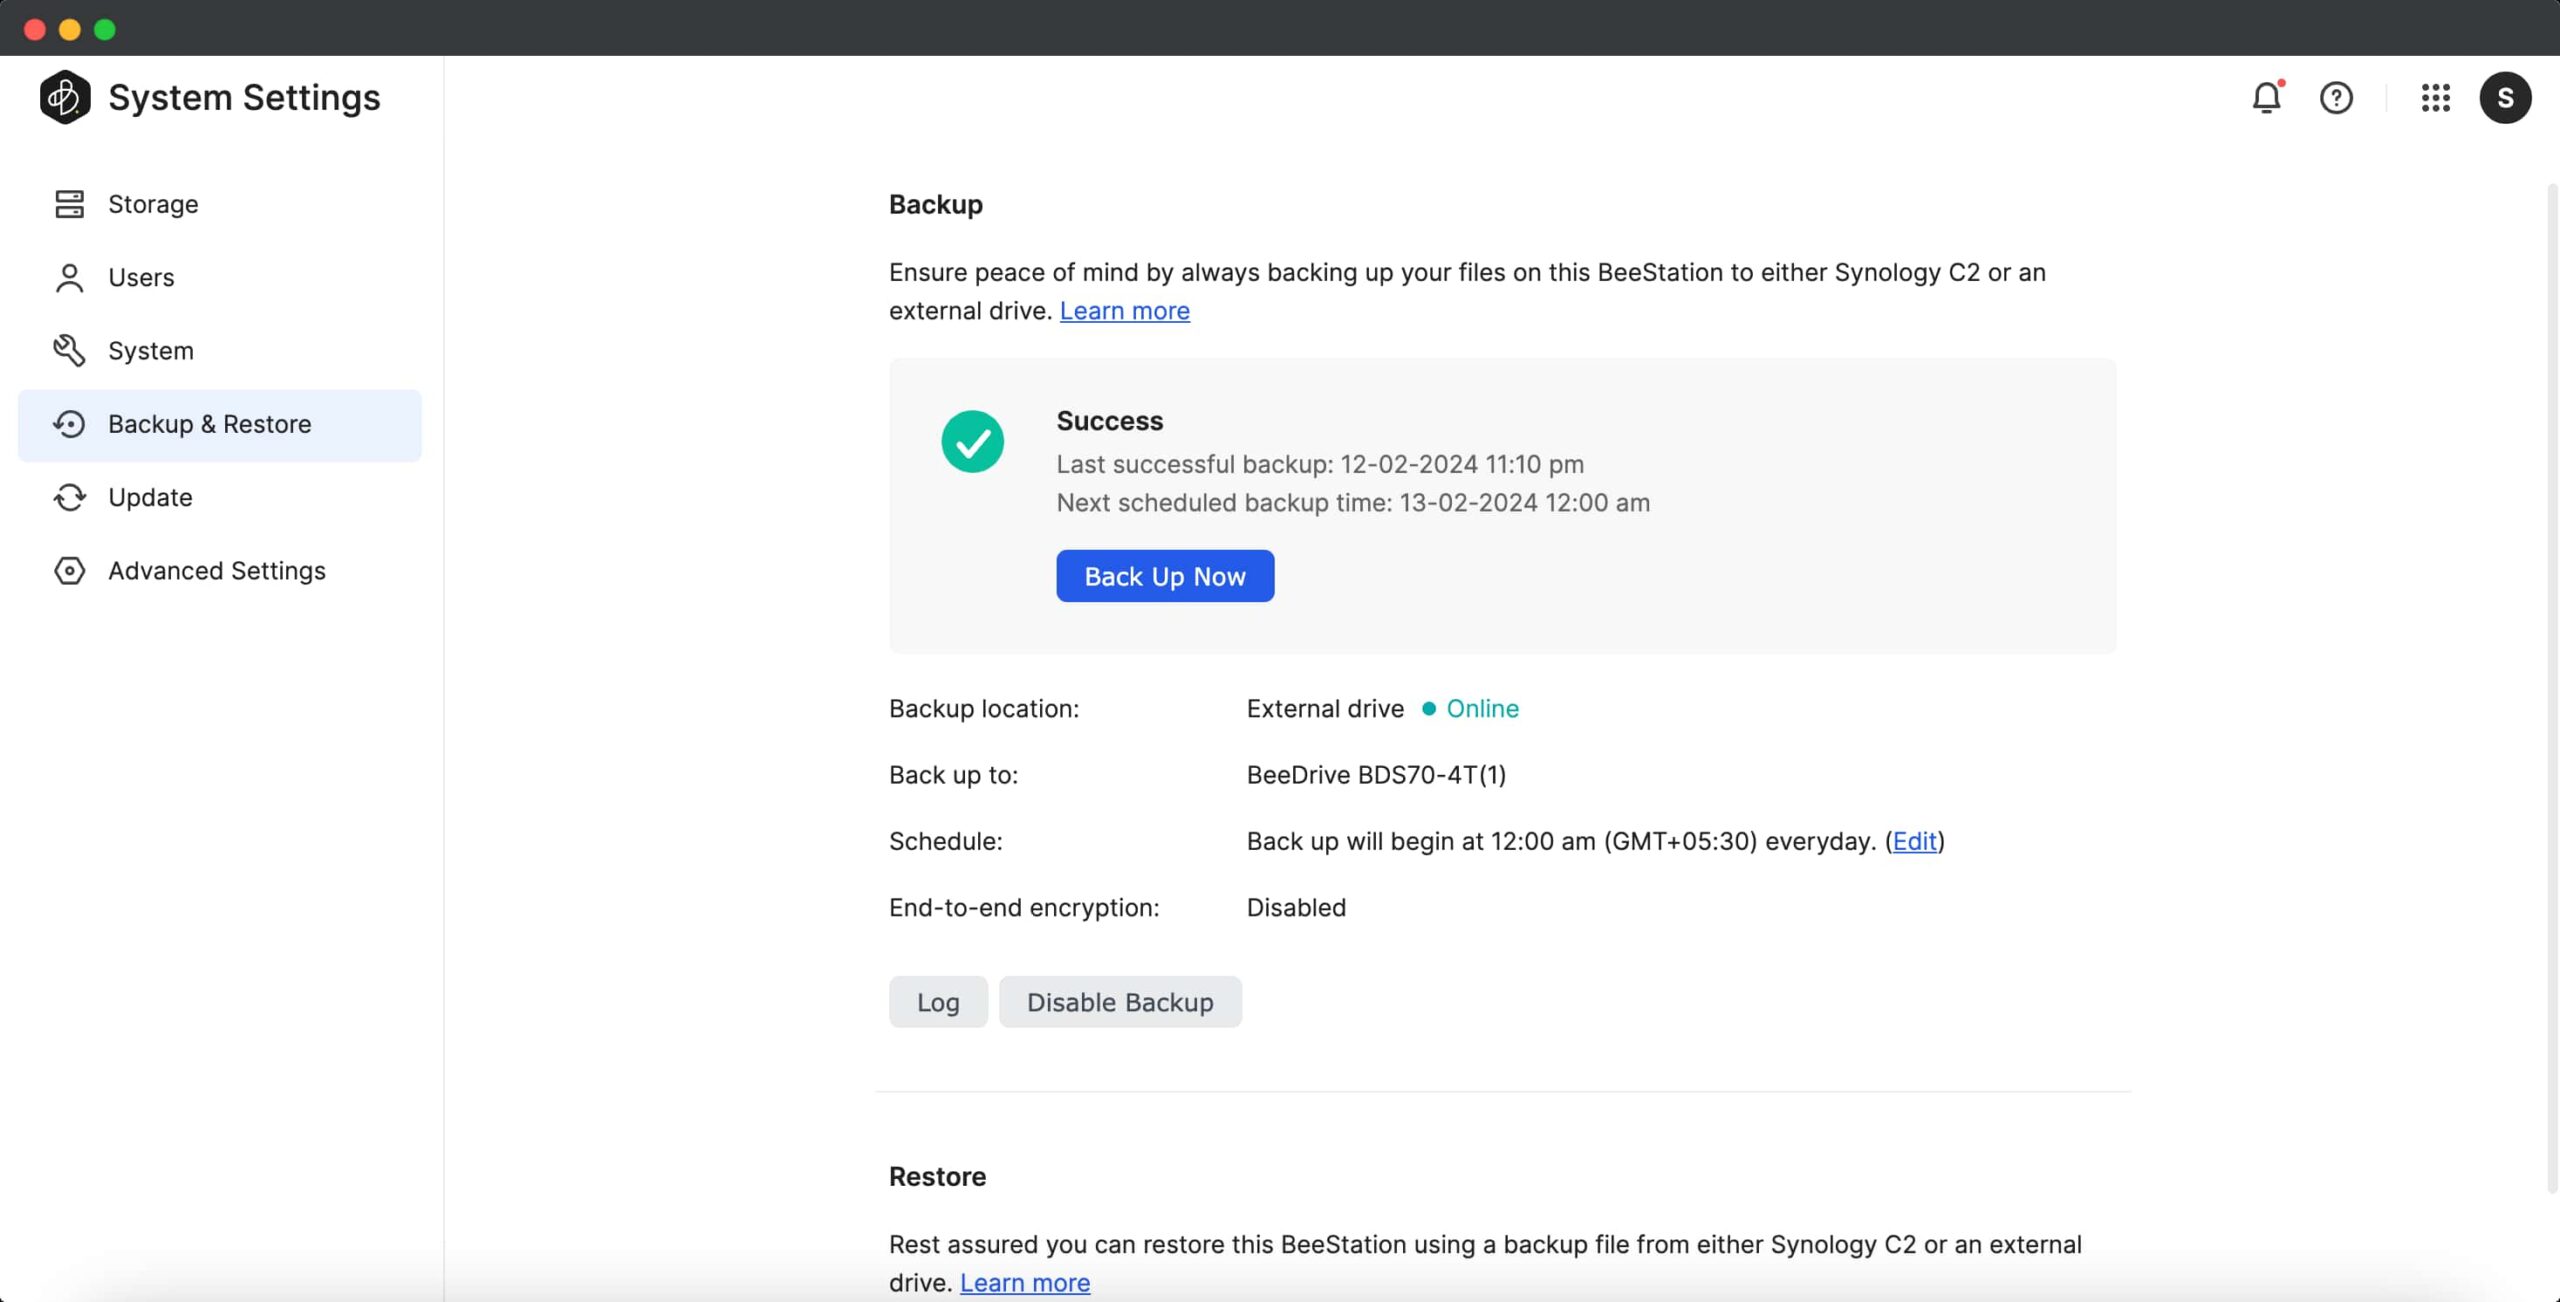
Note: Choosing end-to-end encryption is a good way to keep your data safe. But, it’s important to know that if you forget the password, you won’t be able to get your data back. If you decide to use this option, make sure to remember your password or note down the recovery key in a safe place.
Other BeeDrive Features
Built-in AI and keyword search: The BeePhots app is powered by AI, assisting you in discovering photos of your loved ones and special moments. BeeStation’s built-in AI conducts photo recognition without transmitting any data to the cloud. The integrated Neural Processing Unit (NPU) enhances AI processing speed, ensuring that other applications can run seamlessly.
This process includes scanning and analyzing each photo, so it might take some time for all the results to show up. The photos are categorized into People, Subjects, and Places. The Places category displays the photos on a world map, allowing you to revisit destinations by browsing through pictures taken during your travels.
Preview over 100 file formats: You can preview general file formats on the BeeFiles web portal. Popular Images, Text, Compressed files, Microsoft Office, Code, Video, and audio formats are supported, including PDF, PSD, zip, 7z, JSON, HTML, and Image (RAW files).
Personal spaces for family: Similar to sharing Google One Storage, you have the option to share BeeStation storage space with your family and friends. These spaces are completely separate to ensure privacy and control. Their files will be kept separate from each other. You can invite up to 8 people to join BeeStation.
To invite someone, generate an invite link from the System Settings and share it with the person you want to invite. When the invitee clicks on the link, they can sign in to your BeeStation using their Synology Account. Once they join, they will be added to the user list. You can remove their access anytime.
Independent of a computer: You can set up BeeStation using a mobile without relying on a computer. After setting it up, you can use BeePhotos to back up photos from your phone and BeeFiles to transfer files from your phone. While some system management features, like inviting others, monitoring storage usage, configuring external drive backup, and checking system health, are currently accessible only through the desktop browser, you’ll still receive email notifications about the system’s status and health, alerting you to any issues that need your attention.
How to Reset BeeStation?
- Press and hold the RESET button for approximately 4 seconds until you hear a beep, then release the button promptly.
- Within the next 10 seconds, press and hold the RESET button again for another 4 seconds until you hear three additional beeps.
- Wait for approximately 2 minutes until the front LED turns on solid orange.
What is a Local Account in BeeStation, and How Do You Use it?
The Local Account is a valuable feature that allows you to access your BeeStation even in the absence of an internet connection. With a local account, you can seamlessly retrieve all your photos and files from BeeStation, and you also have the capability to upload files directly to BeeStation. Synology has streamlined the process of creating a local account, making it straightforward and effortless for users to create and manage the local account with ease. For local access to BeeStation, ensure that both BeeStation and your laptop are connected to the same Wi-Fi network.
- Visit portal.bee.synology.com
- Tap on the Menu and choose System Settings.
- Proceed to Advanced Settings and select Local Access.
- Enable Local Access.
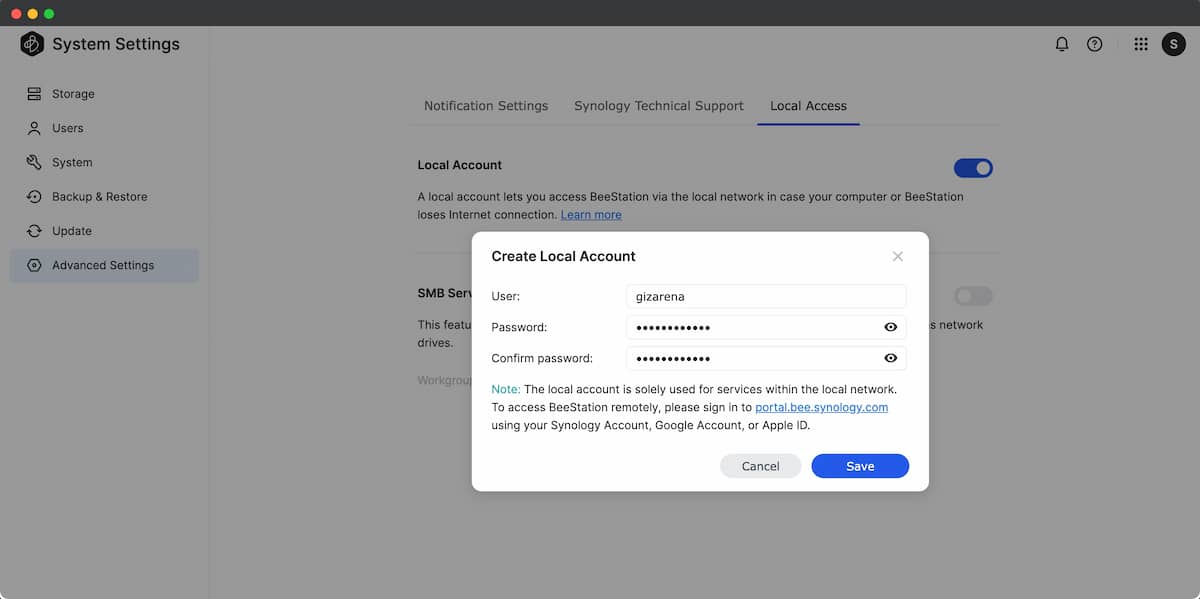
- Provide the User (any name) and Password, then click Save.
- Take note of the IP Address. Enter the IP address in your Web Browser to access the BeeStation Portal.
- Enter the Username and Password to log in to BeeStation via local access.
Things to Remember
- The BeeStation doesn’t come with built-in Wi-Fi capabilities, so it can only connect to a router using an Ethernet cable.
- Files backed up from BeeStation are not compatible with restoring Synology NAS, and vice versa.
- Only drives formatted in ext3, ext4, FAT32, NTFS, Btrfs, exFAT, and HFS+ are recognized. Any external drives not formatted in these types will not be recognized.
- BeePhots and BeeFiles on both Android and iOS support biometric authentication. You can secure both apps using either a passcode or fingerprint sensor on Android devices and Face ID on Apple devices.
- Both BeeFiles and BeePhots support drag-and-drop functionality in the browser.
- Inviting family members is available on the web interface only.
Conclusion
To be precise, Synology BeeStation is not a NAS, and it should not be directly compared to NAS systems. NAS can be somewhat complex and challenging for beginners to understand due to various terminologies. BeeStation is an entirely different product that focuses solely on supporting one function of NAS, which is backup and file/photo management.
BeeStation is tailored for individuals seeking easy access to their files, photos, and videos from the convenience of their home or office. It provides more features compared to other public cloud services like Google Cloud, OneDrive, etc., all without any monthly fees. With BeeStation, you’ll have centralized storage to store photos and files from all your devices, whether you’re at home or in the office. BeeStation is easy to set up, maintain, and manage. Additionally, it comes with a built-in NAS drive, ensuring the device operates consistently and reliably around the clock.
I have been using BeeStation for the past two weeks, and I am extremely happy with its functionality. The hardware syncs well with the software, and I have hardly experienced any issues. Despite being on a pre-release version, I did not experience lags or hiccups. Synology has made the software as simple as possible, making it easy for everyone to understand and use. If you’re seeking a device to back up, store, and manage photos or files at home without wanting to spend on monthly subscription costs, you can’t go wrong with Synology BeeStation. It’s the best device you can buy right now.
What I Like
- Compact and portable design
- User-friendly setup
- Easy to use
- High-quality software
- Supports 3rd-party cloud services
- Automatic external drive backup
- Accessible from anywhere in the world
- Reliable NAS HDD
- Dedicated apps for Windows, Mac, Android & iOS
- 3-Year warranty
What I Didn’t Like
- Only available in 4TB configuration
- HDD is not user-replaceable
- No way to check HDD health
Synology NAS vs BeeStation
A Synology NAS functions as a server and provides advanced users with a variety of features and customization choices, making it highly adaptable to their unique requirements. However, for average users familiar with more straightforward cloud storage solutions like iCloud, Google Drive, or Google Photos, moving to a NAS system may seem daunting. This is partly because, despite its superior software, a NAS involves a learning curve with numerous technical terms such as Volume, Storage Pool, File System, and DNS, among others, which might initially appear complex to beginners.
To address these challenges, Synology has launched an all-new product aimed at simplifying user experience – arriving fully preinstalled and preconfigured. This BeeStation is user-friendly, especially for those already acquainted with 3rd party private cloud services. Essentially, the BeeStation serves as an economical substitute for third-party cloud storage services such as Google Cloud, OneDrive, Google Photos, etc., offering an accessible and straightforward solution for personal storage needs.
With the BeeStation, everything is ready to go right out of the box: the hard drive, operating system, and applications are all preinstalled and preconfigured. To get started, all you need to do is scan a QR code, and in under five minutes, your private cloud drive at home is up and running. Just sign in using your preferred account, like a Google, Apple ID, or Synology Account, on the desktop or mobile apps. This allows you to connect to your BeeStation from anywhere in the world. Additionally, you can access your BeeStation through a web browser on your PC or laptop.
Who are the ideal Users for Synology BeeStation?
The BeeStation is perfect for those who are maxing out their free storage options, like 15GB from Google or 5GB from iCloud and want to avoid monthly fees for extra space. It’s also ideal for anyone considering a 2TB plan upgrade. With the BeeStation, you get 4TB of storage for a one-time cost of $199.95, not including taxes, which is more affordable than many other cloud storage services. Refer to the table below. The prices mentioned below are as of February 1, 2024.
| Solution | Year 1 | Year 2 | Year 3 |
| iCloud (2TB) | $120 | $240 | $360 |
| Google One (2TB) | $100 | $200 | $300 |
If you’re already a NAS user familiar with Synology systems, or if you have the technical skills and time needed to set up a NAS, switching to BeeStation might not be necessary. All the features offered by BeeStation are already available in standard Synology models. However, if you’re adept with computers and smartphones but don’t have the time or knowledge for storage and networking to set up and manage DSM, and you want to avoid ongoing subscription costs, then BeeStation is ideal for you. It functions much like iCloud or Google right from the start, allowing for easy use with minimal setup.
Numerous business professionals depend on desktop software such as Adobe and Microsoft Office. The BeeStation desktop app allows them to open and edit files on BeeStation, sync changes instantly upon saving, and maintain up to 8 versions. This facilitates a smooth transition between an office computer and a home computer while working on the same files. Furthermore, these files only take up laptop storage space when accessed, ensuring that your 256GB laptop is always supported by BeeStation’s expansive 4TB storage capacity.
BeeStation is also ideal for photographers, videographers, and other professionals who depend on external storage solutions for their work. While it may be convenient to store files on a public or private cloud, many work environments face challenges with slow Internet access. For professionals like photographers working in outdoor or client locations, or others who generate significant data on the go, it’s common to save files to portable drives initially.
Upon returning to their studio or home, they can effortlessly connect the drive to BeeStation, allowing it to automatically back up the data. These files can then be managed, organized, and shared with collaborators using BeeFiles. BeeStation’s USB-A and USB-C ports ensure seamless connectivity for external drives, portable SSDs, or flash drives without requiring an adapter.
Synology BeeStation Price and Availability
The Synology BeeStation is offered in 4TB configuration and will be available to buy on Amazon, Synology’s official website, and via authorized partners and resellers worldwide, commencing February 2, 2022. This device is backed by a 3-year limited warranty.
That’s it. Thank you for reading our comprehensive review of Synology BeeStation. If you have any questions, feel free to let us know in the comments, and we’ll get back to you as soon as possible.