eSIM, short for embedded SIM, is a technology that replaces the traditional physical SIM card with a programmable chip integrated into mobile devices, allowing users to switch between mobile network providers without needing a physical SIM swap. It offers greater flexibility and convenience for users, enabling seamless connectivity and the ability to add or change network plans directly from their devices.
eSIM technology has gained widespread adoption among original equipment manufacturers (OEMs), with many major smartphone and device manufacturers incorporating eSIM support into their products, such as Apple, Google, Samsung, etc. Configuring an eSIM can involve some effort, but the process has become more streamlined over time. Let’s check out a detailed guide to activate and set up Jio eSIM on Google Pixel 7a below.
Also read: How to Activate Airtel eSIM on iPhone and Android: Step-by-step Guide
How to Activate Jio eSIM
Converting your physical Jio SIM card to eSIM or Transferring your Jio eSIM from one device to another compatible device involves seven simple steps. Even though the tutorial below is made on Google Pixel 7a, the same process applies to all Pixel devices. You can also follow the same process to set up Jio eSIM on Apple iPhones.
Note: Your physical Jio SIM card must be active, and it should have an active plan to send an SMS to activate the eSIM. You would also need an active internet connection or Mobile data to activate Jio eSIM
Step 1: Check Your Device Compatibility
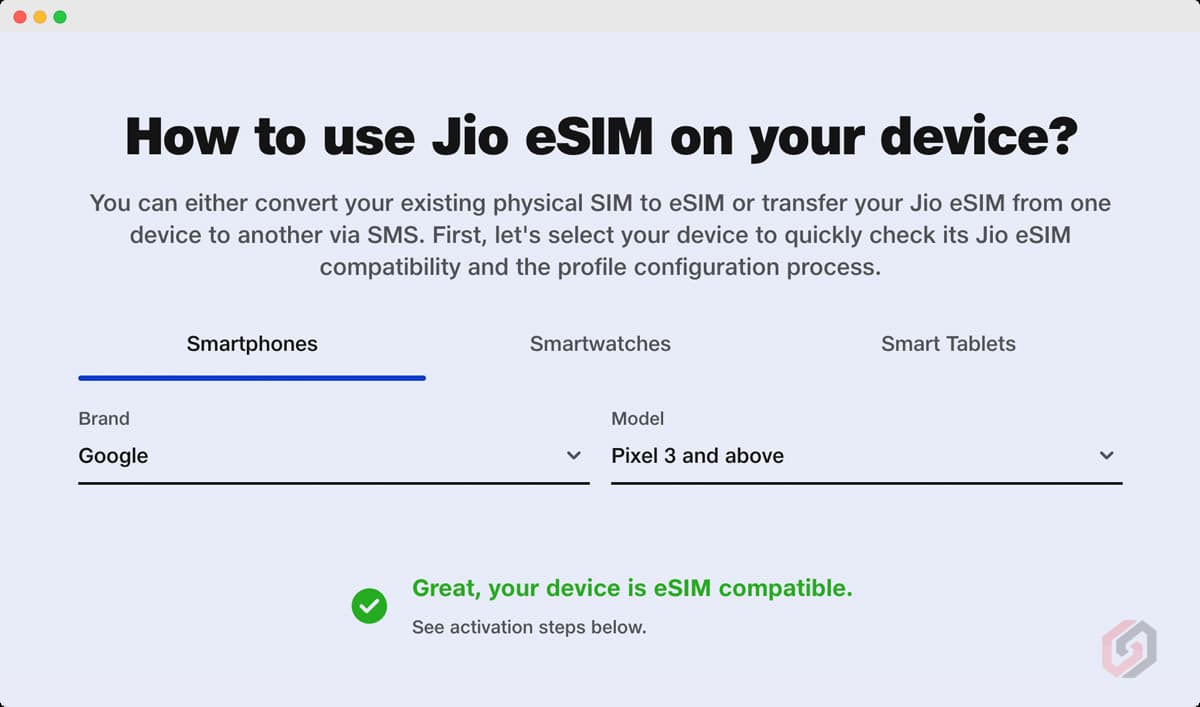
- Go to this link – jio.com/jcms/esim/.
- Scroll down and select the device type – Smartphone, Smartwatch, Smart Tablet.
- Select Brand and Model.
- Click on Check Compatibility.
- If your device is compatible, you’ll get a response as “Your device is eSIM compatible“.
List of Jio eSIM Compatible Devices (As of 22 May 2023)
| Apple | iPhone 11, iPhone 11 Pro, iPhone 11 Pro Max, iPhone 12, iPhone 12 Mini, iPhone 12 Pro, iPhone 12 Pro Max, iPhone 13, iPhone 13 mini, iPhone 13 Pro, iPhone 13 Pro Max, iPhone 14, iPhone 14 Plus, iPhone 14 Pro, iPhone 14 Pro Max |
| Google Pixel | Pixel 3 Series, Pixel 4 Series, Pixel 5 Series, Pixel 6 Series, Pixel 7 Series |
| Motorola | Razr, Next Gen Razr 5G |
| Nokia | G60 5G |
| Samsung | Galaxy Fold, Galaxy Note 20, Galaxy Note 20 Ultra, Galaxy S20, Galaxy S20 Plus, Galaxy S20 Ultra, Galaxy S21, Galaxy S21 Plus, Galaxy S21 Ultra, Galaxy S22, Galaxy S22 Plus, Galaxy S22 Ultra, Galaxy S23, Galaxy S23 Ultra, Galaxy S23+, Galaxy Z Flip, Galaxy Z Flip 3, Galaxy Z Flip4, Galaxy Z Fold 2, Galaxy Z Fold 3, Galaxy Z Fold4 |
| Vivo | X90 Pro |
Step 2: Check if Your Email is Registered for Your Jio Number
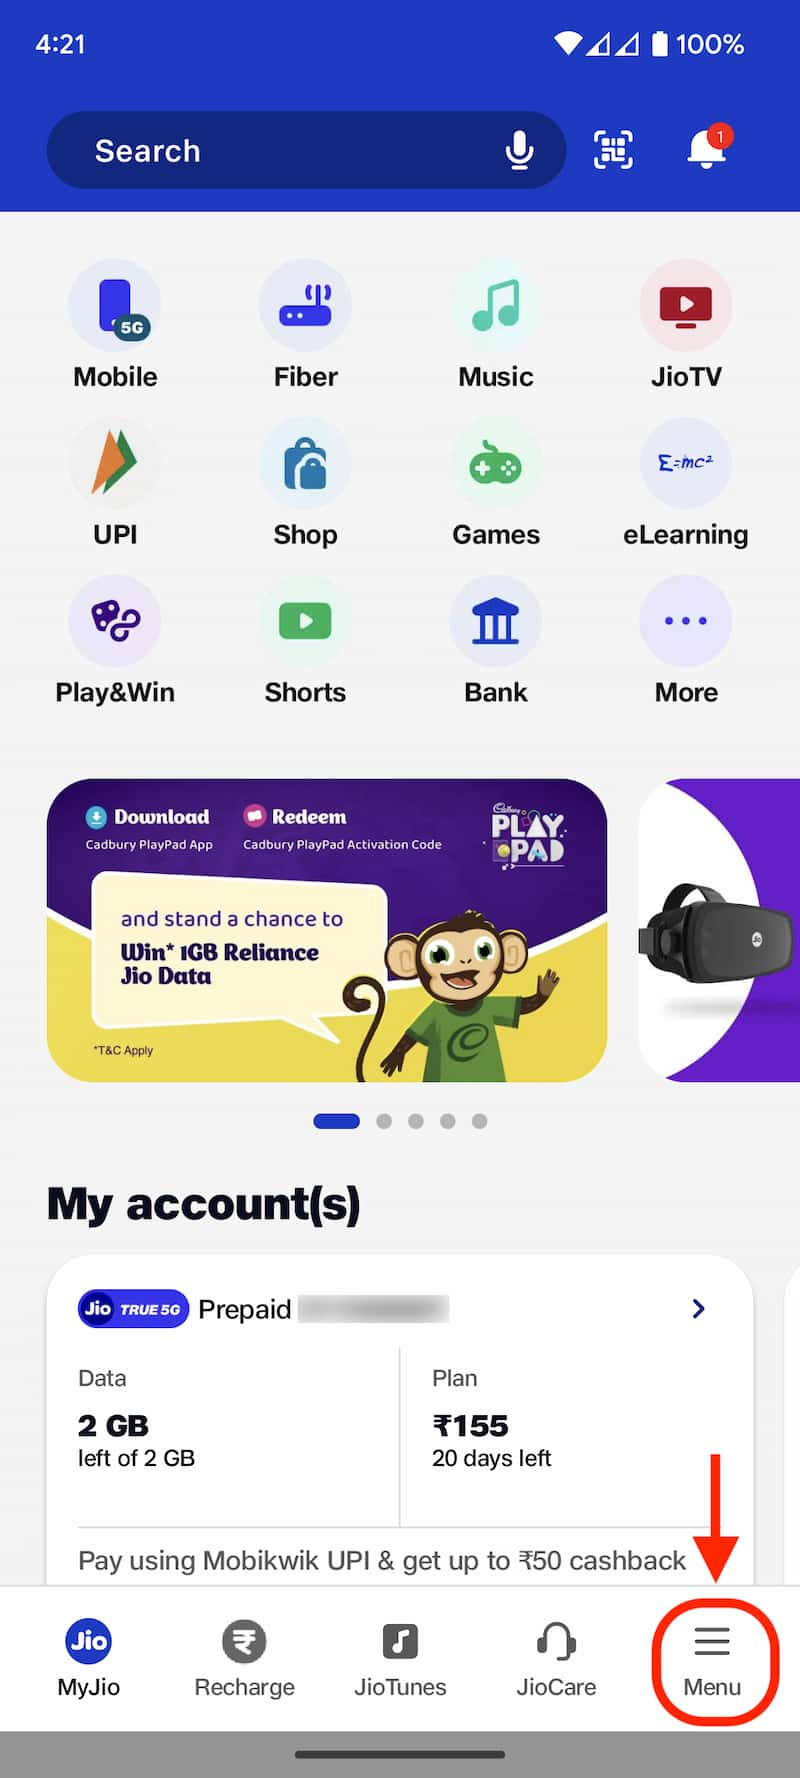
- Open the MyJio app on your phone.
- Tap on the Menu icon on the bottom right.
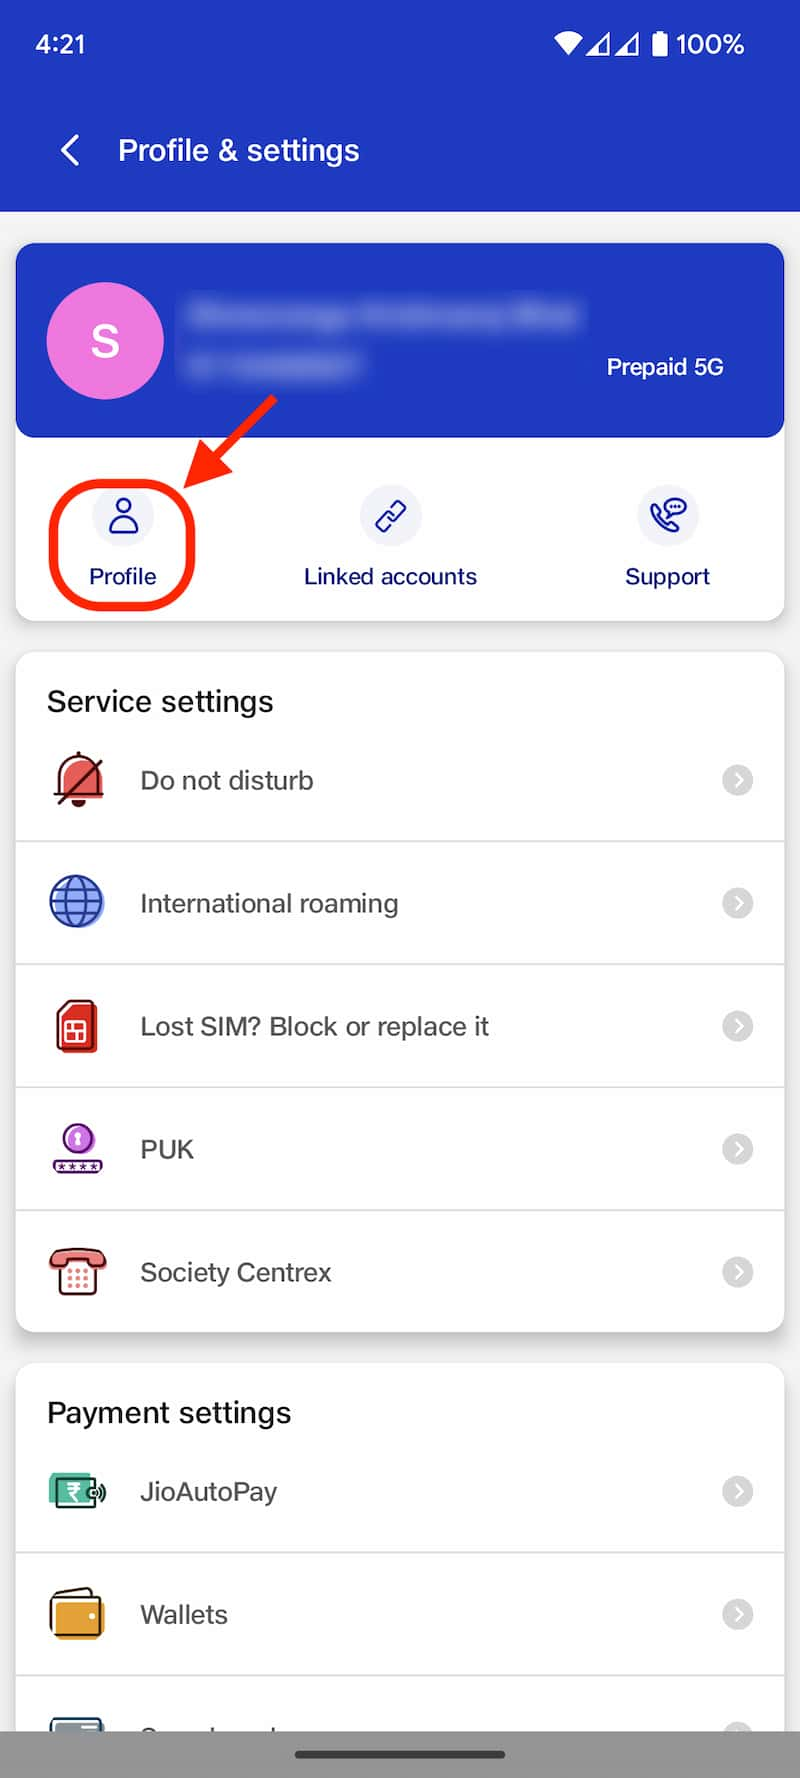
- Select Profile.
- Tap on Profile & Settings.
- Check the Email field. Move to the next step if a valid and working email ID is mentioned.
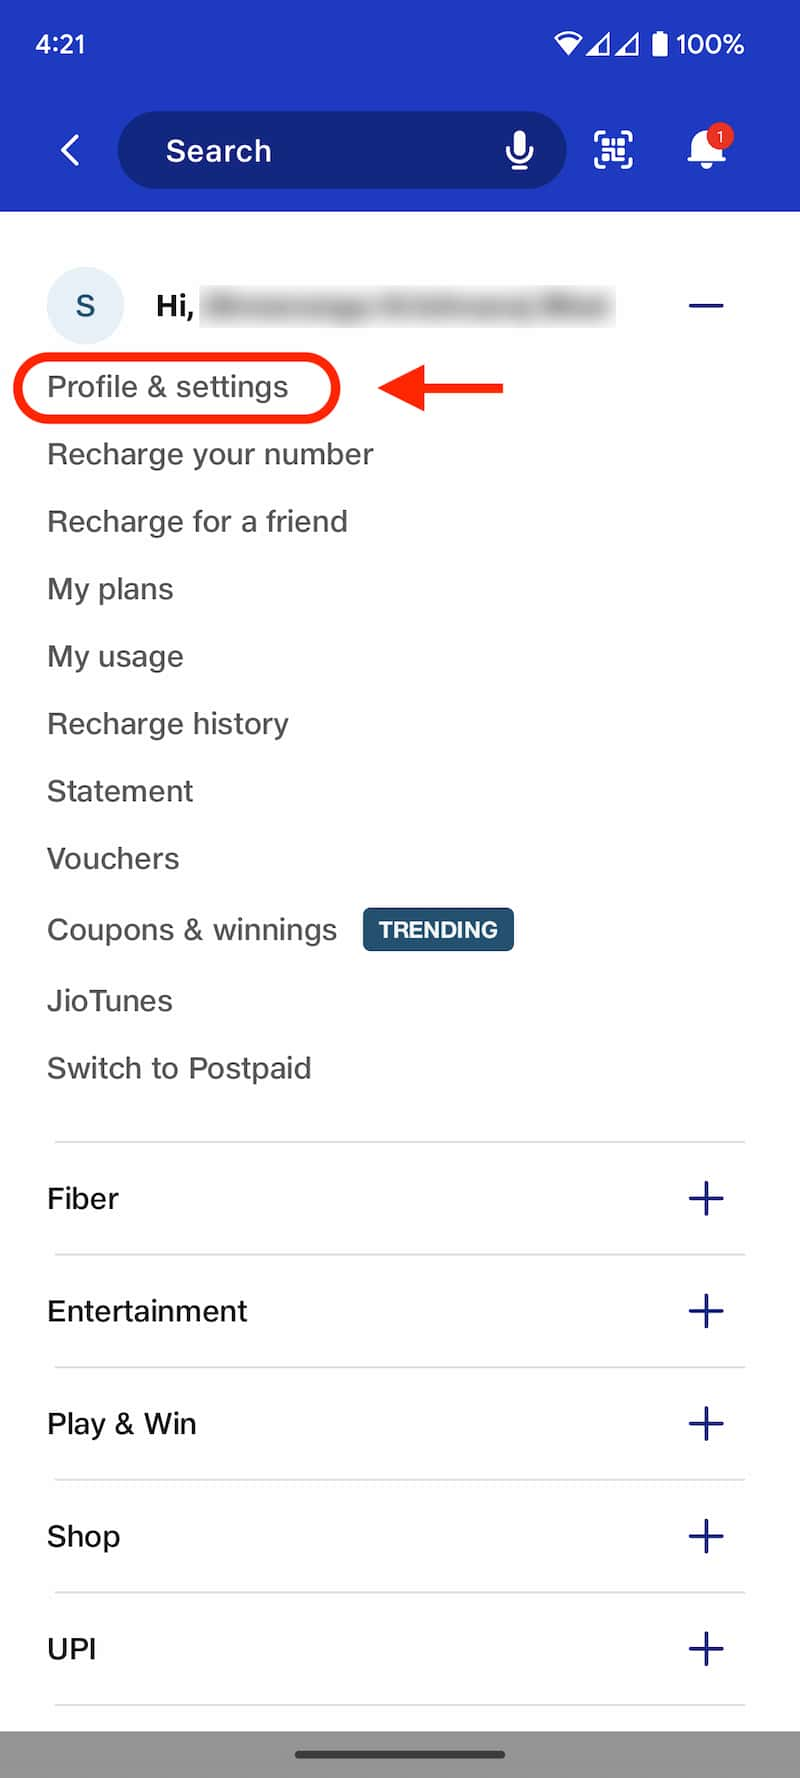
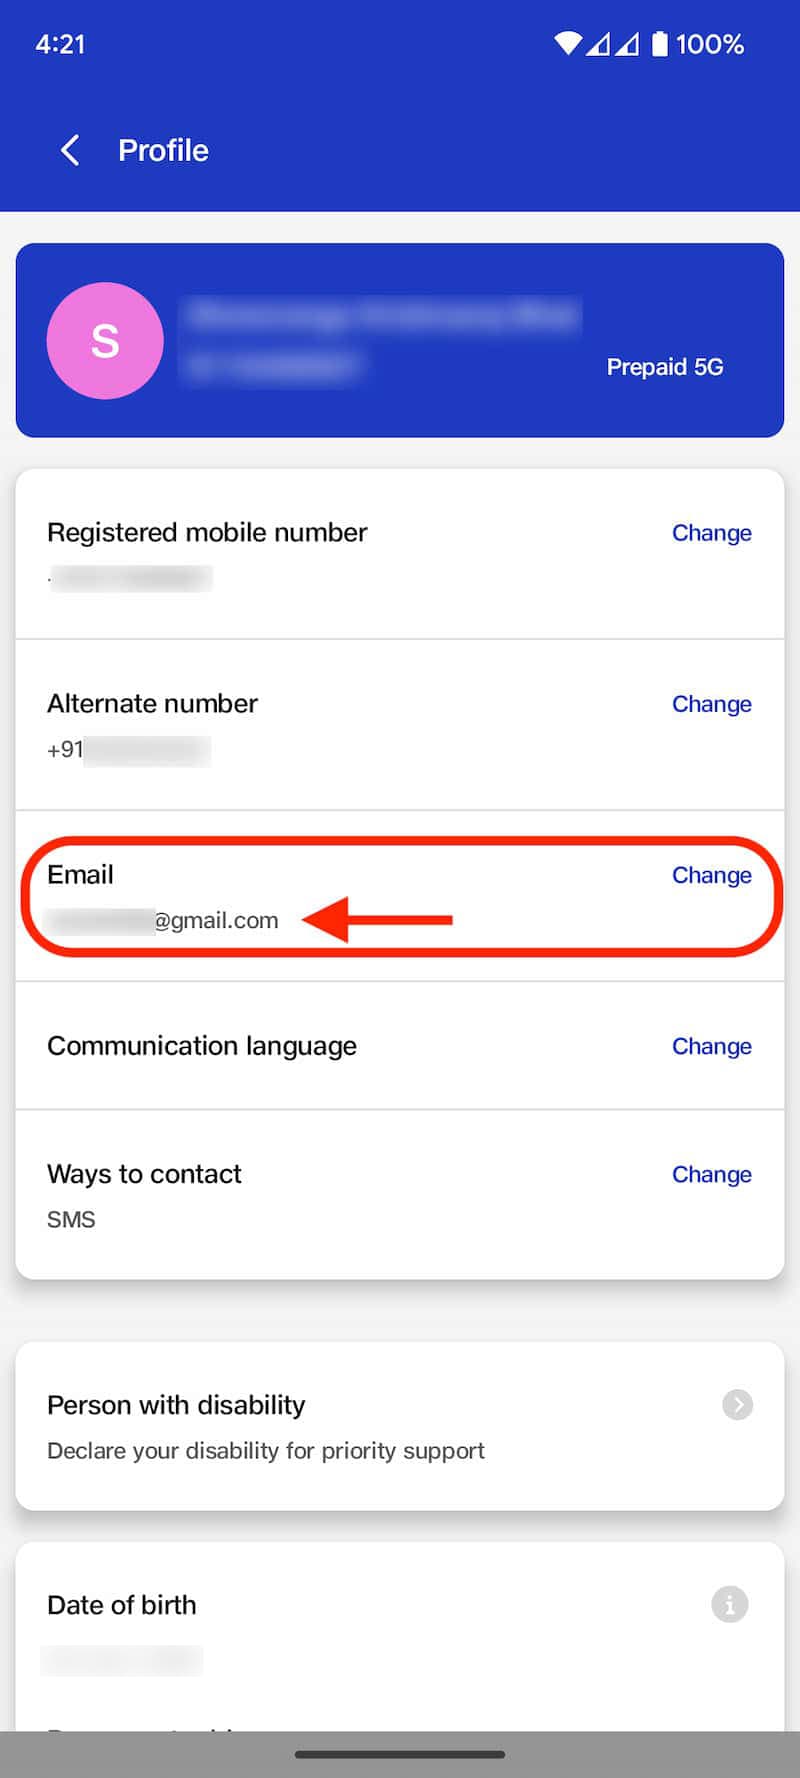
- If the Email is not registered or updated incorrectly, tap the Change button.
- Enter the correct Email.
- Enter the OTP sent to your new Email.
- Click on Submit. Once you enter the OTP, your Email will be updated immediately.
Step 3: Getting Your Phone’s EID Number and IMEI Number
To get EID Number:
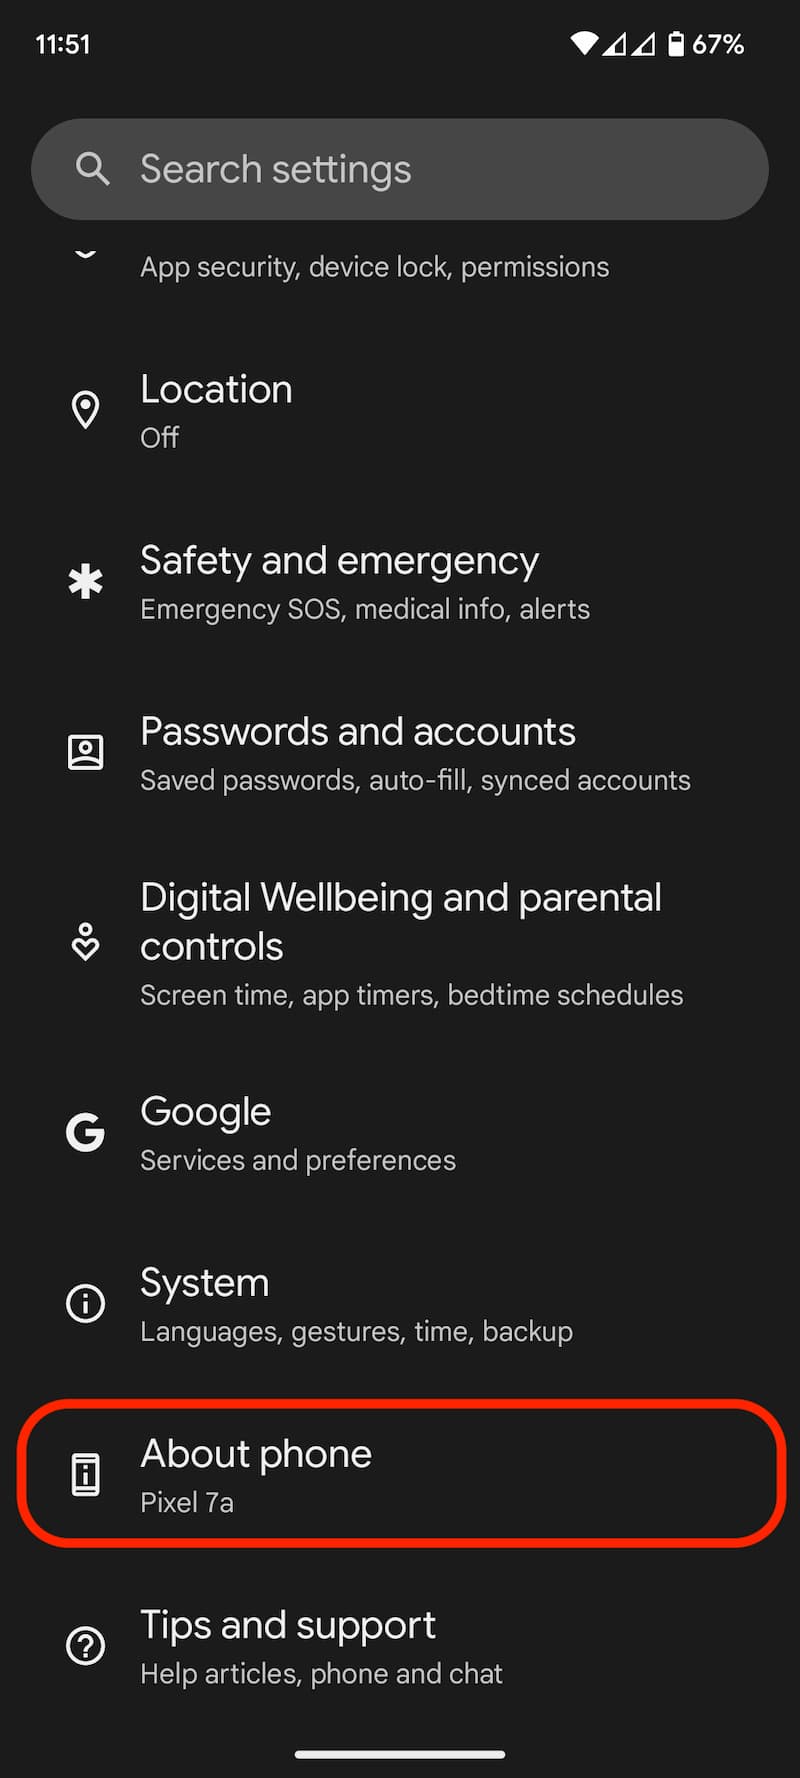
- Go to your Phone Settings -> About phone.
- Under device details, look for SIM status (sim slot 2) and tap on it.
- A pop-up will open. Scroll down and copy the EID number.
To Get IMEI Number:
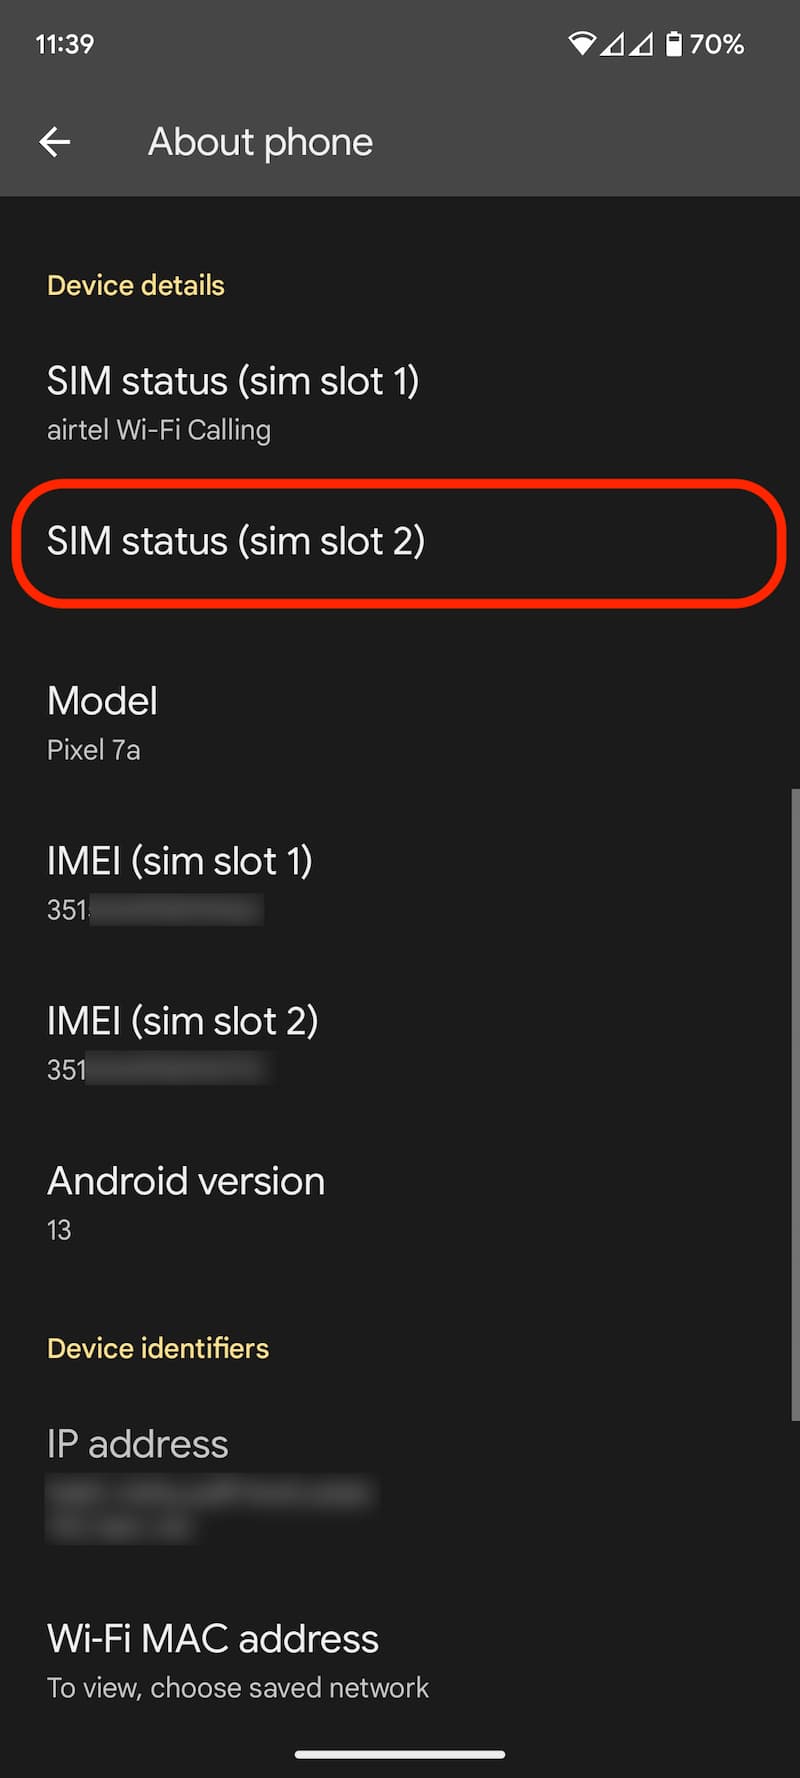
- Go to your Phone Settings -> About phone.
- Scroll down and make a note of IMEI (sim slot 2).
- Or dial *#06# and long press on the IMEI 2 and copy it.
Step 4: Sending eSIM Activation SMS
Once you’re done copying the EID and IMEI, now its time to start the eSIM activation process. Ensure your phone is connected to the internet through Wi-Fi or Mobile data during activation.
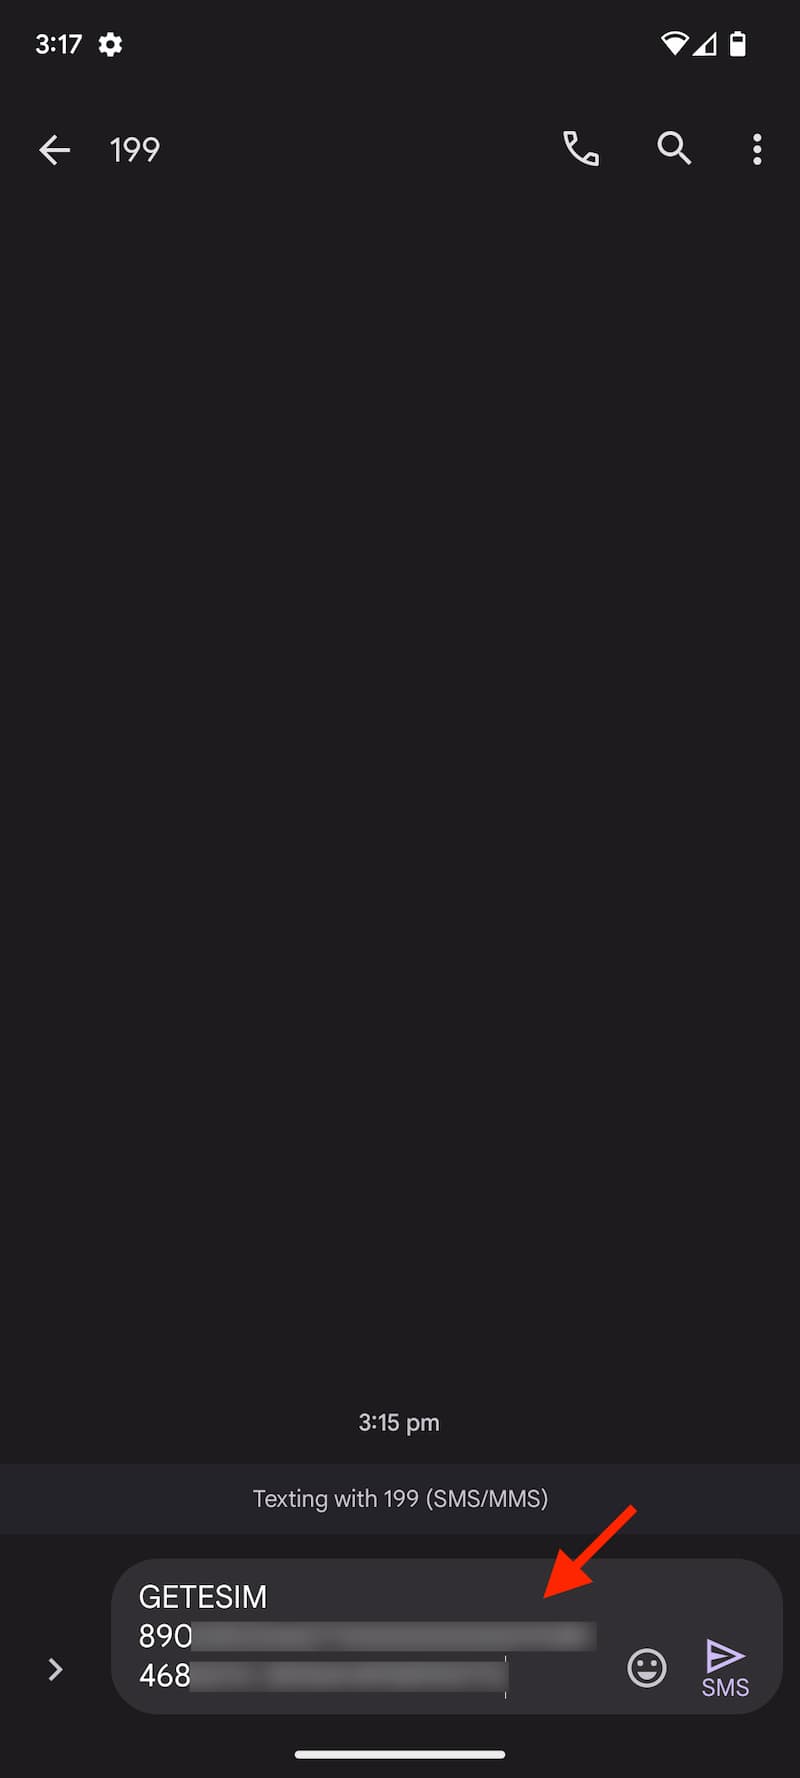
- Open Messages on your phone and compose a new message.
- Type GETESIM <32 Digit EID> <15 Digit IMEI> and send to 199 from the Jio number you wish to migrate to eSIM.
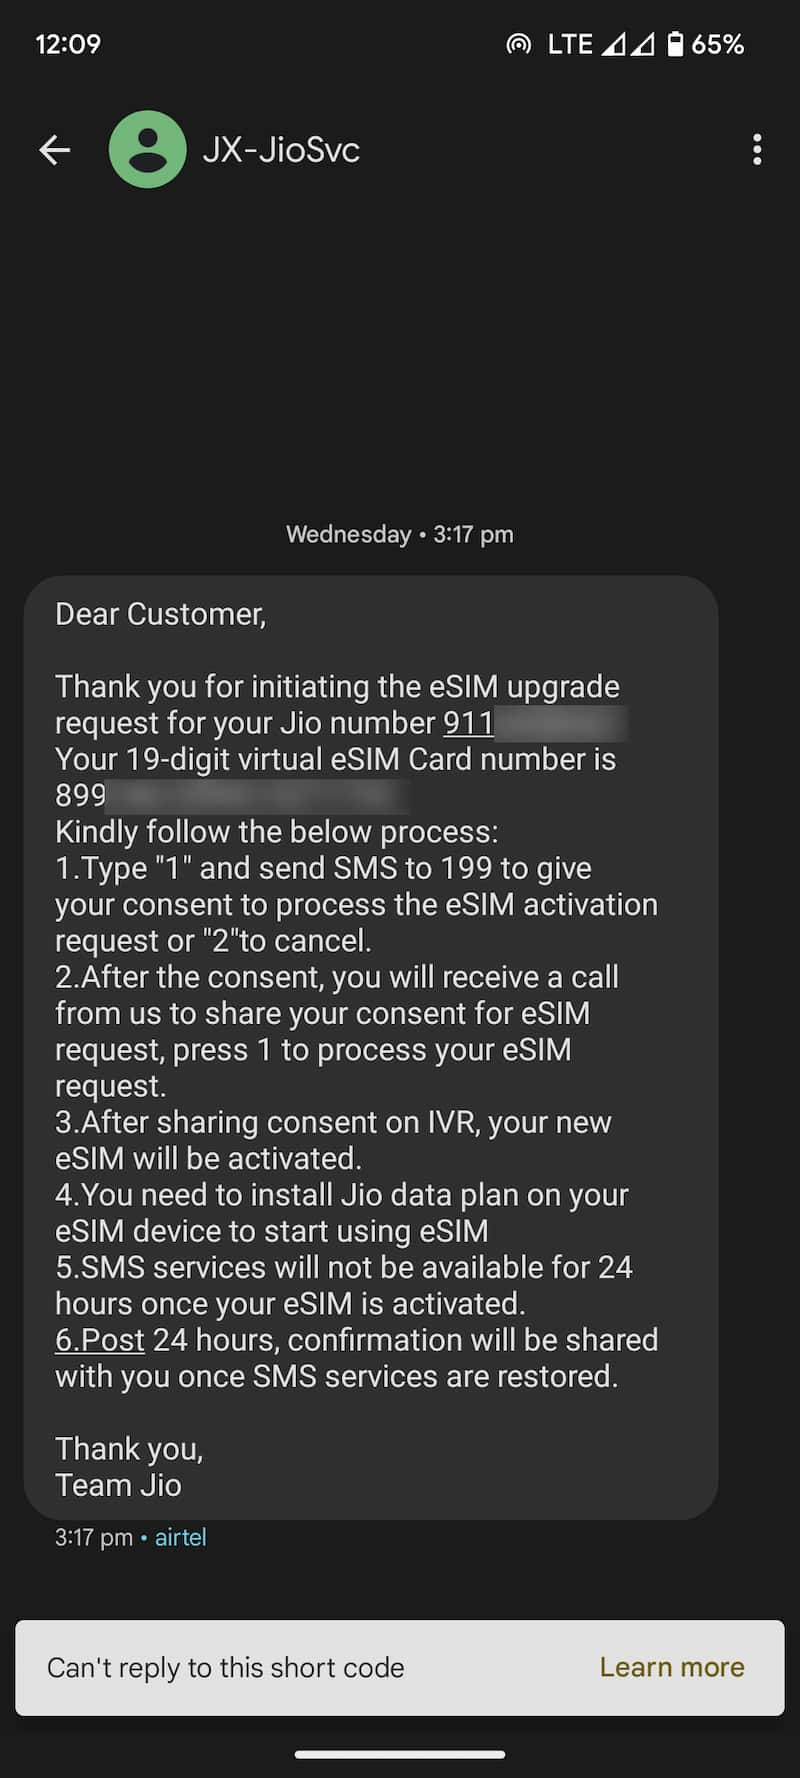
- On sending the correct EID and IMEI number to 199, You will receive a confirmation SMS and Email from Jio.
Step 5: Confirmation SMS
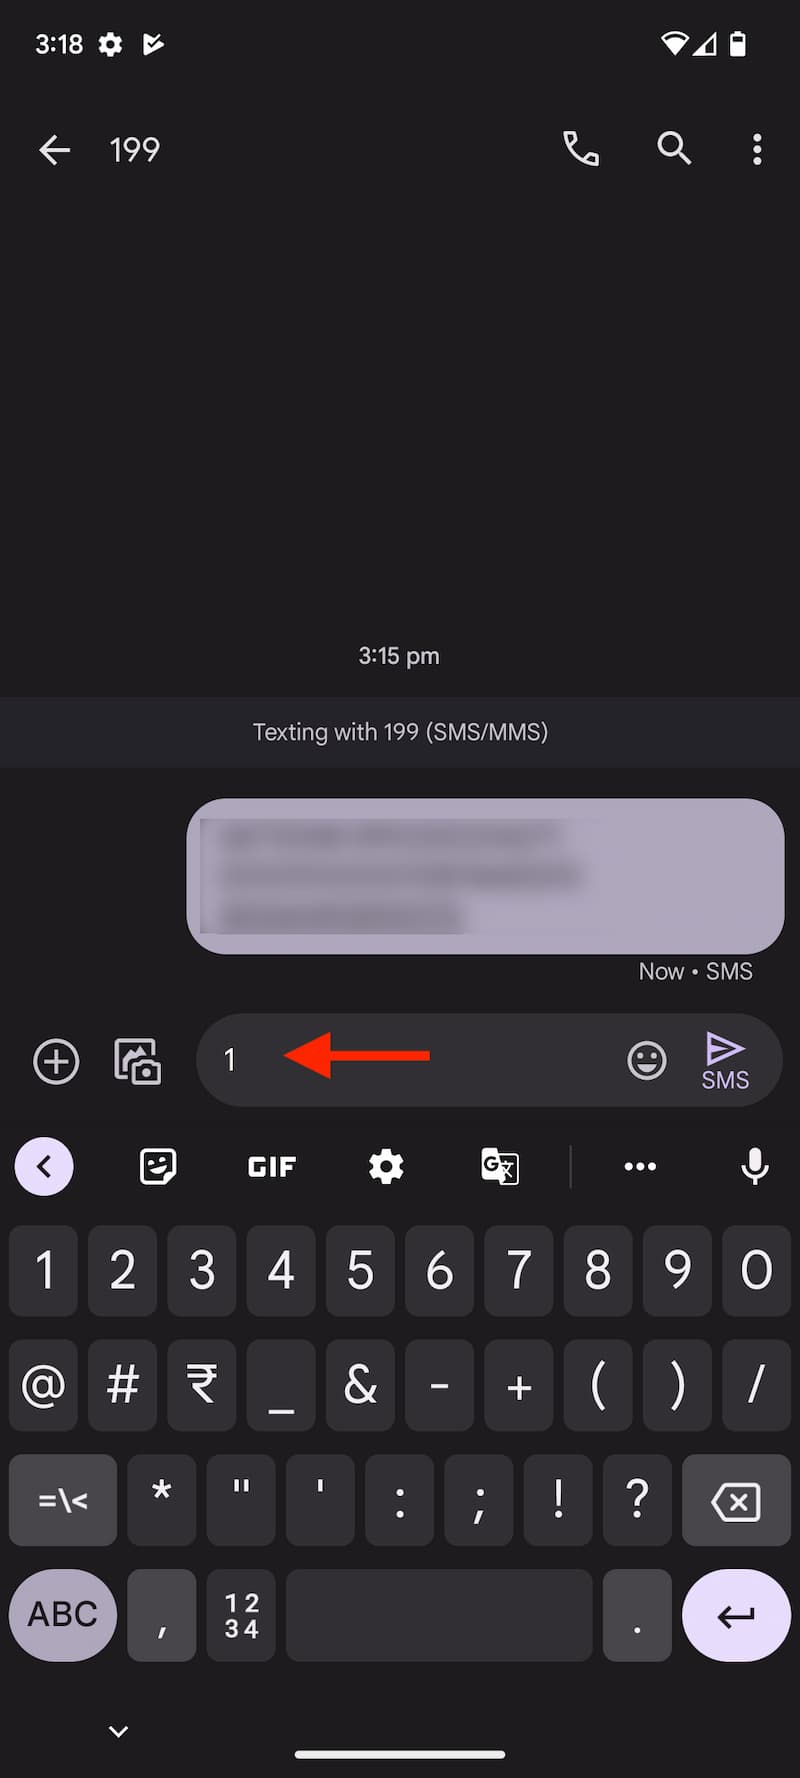
- Open Messages again and compose a new SMS.
- Type 1 and send it to 199.
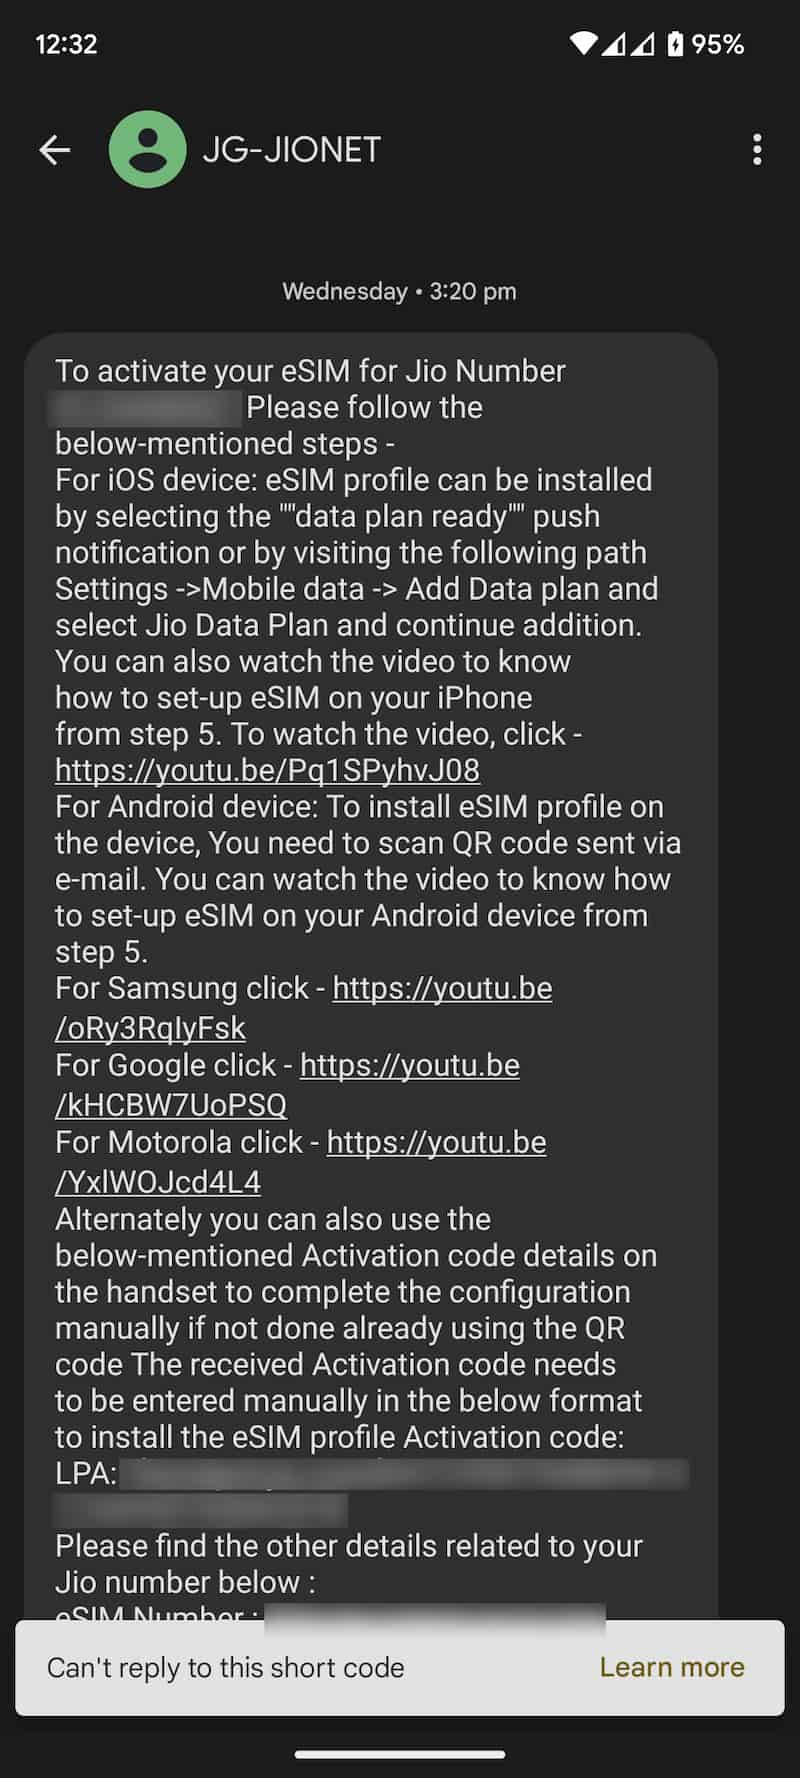
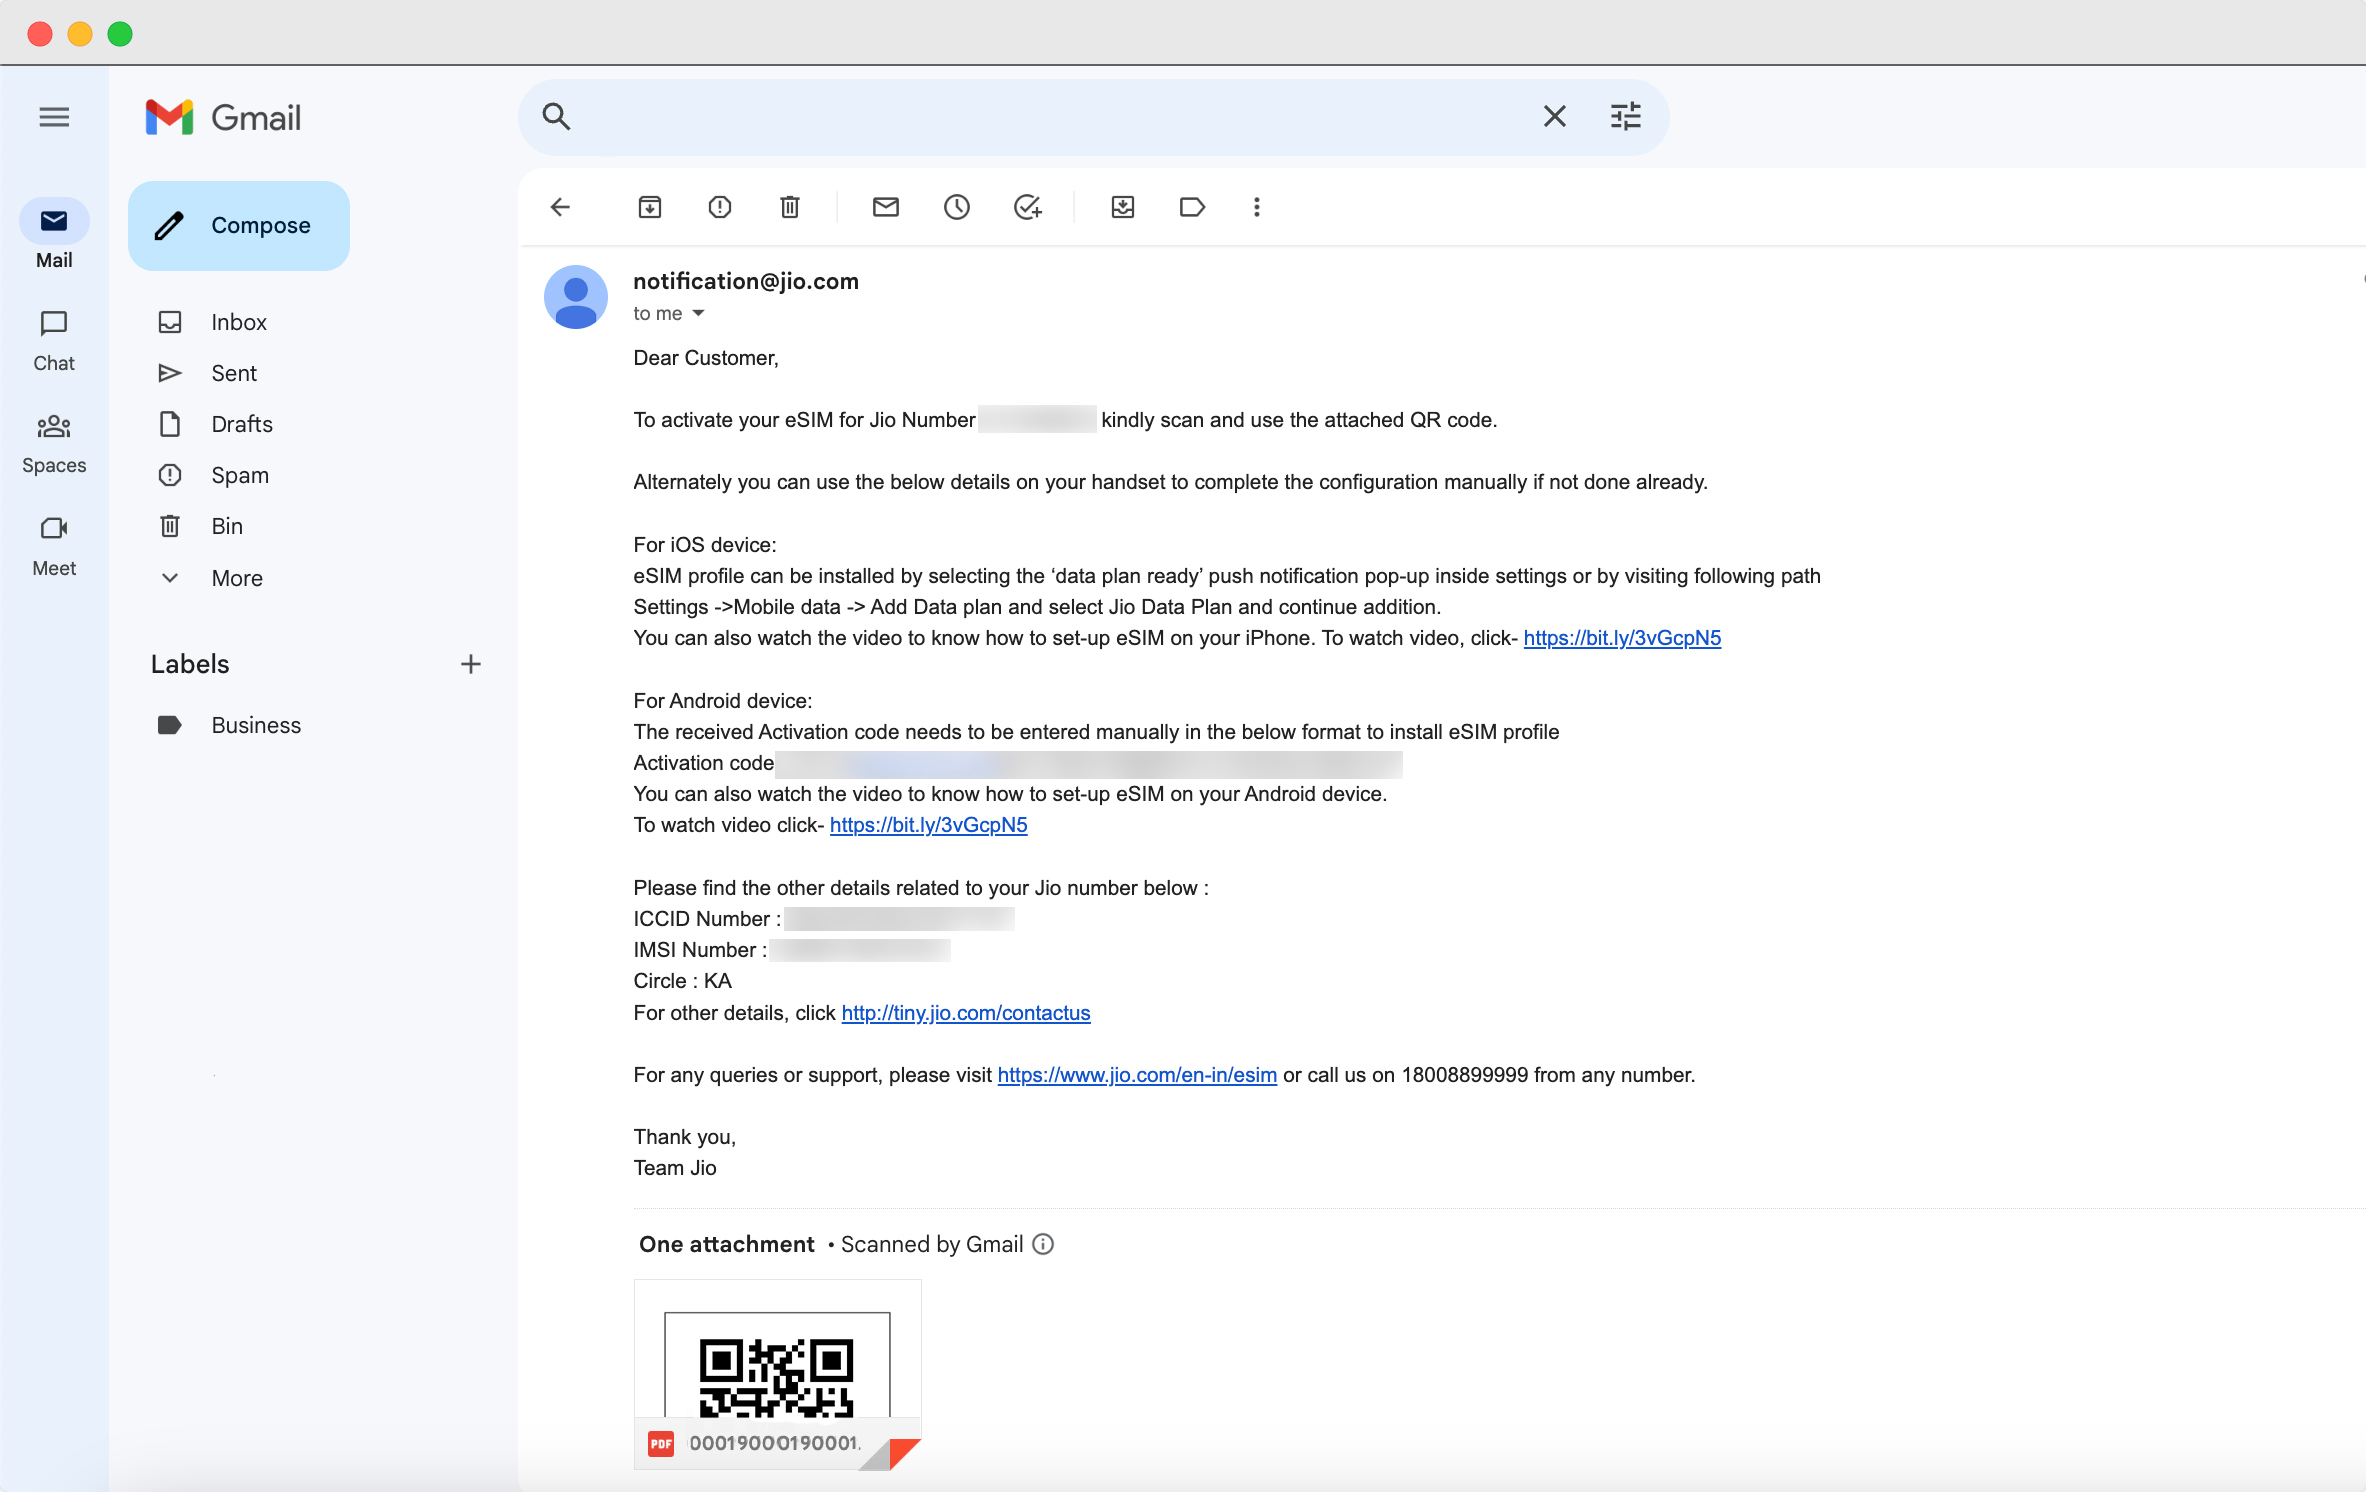
- On sending the consent SMS, you’ll receive a confirmation SMS and an email with QR Code on your registered Email. You will also get activation code details via SMS on your Jio number.
- Do not delete the QR Code email or Activation code SMS. You need these later to install the eSIM profile on your device.
Step 6: Confirmation Call
- Within 10 minutes of sending the consent SMS, you will receive an automated call from Jio support (+912235072222) on your Jio number, asking for your consent to process the eSIM request. Press 1 to share your consent on the automated call.
- After sharing consent on the IVR, you’ll again receive a confirmation SMS & Email on the registered Email.
- Check your missed call list if you haven’t received the IVR call within 10 minutes of sending the consent SMS. It’s possible that you didn’t answer the call, mistaking it for a spam call. Also, verify if you have enabled spam blocking through your phone’s dialer or any third-party apps.
- Type get the confirmation call again, Type RECALL, and send sms to 199 from your Jio number.
Note: After providing your consent on the IVR call, you will need to wait for 2 hours for the eSIM migration process. Throughout this period, you can continue using all the services associated with your Jio number on your current SIM card. In most cases, the process will be completed within a few minutes, but sometimes, it may take up to 2 hours.
Step 7: Jio eSIM Activation
- After the 2-hour wait, you’ll receive an SMS from Jio to install the eSIM on your new phone. As soon as you receive this SMS, Your existing SIM will stop working, and your phone will not show the network signals.
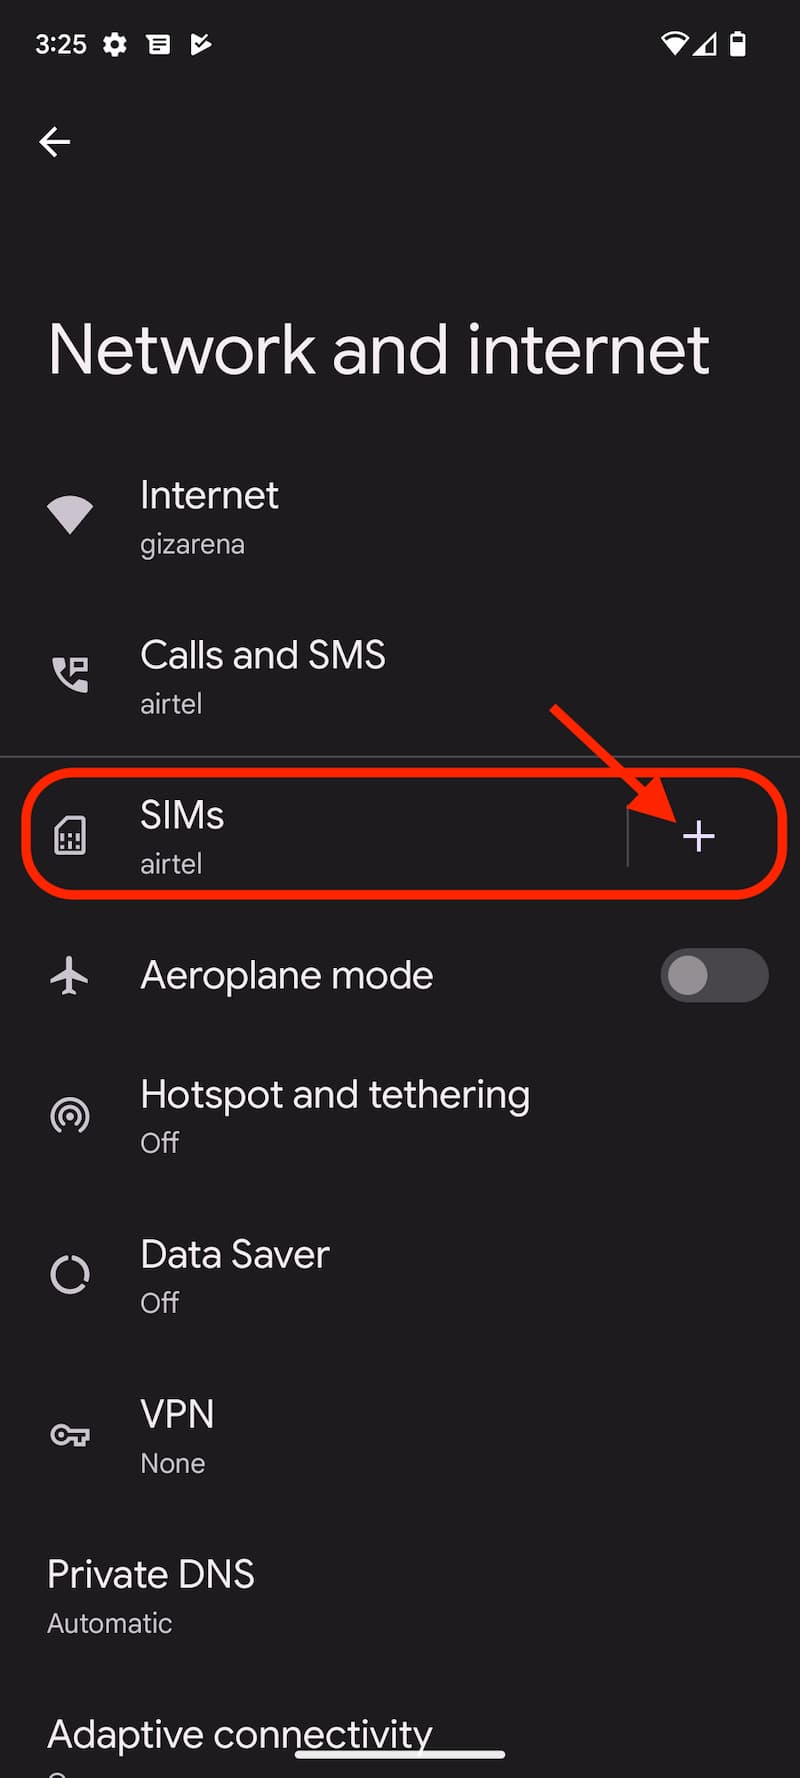
- Now, Go to Settings -> Network and internet.
- Tap on the + symbol placed in front of SIMs.
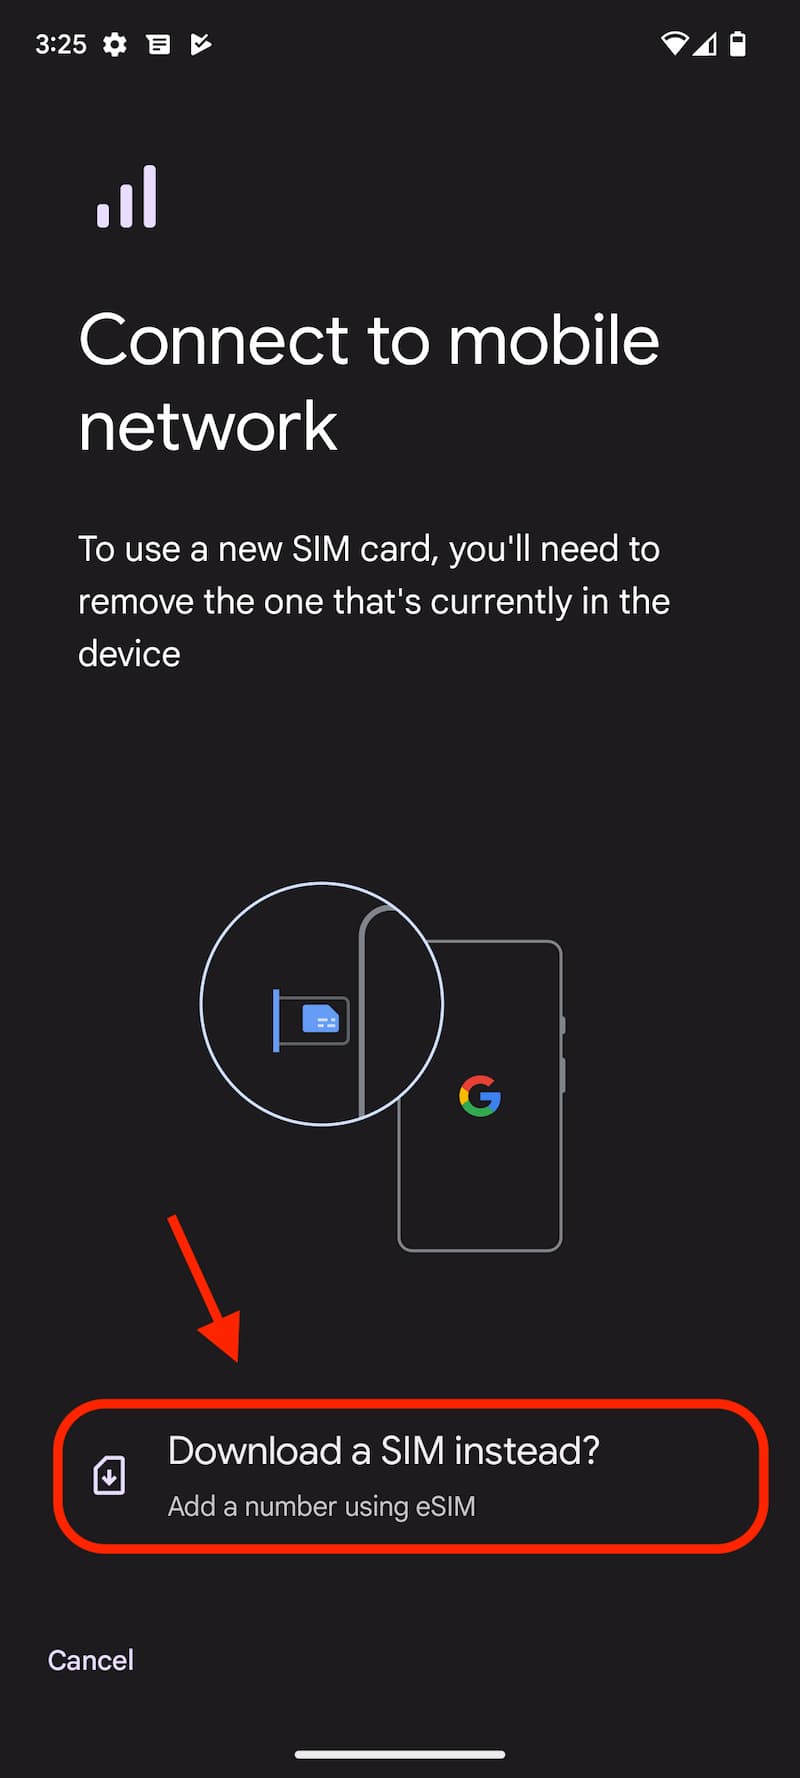
- Tap on Download a SIM Instead.
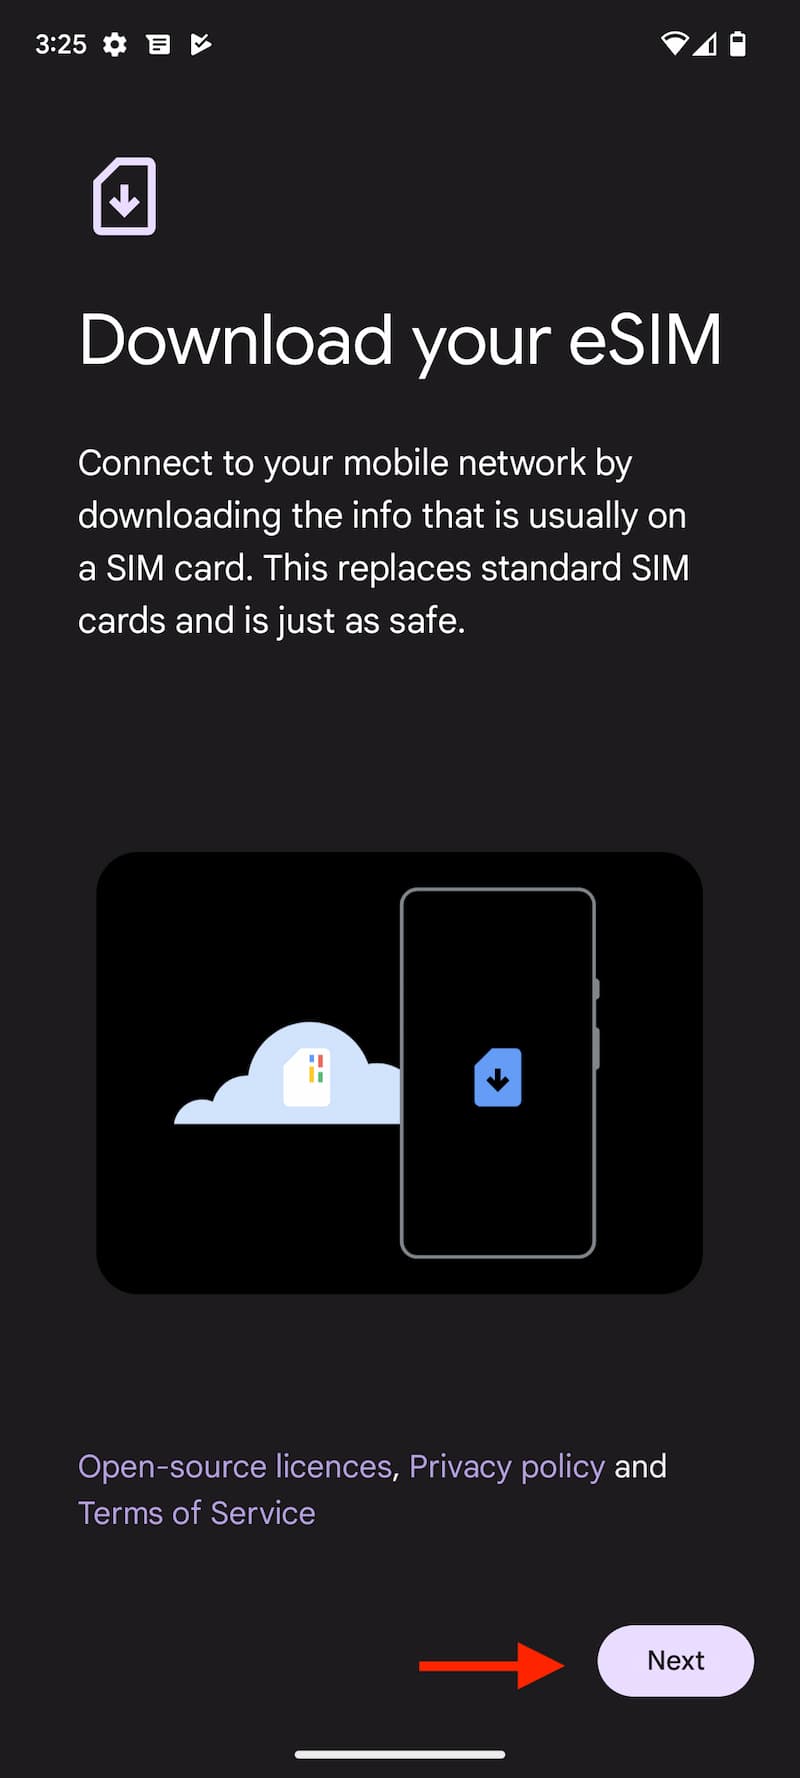
- Select Next.
- Now, you’ll be asked to Scan the QR code. Open the QR code attachment you received in the Email fromJio and Scan the QR code.
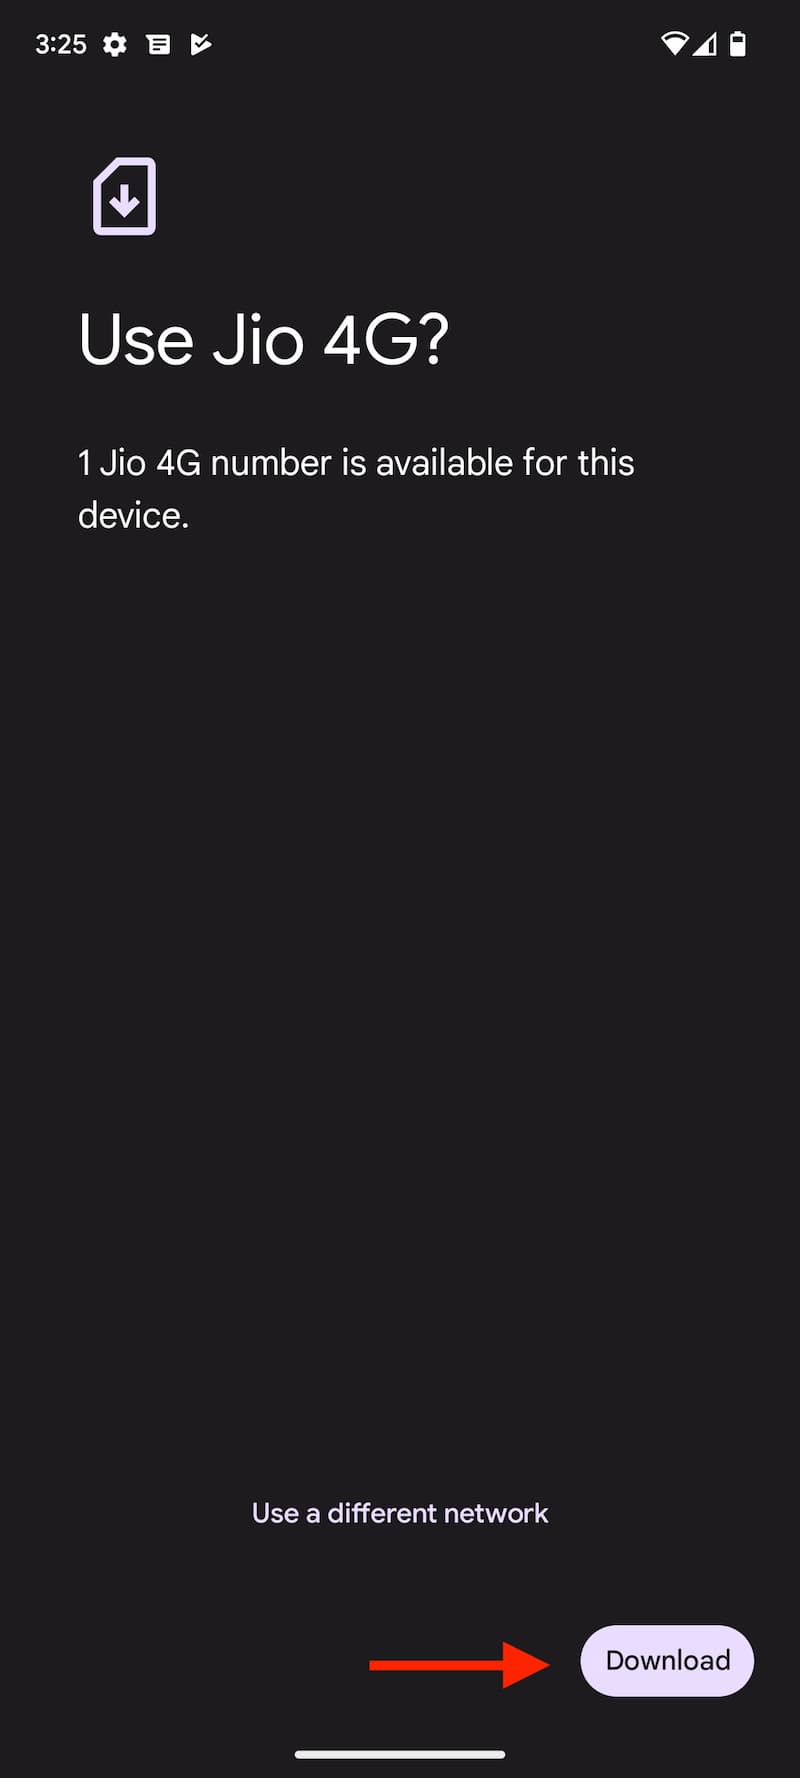
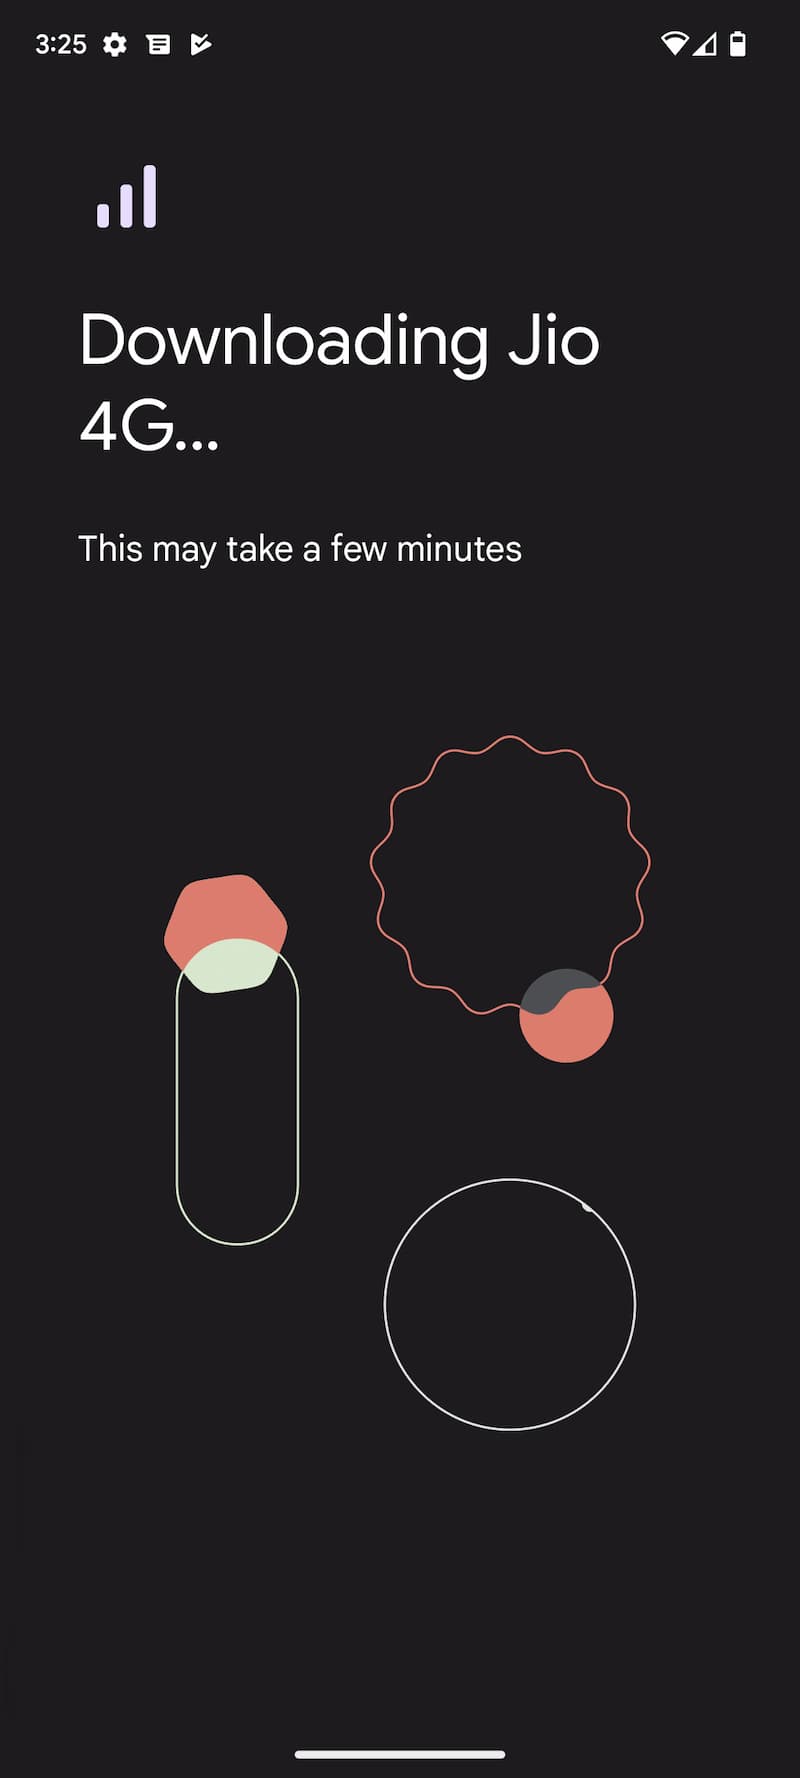
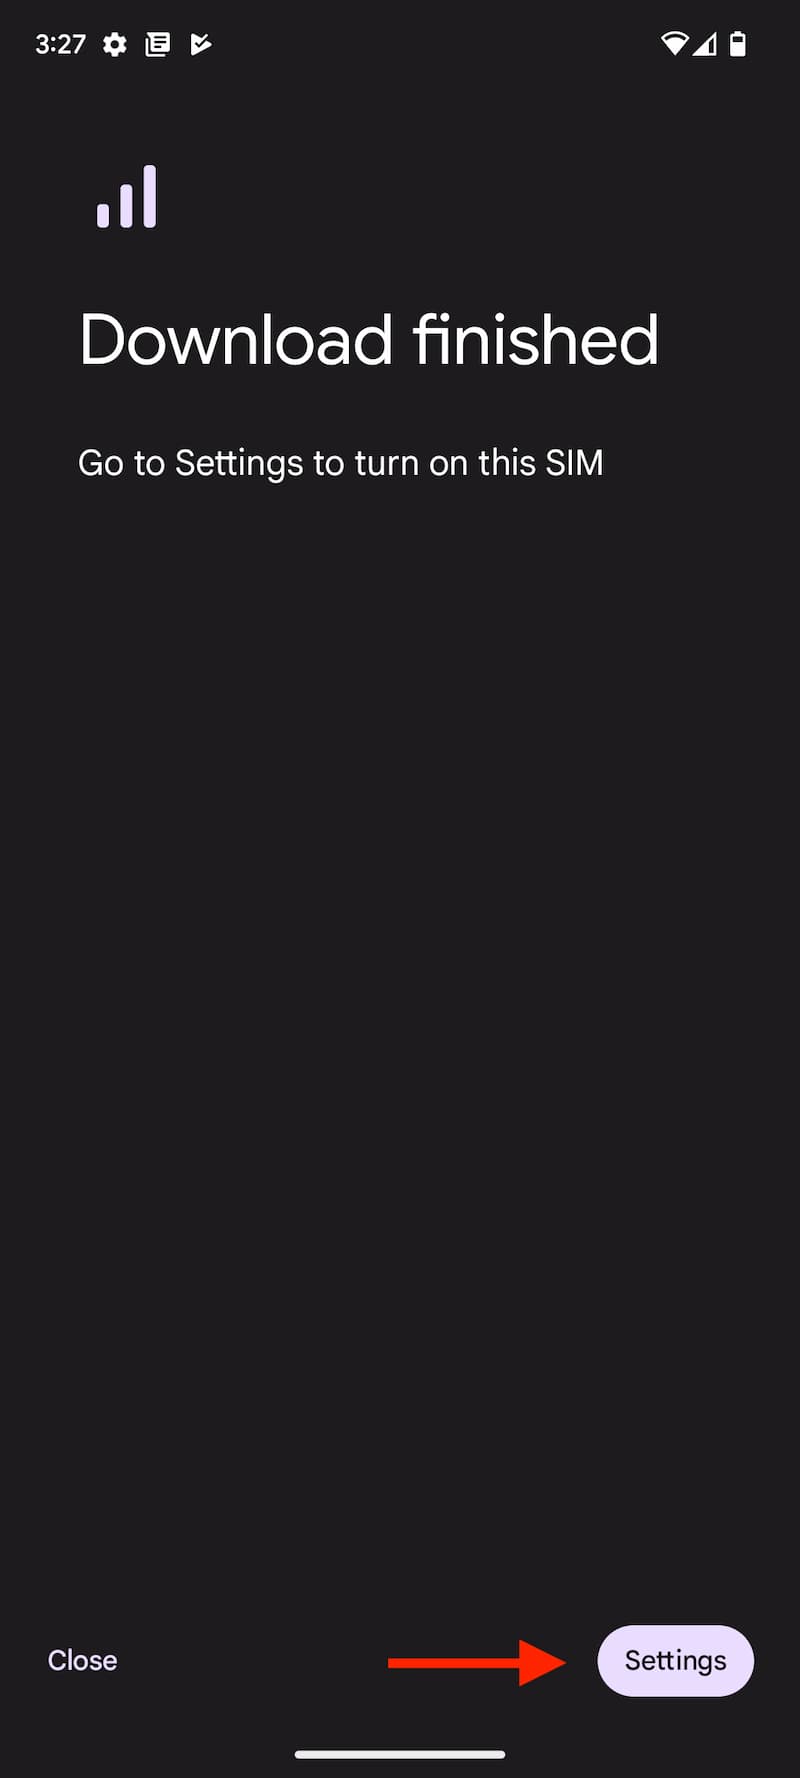
- After scanning the QR Code, Tap on Download. It will take a few seconds to download the Jio profile into your phone. Once the download is finished, you’ll get a confirmation saying Download finished.
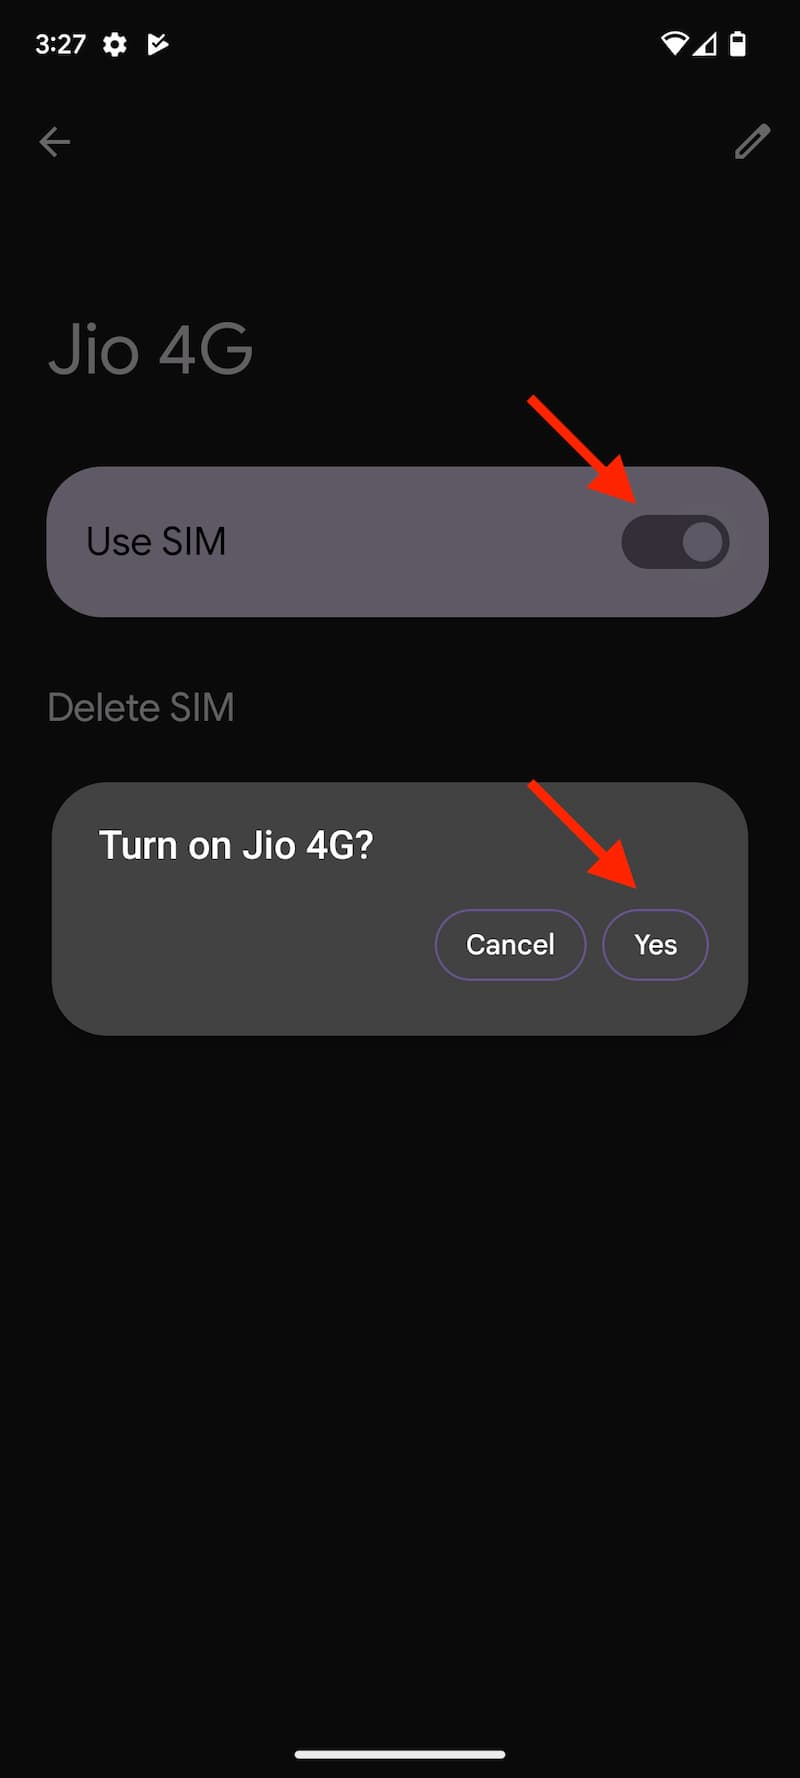
- By default, the SIM is off, and to turn on the eSIM, tap on Settings.
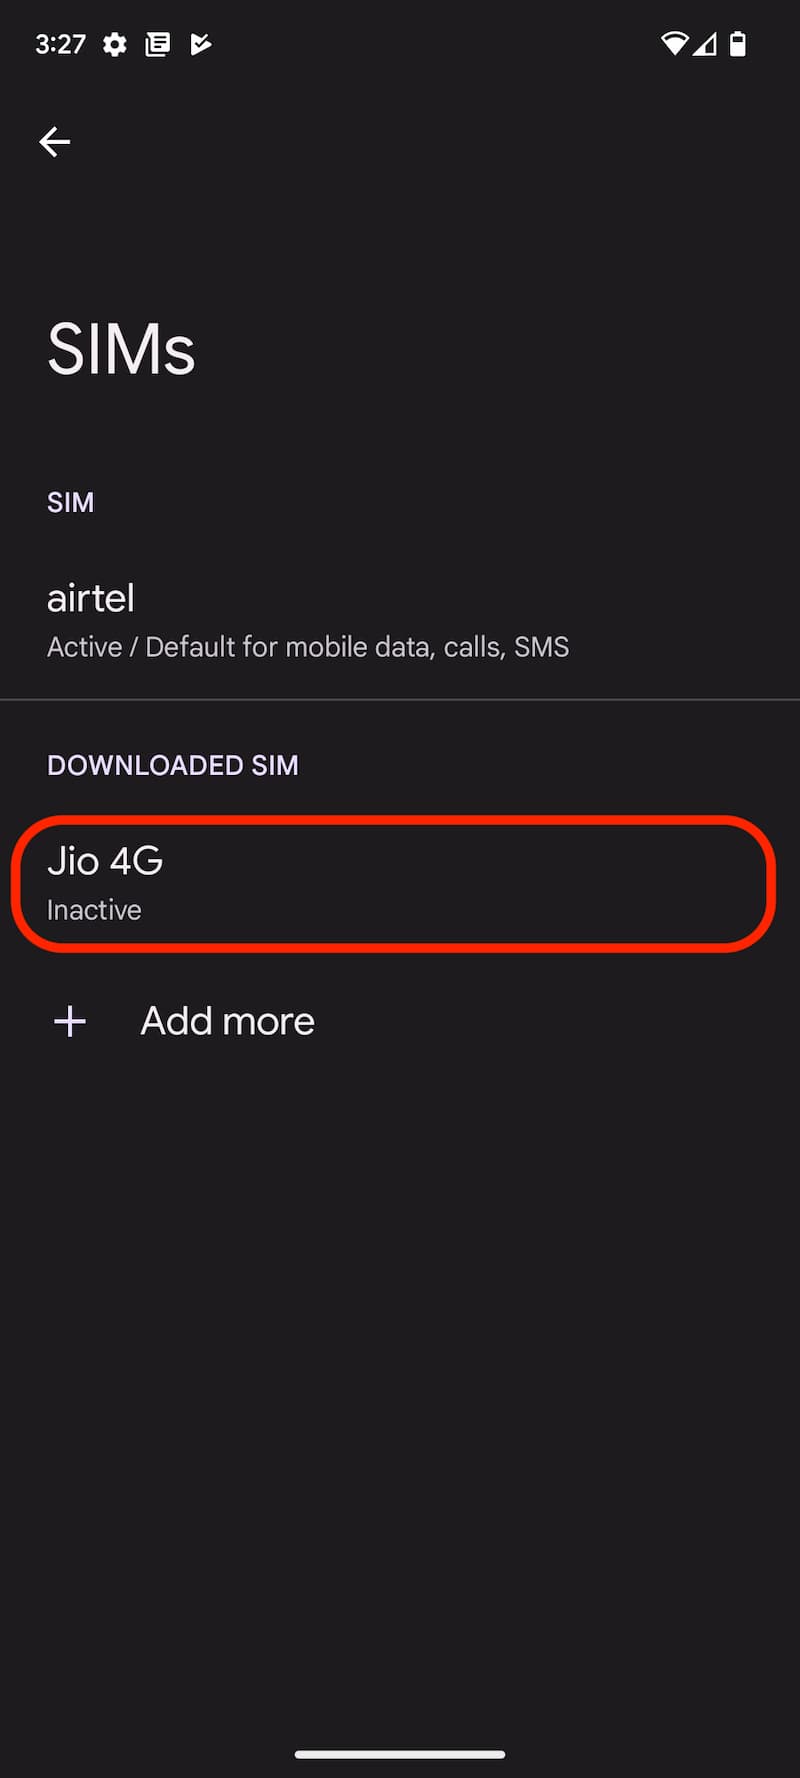
- Tap on Jio 4G.
- Enable the Use SIM option and tap on Yes. Thats it. The Jio eSIM is now ready to use.
- As per regulatory guidelines, SMS services on the Jio number will not be available 24 hours post eSIM upgrade. So you’ll be unable to send any SMS from your Jio number. You’ll receive an SMS from Jio once the SMS service is restored.
Note: Do not click on the “Erase SIM” option, as doing so will permanently delete your eSIM profile on your phone, and you’ll be unable to access any Jio services. If you have accidentally clicked on the Erase option, you must visit the nearest Jio Store with your proof of identity to initiate a new eSIM request. Unfortunately, in this scenario, configuring the new eSIM via the SMS process will not be possible.
The process is not only specific to Jio but also applies to other telecom service providers like Vi, Airtel, and more. While there may be slight variations, the overall process remains fairly similar across these providers. Thanks for reading this quick tutorial to convert your physical Jio SIM to eSIM. Do let us know in the comments if you have any issues. Follow GizArena on Facebook and Twitter for the latest updates.
I want to block my divice through my IMEI number
Excellent 👌👍 perfectly helped me.